注意
WebSocketを趣味で勉強しているものです、間違いなどありましたらご指摘お願いします ![]()
Hexnut とは
google翻訳
🔩Hexnutはミドルウェアベースの、Express / Koa風のWebソケット用フレームワーク
Installing HexNut
インストール
npm i hexnut
Creating a server
サーバー起動
const HexNut = require('hexnut');
const app = new HexNut({ port: 8080 });

app.start();
node server.js
<!DOCTYPE html>
<html lang="ja">
<head>
    <meta charset="UTF-8">
    <meta name="viewport" content="width=device-width, initial-scale=1.0">
    <meta http-equiv="X-UA-Compatible" content="ie=edge">
    <title>Document</title>
</head>
<body>

<script>
{
    const ws = new WebSocket("ws://127.0.0.1:8080");
    ws.addEventListener("open", e => console.log("socket open"));
}
</script>
</body>
</html>
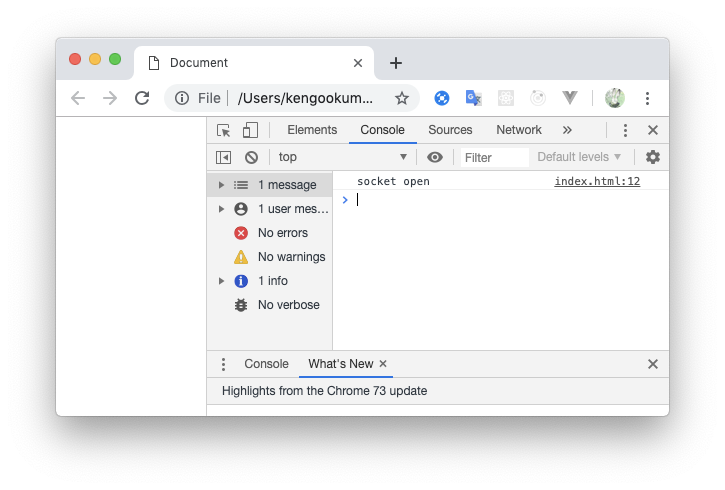
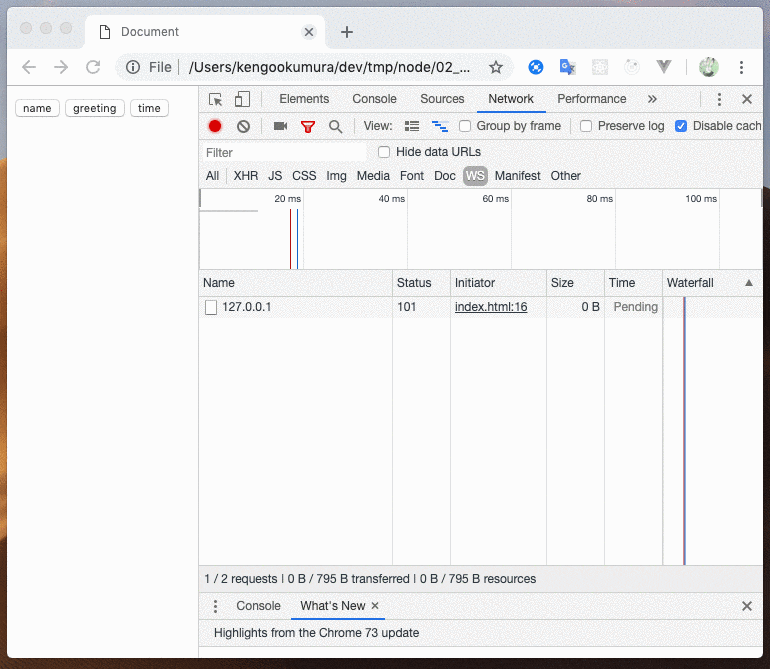
これでWebSocketサーバーが簡単に起動でき、接続も確認できました
Examples
簡単な例
const Hexnut = require('hexnut');
const app = new Hexnut({ port: 8080 });

app.onerror = async (err, ctx) => {
    ctx.send(`Error! ${err.message}`);
};

app.use(ctx => {
    if (ctx.isConnection) {
        // 接続時に送信
        ctx.state = { count: 0 };
        return ctx.send('Hello, and welcome to the socket!');
    }

    ctx.state.count++;
    ctx.send(`Message No. ${ctx.state.count}: ${ctx.message}`); // ctx.messageで受信したメッセージを取得できる
});

app.start();
<!DOCTYPE html>
<html lang="ja">
<head>
    <meta charset="UTF-8">
    <meta name="viewport" content="width=device-width, initial-scale=1.0">
    <meta http-equiv="X-UA-Compatible" content="ie=edge">
    <title>Document</title>
</head>
<body>

<input type="button" value="send">
<script>
{
    const ws = new WebSocket("ws://127.0.0.1:8080");
    ws.addEventListener("message", e => console.log(e.data));
    document.querySelector("[type=button]").addEventListener("click", e => {
        ws.send(new Date().toLocaleTimeString());
    });
}
</script>
</body>
</html>
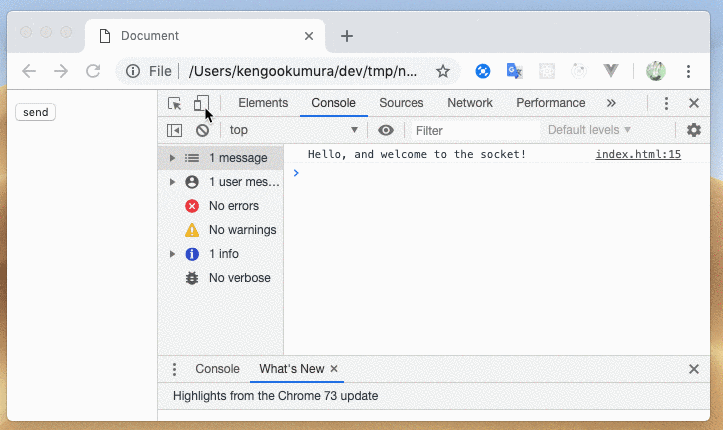
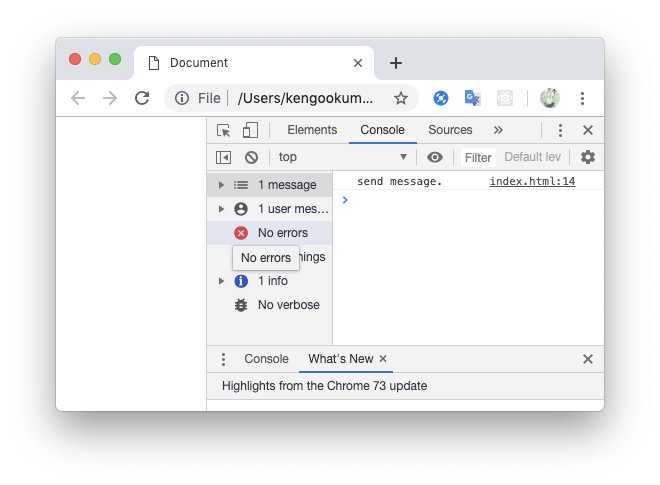
簡単にメッセージの送受信をすることができました
ctx.send(data)だと送信してきたクライアントにしかメッセージを送らないため、
接続しているクライアント全てに送るときはctx.sendToAll(data)とするようです
JSONを自動的に解析する
const Hexnut = require('hexnut');
const bodyParser = require('hexnut-bodyparser');
const app = new Hexnut({ port: 8080 });

app.use(bodyParser.json());

app.use(ctx => {
    if (ctx.isConnection) {
        ctx.state = { count: 0 };
        return ctx.send('Hello, and welcome to the socket!');
    }

    const { type, date, msg } = ctx.message;
    if (type) {
        ctx.state.count++;
        ctx.send(`Message No. ${ctx.state.count}: ${type} ${date} ${msg}`);
    } else {
        ctx.send(`Invalid message format, expecting JSON with a "type" key`);
    }
});

app.start();
npm i hexnut-bodyparser
node server.js
<!DOCTYPE html>
<html lang="ja">
<head>
    <meta charset="UTF-8">
    <meta name="viewport" content="width=device-width, initial-scale=1.0">
    <meta http-equiv="X-UA-Compatible" content="ie=edge">
    <title>Document</title>
</head>
<body>

<input type="button" value="send">
<script>
{
    const ws = new WebSocket("ws://127.0.0.1:8080");
    ws.addEventListener("message", e => console.log(e.data));
    document.querySelector("[type=button]").addEventListener("click", e => {
        ws.send(JSON.stringify({
            type: "send",
            date: new Date().toLocaleTimeString(),
            msg: "\nabc\nあいう\n😀😁😂",
        }));
    });
}
</script>
</body>
</html>
JSONを自動でオブジェクトに解析してくれたのが確認できました
hexnut-bodyparser を使わなくても、 JSON.parse(ctx.message); とすれば同じように扱ってくれます
  const Hexnut = require('hexnut');
  const bodyParser = require('hexnut-bodyparser');
  const app = new Hexnut({ port: 8080 });

- app.use(bodyParser.json());

  app.use(ctx => {
      if (ctx.isConnection) {
          ctx.state = { count: 0 };
          return ctx.send('Hello, and welcome to the socket!');
      }

-     const { type, date, msg } = ctx.message;
+     const { type, date, msg } = JSON.parse(ctx.message);
      if (type) {
          ctx.state.count++;
          ctx.send(`Message No. ${ctx.state.count}: ${type} ${date} ${msg}`);
      } else {
          ctx.send(`Invalid message format, expecting JSON with a "type" key`);
      }
  });

  app.start();
メッセージの種類判別
const Hexnut = require('hexnut');
const handle = require('hexnut-handle');
const app = new Hexnut({ port: 8080 });

// 接続時に呼ばれるイベント
app.use(handle.connect(ctx => {
  ctx.count = 0;
}));

// msg === 'incCount' に一致する値が送られ的場合に実行される
app.use(handle.matchMessage(
  msg => msg === 'incCount',
  ctx => ctx.count++
));

// msg === 'decCount' に一致する値が送られ的場合に実行される
app.use(handle.matchMessage(
  msg => msg === 'decCount',
  ctx => ctx.count--
));

// msg === 'getCount' に一致する値が送られ的場合に実行される
app.use(handle.matchMessage(
  msg => msg === 'getCount',
  ctx => ctx.send(ctx.count)
));

// ↑に一致しなかった値が送られてきた場合にはここが実行される
app.use(handle.message(ctx => {
    ctx.send(`Any other kind of message will go here.`);
}));

app.start();
npm i hexnut-handle
node server.js
<!DOCTYPE html>
<html lang="ja">
<head>
    <meta charset="UTF-8">
    <meta name="viewport" content="width=device-width, initial-scale=1.0">
    <meta http-equiv="X-UA-Compatible" content="ie=edge">
    <title>Document</title>
</head>
<body>

<input type="button" value="incCount">
<input type="button" value="decCount">
<input type="button" value="getCount">
<script>
{
    const ws = new WebSocket("ws://127.0.0.1:8080");
    ws.addEventListener("message", e => console.log(e.data));

    Array.from(document.querySelectorAll("[type=button]")).forEach(elm => {
        elm.addEventListener("click", e => ws.send(e.target.value));
    });
}
</script>
</body>
</html>
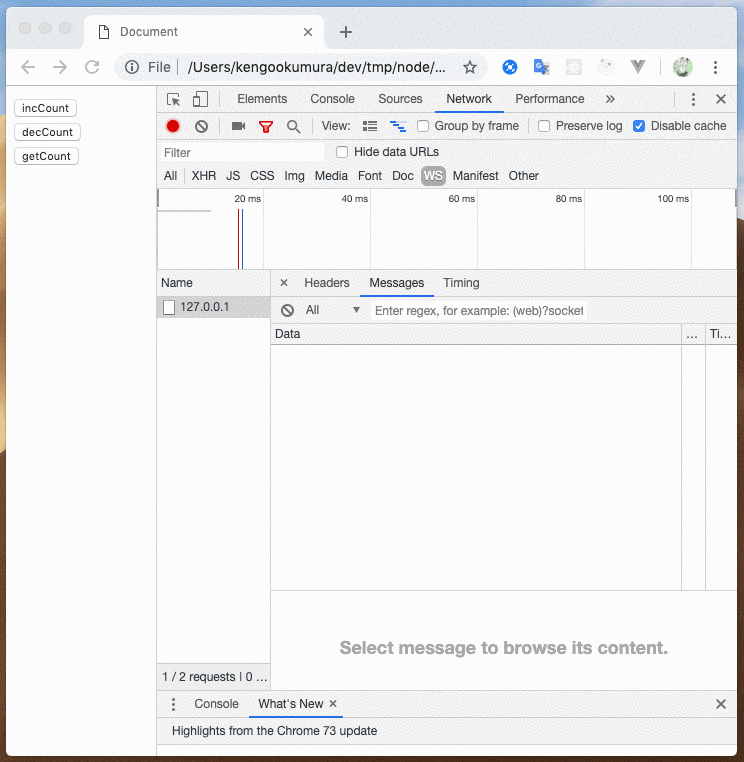
このように、送信するメッセージによって処理を分岐させることができました
Sequencing Interactions
メッセージを受信する順番を保証できる機能のようです
const Hexnut = require('hexnut');
const bodyParser = require('hexnut-bodyparser');
const sequence = require('hexnut-sequence');
const app = new Hexnut({ port: 8080 });

app.use(bodyParser.json());

// ユーザーが接続したときに発生
app.use(sequence.onConnect(function* (ctx) {
  ctx.send(`Welcome, ${ctx.ip}`);
  const name = yield sequence.getMessage(); // 接続時、次のメッセージが来るまで待つ、メッセージを受信したらイテレータを次に進める
  ctx.clientName = name;
  return;
}));

app.use(sequence.interruptible(function* (ctx) {
    // clientNameが存在すればイテレータを次に進める
    yield sequence.assert(() => 'clientName' in ctx);

    // type == greeting を受信すると、イテレータを次に進める
    const greeting = yield sequence.matchMessage(msg => msg.type === 'greeting');

    // type == time を受信すると、イテレータを次に進める
    const time = yield sequence.matchMessage(msg => msg.type === 'time');

    // ↑の条件が全てが受信されると、↓の送信の部分に処理が到達する
    return ctx
        .send(`${greeting.value} ${ctx.clientName}です、 今の時間は${time.value}です`);
}));

app.start();
npm i hexnut-sequence
node server.js
<!DOCTYPE html>
<html lang="ja">
<head>
    <meta charset="UTF-8">
    <meta name="viewport" content="width=device-width, initial-scale=1.0">
    <meta http-equiv="X-UA-Compatible" content="ie=edge">
    <title>Document</title>
</head>
<body>

<input type="button" value="name" data-msg="tarou">
<input type="button" value="greeting" data-msg='{"type":"greeting","value":"おはようございます"}'>
<input type="button" value="time" data-msg='{"type":"time","value":"10:00"}'>
<script>
{
    const ws = new WebSocket("ws://127.0.0.1:8080");
    ws.addEventListener("message", e => console.log(e.data));

    Array.from(document.querySelectorAll("[type=button]")).forEach(elm => {
        elm.addEventListener("click", e => ws.send(e.target.dataset.msg));
    });}
</script>
</body>
</html>
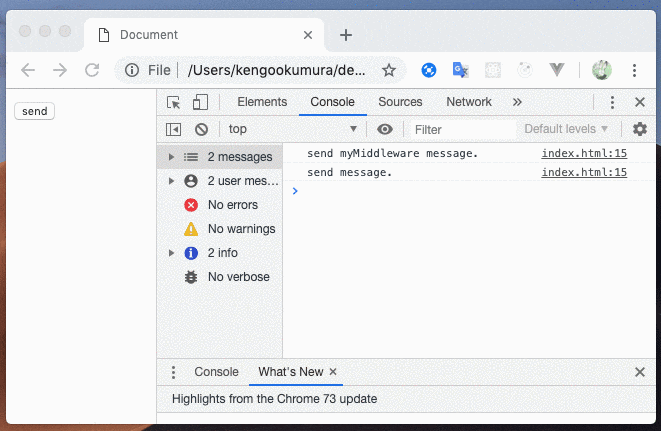
Middlewareを自作
const Hexnut = require('hexnut');
const app = new Hexnut({ port: 8080 });

const myMiddleware = async (ctx, next) => {
    ctx.send("send myMiddleware message.");
    return await next();
}
app.use(myMiddleware);

app.use(ctx => {
    ctx.send("send message.");
});

app.start();
<!DOCTYPE html>
<html lang="ja">
<head>
    <meta charset="UTF-8">
    <meta name="viewport" content="width=device-width, initial-scale=1.0">
    <meta http-equiv="X-UA-Compatible" content="ie=edge">
    <title>Document</title>
</head>
<body>

<input type="button" value="send">
<script>
{
    const ws = new WebSocket("ws://127.0.0.1:8080");
    ws.addEventListener("message", e => console.log(e.data));
    document.querySelector("[type=button]").addEventListener("click", e => {
        ws.send(new Date().toLocaleTimeString());
    });
}
</script>
</body>
</html>
ミドルウェアで、クライアントに送信前の処理がうまくいきました
HexNut Docs - API
引用部分は全て↑のページのgoogle翻訳です![]()
HexNut Server
new HexNut(wsConfig)
新しいHexNutインスタンスを作成します
const Hexnut = require('hexnut');
const app = new Hexnut({ port: 8080 });
app.use(middleware)
HexNutインスタンスにミドルウェア機能を追加します
app.start()
HexNut Websocketサーバーを起動します。
const Hexnut = require('hexnut');
const app = new Hexnut({ port: 8080 });
app.start(); // サーバー起動
app.stop()
HexNut Websocketサーバーを停止します。
const Hexnut = require('hexnut');
const app = new Hexnut({ port: 8080 });
app.start();
app.stop(); // サーバー起動して即終了する
ctx
HexNut接続を表すコンテキストオブジェクト
ctx.message
受信したメッセージ
app.use(ctx => {
    if (ctx.isConnection) {
        // 接続時はnullになる
        console.log(ctx.message);
    } else {
        // 受信したメッセージ
        console.log(ctx.message);
    }
});
ctx.isConnection
app.use(ctx => {
    // 新しく接続されたのであればtrue、そうでなければfalse
    console.log(ctx.isConnection);
});
ctx.isMessage
app.use(ctx => {
    console.log(ctx.isMessage);
});
<script>
const ws = new WebSocket("ws://127.0.0.1:8080"); // 接続時は、ctx.isMessageはfalse

ws.send("hoge"); // メッセージ送信した時は、ctx.isMessageはtrue
</script>
ctx.isClosing
接続終了したらtrueになる
app.use(ctx => {
    console.log(ctx.isClosing);
});
<script>
const ws = new WebSocket("ws://127.0.0.1:8080"); // 接続時は、ctx.isClosingはfalse

ws.close(); // 接続終了した時は、ctx.isClosingはtrue
</script>
ctx.requestHeaders
この接続を開始したhttp(s)ヘッダを表すオブジェクト
app.use(ctx => {
    console.log(ctx.requestHeaders);
});
{ host: '127.0.0.1:8080',
  connection: 'Upgrade',
  pragma: 'no-cache',
  'cache-control': 'no-cache',
  upgrade: 'websocket',
  origin: 'file://',
  'sec-websocket-version': '13',
  'user-agent':
   'Mozilla/5.0 (Macintosh; Intel Mac OS X 10_14_3) AppleWebKit/537.36 (KHTML, like Gecko) Chrome/73.0.3683.103 Safari/537.36',
  'accept-encoding': 'gzip, deflate, br',
  'accept-language': 'ja-JP,ja;q=0.9,en-US;q=0.8,en;q=0.7',
  'sec-websocket-key': '+oE1f1UWmZ3dJ0k8Et23XQ==',
  'sec-websocket-extensions': 'permessage-deflate; client_max_window_bits' }
ctx.ip
クライアントのIPアドレス
app.use(ctx => {
    console.log(ctx.ip); // ::ffff:127.0.0.1
});
ctx.path
接続を開始した文字列URLパス
app.use(ctx => {
    console.log(ctx.path);
});
<script>
    const ws = new WebSocket("ws://127.0.0.1:8080/path"); // ctx.pathは 「/path」となる
</script>
ctx.method
接続を開始するためのHTTPメソッド
app.use(ctx => {
    console.log(ctx.method);
});
<script>
    const ws = new WebSocket("ws://127.0.0.1:8080"); // ctx.methodは 「GET」となる
</script>
ctx.send(data)
クライアントにメッセージを送る
app.use(ctx => {
    ctx.send("send message.");
});
<script>
    const ws = new WebSocket("ws://127.0.0.1:8080");
    ws.addEventListener("message", e => console.log(e.data));
</script>
ctx.sendToAll(data)
接続されているすべてのクライアントにメッセージを送信する
app.use(ctx => {
    ctx.sendToAll(new Date().toLocaleTimeString());
});
接続しているクライアントにメッセージを送ることができました
ctx.app
HexNutアプリへの参照
const Hexnut = require('hexnut');
const app = new Hexnut({ port: 8080 });

app.use(ctx => {
    console.log(app === ctx.app); // true
});
app.start();
確認バージョン
- node v10.14.1
- npm 6.9.0
- hexnut 0.1.1
- hexnut-bodyparser 0.1.0
- hexnut-handle 1.0.0
- hexnut-sequence 0.1.0
最後まで読んでいただいてありがとうございましたm(_ _)m