TL;DR
git clone https://github.com/kazuyaseki/react-figma-plugin-boilerplate.git <your project name>
yarn or npm install
yarn webpack:watch  or  npm run webpack:watch
Figmaのプラグイン、テンションが上がるものなのですが、プラグイン自体がUIを必要とする & ある程度 Stateful なものな場合、命令的に作るのは耐えられない!という気持ちになりました。
なのでReactで開発できる boilerplate を作ってみたので、使い方をご紹介していこうと思います。
boilerplate の中身はこちらです。cloneしていい感じに使ってみてください。
https://github.com/kazuyaseki/react-figma-plugin-boilerplate
どうやって実現するか
特に難しいことは何もないんですが、Figmaのプラグインでは、プラグインが起動されたときのUIは manifest.json の ui のところに指定した ui.html を読み込むので、そこにエントリーポイントを用意してあげて ReactDOM.render するだけです。普通のReactアプリケーションですね。
<div id="app"></div>
import * as React from 'react';
import * as ReactDom from 'react-dom';

// App の中で普通にReact開発していく
import { App } from './App';

ReactDom.render(<App />, document.getElementById('app'));
開発中のプラグインをFigmaから使えるようにする
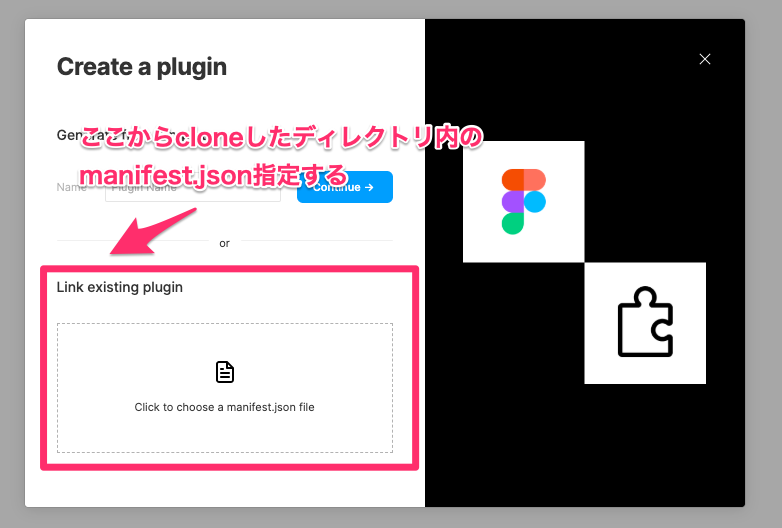
manifest.json へパスを通す必要があります。
Plugins > Development > New Plugin... をクリックすると次のようなWindowが出現するので、そこから指定してあげてください。
サンプル
以上であとは boilerplate 試してみてくれ、というくらい語ることがないのですが、サンプルとして次のツイートのようなものを作ったのでコードを貼っておきます。
めっちゃ雑だけどReactでプロジェクト内のコンポーネントをインクリメンタルサーチしてコンポーネント作るfigma plugin作れた。keyboard shortcut機能が追加されたら普通に便利になれそう pic.twitter.com/Zx52Mz5tQX
— seya (@sekikazu01) April 4, 2020
プラグイン作る上での注意点は、figma のデータを参照できるスレッドとプラグインのUI部分のスレッドは別物だというところです。詳しくはFigmaのドキュメントHow Plugins Runを参照ください。
なので message オブジェクトを使ってなんとかするのですが、下記サンプルにて main thread -> ui thread と ui thread -> main thread の両方向の例があるので参考にしてみてください。
import { subscribeOnMessages } from 'react-figma';

figma.showUI(__html__);

const componentNodes = figma.root.findAll((node) => node.type === 'COMPONENT');
// uiスレッドにそのままNode渡すとなぜかプロパティが undefined になるので成形してから渡す
const conmponentsData = componentNodes.map((node) => ({
  id: node.id,
  name: node.name,
}));
figma.ui.postMessage(conmponentsData);

figma.ui.onmessage = (message) => {
  subscribeOnMessages(message);

  if (message.type === 'create-instance') {
    const component = figma.root.findOne(
      (node) => node.id === message.id
    ) as ComponentNode;
    component.createInstance();
  }
};
import * as React from 'react';

type ComponentItemType = {
  id: string;
  name: string;
};

export const App = () => {
  const [query, setQuery] = React.useState('');
  const [components, setComponents] = React.useState<ComponentItemType[]>([]);

  React.useEffect(() => {
    onmessage = (event) => {
      setComponents(event.data.pluginMessage as ComponentItemType[]);
    };
  }, []);

  const create = (id: string) => {
    parent.postMessage({ pluginMessage: { type: 'create-instance', id } }, '*');
  };

  return (
    <div>
      <input value={query} onChange={(e) => setQuery(e.target.value)} />
      <div style={{ display: 'flex', flexDirection: 'column' }}>
        {components
          .filter((component) => {
            if (query.length === 0) {
              return true;
            }
            return component.name.includes(query);
          })
          .map((component) => (
            <button onClick={() => create(component.id)}>
              {component.name}
            </button>
          ))}
      </div>
    </div>
  );
};