ちょっと目をはなしてる隙に、こんなドキュメントが出来てた!
ASP.NET Core Blazor WebAssembly をセキュリティで保護する
Blazor WebAssembly でもログイン機能が公式でいけるんですね。
やってみよう
ということでやってみようと思います。とりあえず、Twitter やら独自ログインやらなんでもござれの Azure AD B2C でやってみようかな。ドキュメントに手順もあるし。
- Azure Active Directory B2C を使用して ASP.NET Core Blazor のスタンドアロンアプリをセキュリティで保護する
- Azure Active Directory B2C を使用して、ASP.NET Core Blazor Webashosted アプリをセキュリティで保護する
このドキュメントを見ていて気付いたのですが、プロジェクトをつくるためのコマンドはあってるのですが、その後のコードの解説が Azure AD B2C ではなく Azure AD での解説になってるので、注意が必要です。実際に動くコードが欲しい人は、アプリを作成するの手順にある以下のコマンドをうちましょう。
dotnet new blazorwasm -au IndividualB2C --aad-b2c-instance "{AAD B2C INSTANCE}" --api-client-id "{SERVER API APP CLIENT ID}" --app-id-uri "{APP ID URI}" --client-id "{CLIENT APP CLIENT ID}" --default-scope "{DEFAULT SCOPE}" --domain "{DOMAIN}" -ho -ssp "{SIGN UP OR SIGN IN POLICY}" --tenant-id "{TENANT ID}"
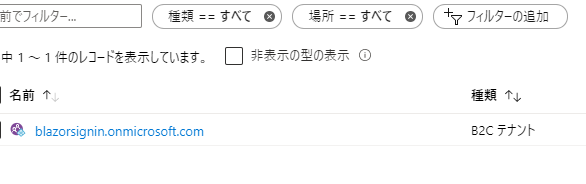
では、とりあえず Azure に適当なリソースグループ作って、その中に Azure AD B2C のテナントを作ります。
今回は ASP.NET Core にホストされたほうで試してみたいので上記リンクの中の下の方のドキュメントに従ってやっていこうと思います。
サーバー側アプリの登録
ということで、Azure AD B2C にアプリを登録しましょう。最終的に今回は Blazor をホストしている ASP.NET Core 側をアプリとして登録するのと、Blazor WebAssembly もアプリとして登録するので、2 つ登録します。
Azure AD B2C の管理画面で「アプリの登録」から Webアプリ/WebAPI の形式のアプリを登録します。

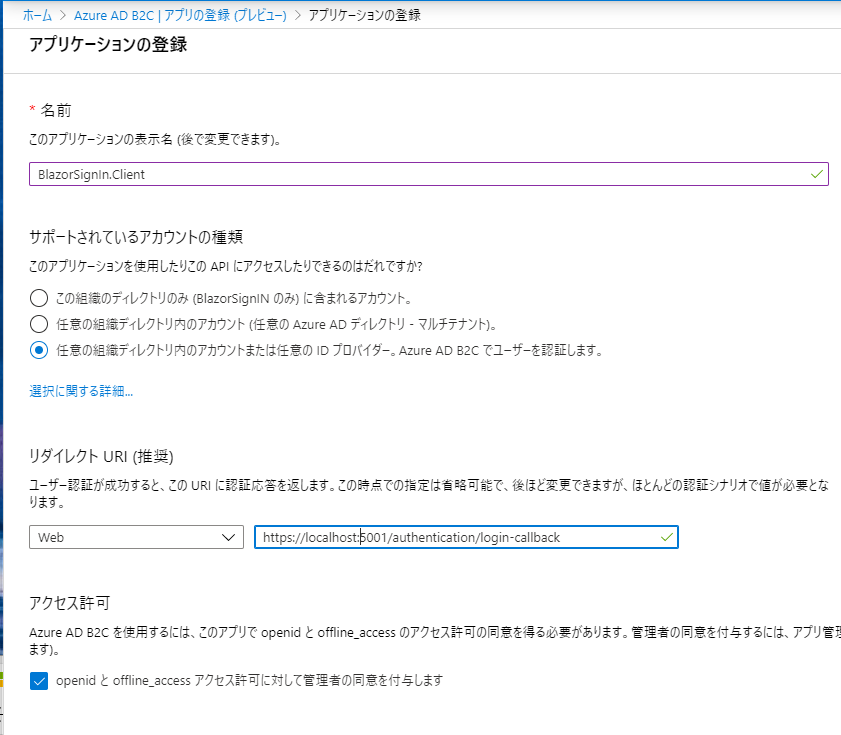
名前を入れて、任意の組織からのサインインを許可して、リダイレクトURLはWebを指定してURLは空にします。「openid と offline_access アクセス許可に対して管理者の同意を付与します」にチェックを入れて登録して官僚。
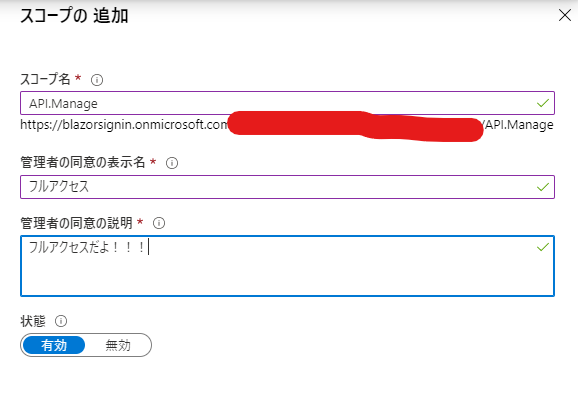
登録したアプリの管理画面で「API の公開」を選んで「Scope を追加」しましょう。アプリケーションIDの登録が初回は出るはずなので、登録をして適当なスコープ名を入れます。
必要な情報のメモ
ログイン処理を書くために必要な情報をゲットします。
アプリ管理画面の概要から大体取得できます。
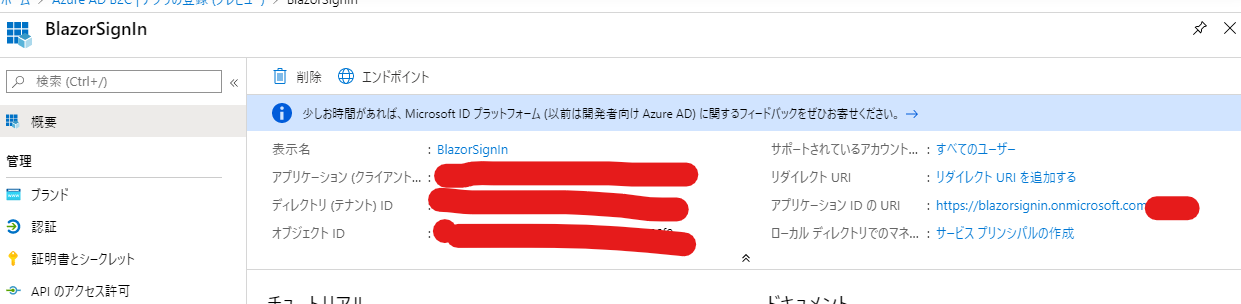
- アプリケーション ID
- テナント ID
- アプリケーション ID の URL
- 先ほど作った Scope の名前 (今回は API.Manage)
サービスプリンシパルの作成
一通りメモったら先ほどの画面から「サービスプリンシパルの作成」を押して作成しておきます。
クライアントアプリの登録
同じ要領で登録していきます。クライアント側はリダイレクト URL を入れます。今回はテスト用にローカルホストで動かすので、その URL (アプリ新規作成して、ローカルサーバーの https のポート番号を確認しましょう。) に対して /authentication/login-callback というものをつけた形で登録します。
この authentication の部分は決め打ちではなく、後でクライアント側のアプリに Authentication.razor というものを作って @page "/authentication" と指定するものになります。/authentication の後の文字列は Microsoft.AspNetCore.Components.WebAssembly.Authentication.RemoteAuthenticatorView というコントロールで使うやつなので決め打ちです。
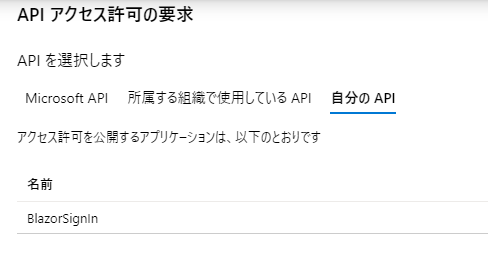
クライアント側のアプリの管理画面で「API のアクセス許可」から「アクセス許可の追加」を選んで「自分の API」から、先ほど作ったサーバー側のアプリのスコープを選びます。
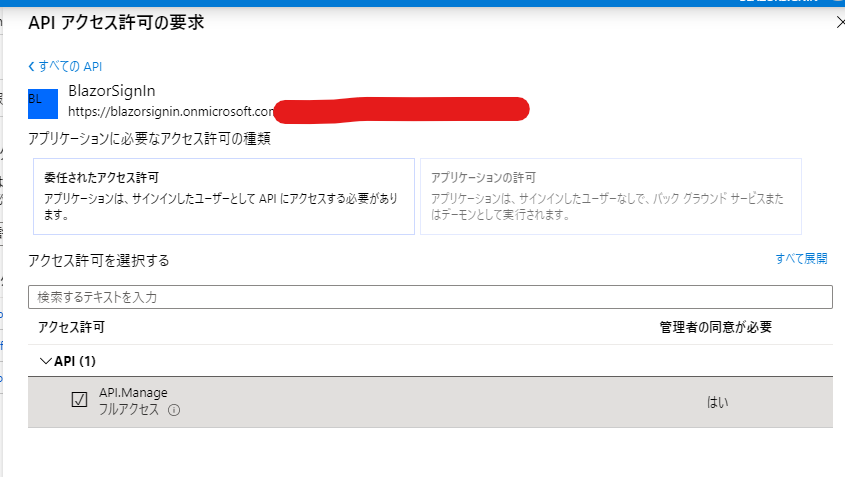
アクセス許可を与えるボタンを押して完了
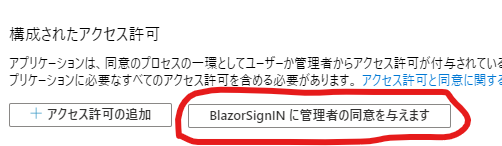
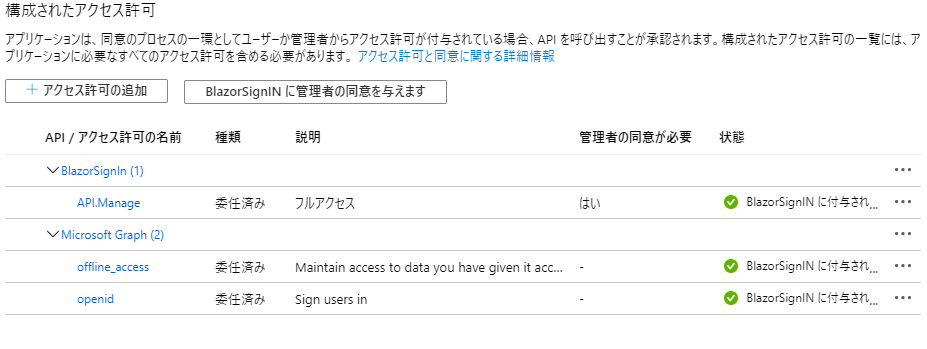
全ての API アクセス許可の状態が緑のチェックマークになれば成功です。
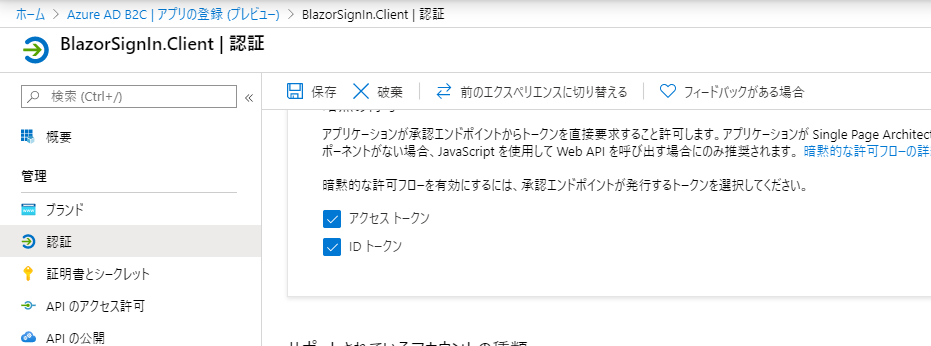
最後にクライアントアプリの「認証」のページで暗黙の付与で「アクセストークン」と「ID トークン」にチェックを入れておきます。
必要な情報のメモ
クライアントアプリ側で以下の情報を取得しておきます。
- アプリケーション ID
ユーザー フローの作成
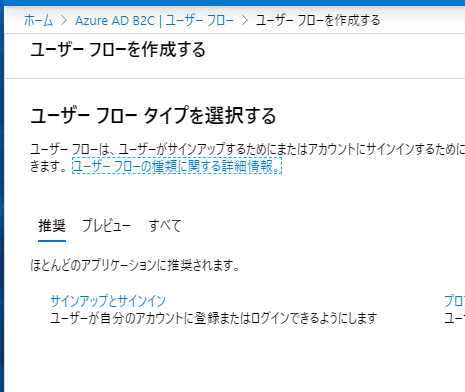
最後にユーザーフローを作ります。これが出来たら Azure AD B2C 画面での操作は終わります。
Azure AD B2C の管理画面からユーザーフローの作成をします。で「サインアップとサインイン」を選んで「ユーザーフローを作成する」を選んで「サインアップとサインイン」を選びます。
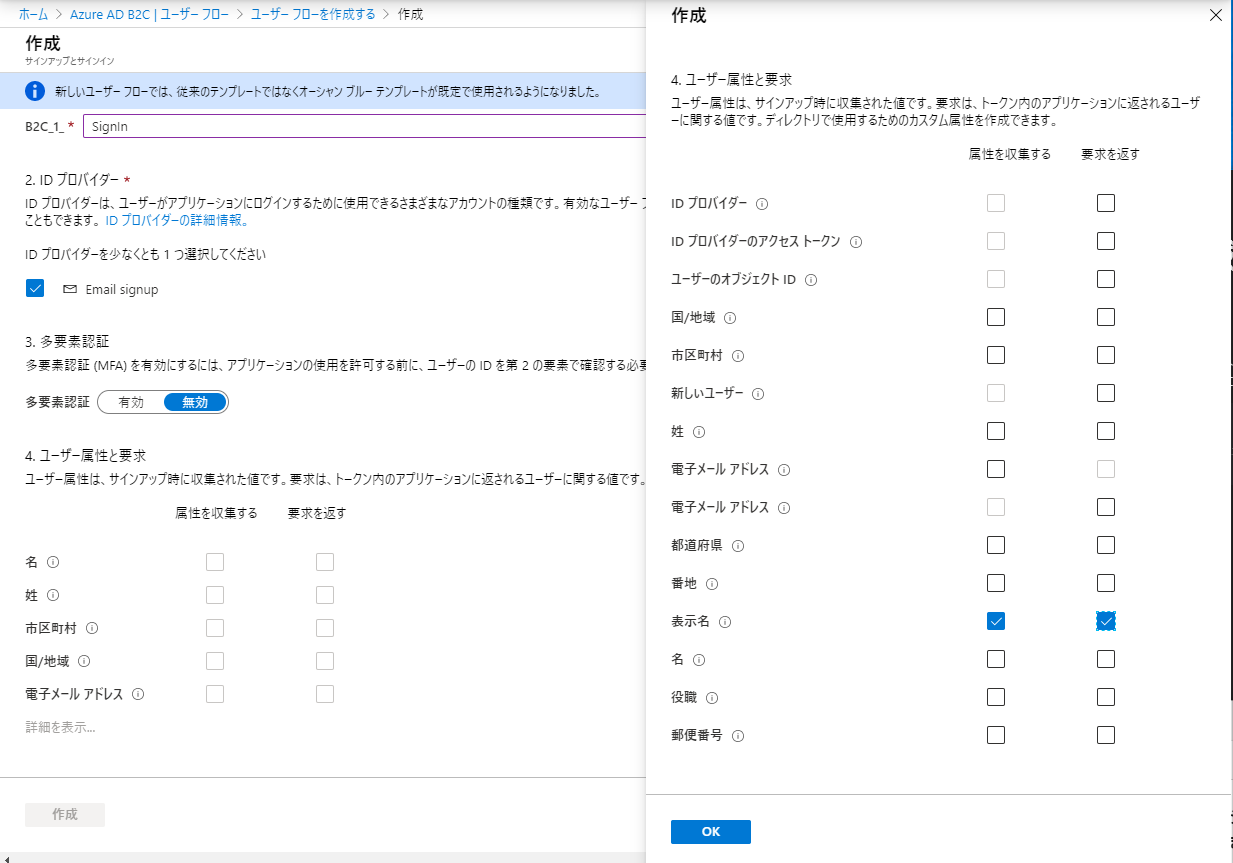
そして、ID プロバイダー(今回は Twitter とかとの連携設定をしてないので、デフォルトの Email signup)とユーザー属性と要求で表示名を選んでおきます。
そして、作成しましょう。
このユーザーフローの名前をメモっておきます。(今回は B2C_1_SignIn)
アプリにログイン機能を追加しよう
Blazor WebAssembly App を作ります。ASP.NET Core hostedにして、認証はなしを選びます。認証有りにしてもいいのですが、自分で1つずつ追加していきたいので、今回は無しからやっていきましょう。
サーバーアプリの編集
appsettings.Development.json あたりに Azure AD B2C からゲットしてきた情報を追加します。
余談ですが、サーバー側アプリに関しては以下のような情報は、ユーザーシークレットなどに格納するオプションもあります。そうするとプログラム内に秘密の情報を埋め込まなくてもすみます。本番は Azure App Service のアプリケーション設定か Azure Key Vault あたりに設定もできます。
{
  "Logging": {
    "LogLevel": {
      "Default": "Information",
      "Microsoft": "Warning",
      "Microsoft.Hosting.Lifetime": "Information"
    }
  },
  "AzureAD": {
    "Instance": "https://blazorsignin.b2clogin.com/",
    "ClientId": "サーバー側のアプリID",
    "Domain": "blazorsignin.onmicrosoft.com",
    "SignUpSignInPolicyId": "B2C_1_SignIn"
  }
}
サーバー側アプリに NuGet から Microsoft.AspNetCore.Authentication.AzureADB2C.UI を追加しましょう。そしてサーバー側の Startup.cs の ConfigureServices に認証系のサービスを追加する処理を追加します。ここで、先ほど appsettings.Development.json の AzureAD に設定した値を options に設定しています。
public void ConfigureServices(IServiceCollection services)
{
    services.AddAuthentication(AzureADB2CDefaults.BearerAuthenticationScheme)
        .AddAzureADB2CBearer(options => Configuration.Bind("AzureAD", options));
    services.AddControllersWithViews();
}
そして、Configure メソッドにも認証認可の追加の処理を書きます。
public void Configure(IApplicationBuilder app, IWebHostEnvironment env)
{
    if (env.IsDevelopment())
    {
        app.UseDeveloperExceptionPage();
        app.UseWebAssemblyDebugging();
    }
    else
    {
        app.UseExceptionHandler("/Error");
        // The default HSTS value is 30 days. You may want to change this for production scenarios, see https://aka.ms/aspnetcore-hsts.
        app.UseHsts();
    }

    app.UseHttpsRedirection();
    app.UseBlazorFrameworkFiles();
    app.UseStaticFiles();

    app.UseRouting();

    // 認証認可
    app.UseAuthentication();
    app.UseAuthorization();

    app.UseEndpoints(endpoints =>
    {
        endpoints.MapControllers();
        endpoints.MapFallbackToFile("index.html");
    });
}
API の保護
デフォルトのプロジェクトテンプレートに含まれている API の WeatherForecastController に `[Authorize]' 属性をつけて認証されていない要求ははじくようにしましょう。
namespace BlazorSignIn.Server.Controllers
{
    [Authorize]
    [ApiController]
    [Route("[controller]")]
    public class WeatherForecastController : ControllerBase
    {
        private static readonly string[] Summaries = new[]
        {
クライアントアプリに認証を追加
以下の MSAL 用の NuGet パッケージをクライアント側のプロジェクトに追加します。
- Microsoft.Authentication.WebAssembly.Msal
そして、Program.cs の Main メソッドに MSAL の設定を追加します。
public static async Task Main(string[] args)
{
    var builder = WebAssemblyHostBuilder.CreateDefault(args);
    builder.RootComponents.Add<App>("app");

    builder.Services.AddBaseAddressHttpClient();
    builder.Services.AddMsalAuthentication(options =>
    {
        var a = options.ProviderOptions.Authentication;
        a.Authority = "https://blazorsignin.b2clogin.com/blazorsignin.onmicrosoft.com/B2C_1_SignIn";
        a.ClientId = "xxxxxx-xxxx-xxxx-xxxx-xxxxxxxxxxx";
        a.ValidateAuthority = false;
        options.ProviderOptions.DefaultAccessTokenScopes.Add(
            "https://blazorsignin.onmicrosoft.com/xxxxxx-xxxx-xxxx-xxxx-xxxxxxxxxxxxxx/API.Manage");
    });

    await builder.Build().RunAsync();
}
クライアントアプリの wwwroot にある index.html に MSAL の JavaScript を読み込ませておきます。
<!DOCTYPE html>
<html>

<head>
    <meta charset="utf-8" />
    <meta name="viewport" content="width=device-width" />
    <title>BlazorSignIn</title>
    <base href="/" />
    <link href="css/bootstrap/bootstrap.min.css" rel="stylesheet" />
    <link href="css/site.css" rel="stylesheet" />
    <!-- 追加!! -->
    <script src="_content/Microsoft.Authentication.WebAssembly.Msal/AuthenticationService.js"></script>
</head>

<body>
    <app>Loading...</app>

    <div id="blazor-error-ui">
        An unhandled error has occurred.
        <a href="" class="reload">Reload</a>
        <a class="dismiss">🗙</a>
    </div>
    <script src="_framework/blazor.webassembly.js"></script>
</body>

</html>
App.razor に認証系のコンポーネントを組み込みます。まずは _Imports.razor に認証系コンポーネントの名前空間を using するように一行追加します。
@using System.Net.Http
@using Microsoft.AspNetCore.Components.Forms
@using Microsoft.AspNetCore.Components.Routing
@using Microsoft.AspNetCore.Components.Web
@using Microsoft.JSInterop
@using BlazorSignIn.Client
@using BlazorSignIn.Client.Shared
// これを追加
@using Microsoft.AspNetCore.Components.Authorization
そして、App.razor に追加するコンポーネントを Shared に追加します。
RedirectToLogin.razor
@inject NavigationManager Navigation
@using Microsoft.AspNetCore.Components.WebAssembly.Authentication
@code {
    protected override void OnInitialized()
    {
        Navigation.NavigateTo($"authentication/login?returnUrl={Navigation.Uri}");
    }
}
認証ページもさくっと追加しましょう。Pages に Authentication.razor を追加します。
@page "/authentication/{action}"
@using Microsoft.AspNetCore.Components.WebAssembly.Authentication
<RemoteAuthenticatorView Action="@Action" />

@code{
    [Parameter] public string Action { get; set; }
}
App.razor を以下のように編集して認証が求められているページに認証されていないユーザーが来たときにログインを促すようにします。
<CascadingAuthenticationState>
    <Router AppAssembly="@typeof(Program).Assembly">
        <Found Context="routeData">
            <AuthorizeRouteView RouteData="@routeData"
                DefaultLayout="@typeof(MainLayout)">
                <NotAuthorized>
                    <RedirectToLogin />
                </NotAuthorized>
            </AuthorizeRouteView>
        </Found>
        <NotFound>
            <LayoutView Layout="@typeof(MainLayout)">
                <p>Sorry, there's nothing at this address.</p>
            </LayoutView>
        </NotFound>
    </Router>
</CascadingAuthenticationState>
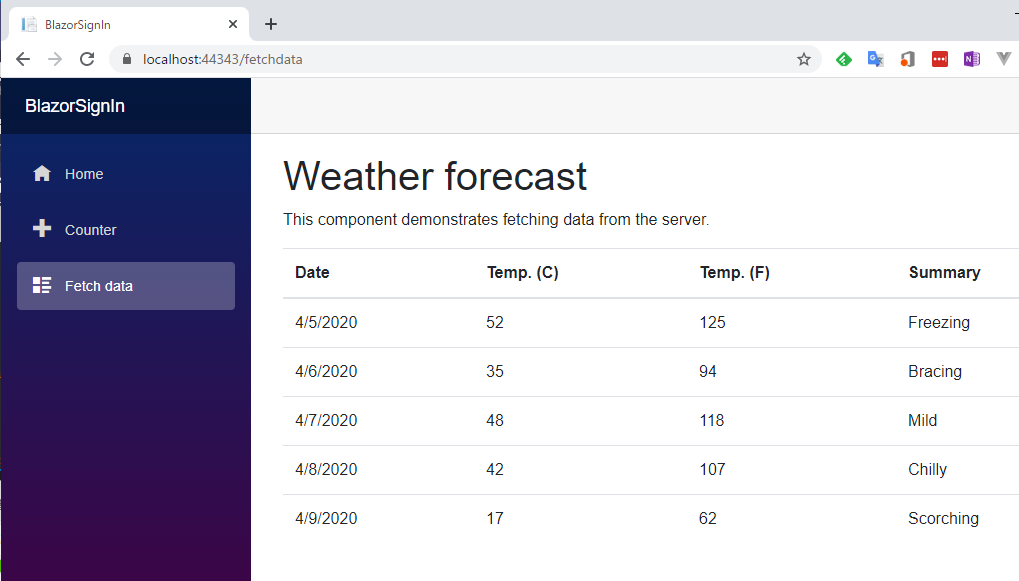
そして、FetchData.razor にアクセスするとログインを求めるように設定したいと思います。といっても [Authorize] 属性を付けるだけです。こうすると自動でログインが行われるようになり、IAccessTokenProvider からアクセストークンが取れるようになるので、そのアクセストークンを使ってサーバーの API を呼び出します。
@page "/fetchdata"
@using BlazorSignIn.Shared
@using Microsoft.AspNetCore.Authorization
@using Microsoft.AspNetCore.Components.WebAssembly.Authentication

@inject HttpClient Http
@inject IAccessTokenProvider AuthenticationService
@inject NavigationManager Navigation

@attribute [Authorize]
<h1>Weather forecast</h1>

<p>This component demonstrates fetching data from the server.</p>

@if (forecasts == null)
{
    <p><em>Loading...</em></p>
}
else
{
    <table class="table">
        <thead>
            <tr>
                <th>Date</th>
                <th>Temp. (C)</th>
                <th>Temp. (F)</th>
                <th>Summary</th>
            </tr>
        </thead>
        <tbody>
            @foreach (var forecast in forecasts)
            {
                <tr>
                    <td>@forecast.Date.ToShortDateString()</td>
                    <td>@forecast.TemperatureC</td>
                    <td>@forecast.TemperatureF</td>
                    <td>@forecast.Summary</td>
                </tr>
            }
        </tbody>
    </table>
}

@code {
    private WeatherForecast[] forecasts;

    protected override async Task OnInitializedAsync()
    {
        var tokenResult = await AuthenticationService.RequestAccessToken();
        if (tokenResult.TryGetToken(out var token))
        {
            Http.DefaultRequestHeaders.Add("Authorization", $"Bearer {token.Value}");
            forecasts = await Http.GetJsonAsync<WeatherForecast[]>("WeatherForecast");
        }
        else
        {
            Navigation.NavigateTo(tokenResult.RedirectUrl);
        }
    }
}
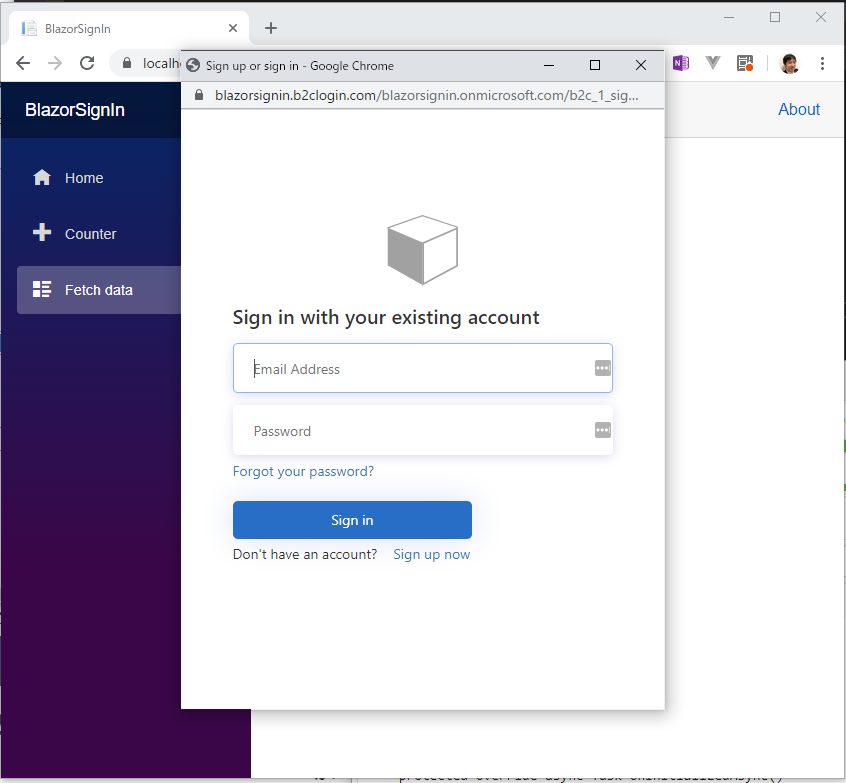
実行してみよう
実行して Fetch data に遷移すると以下のようにログイン画面が表示されます。
まだ Azrue AD B2C にユーザー追加していなかったことに気付いたので、適当に作りましょう。
ちなみに ID プロバイダーを設定しておくと SNS 認証も出来ます。
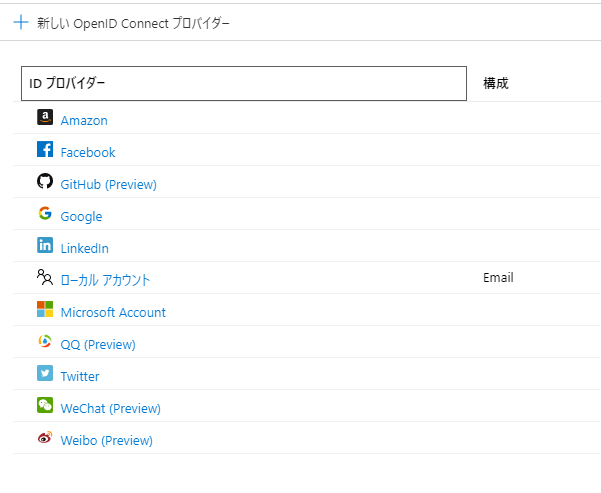
とりあえず今回は Azure AD B2C に直接ユーザーを追加しました。
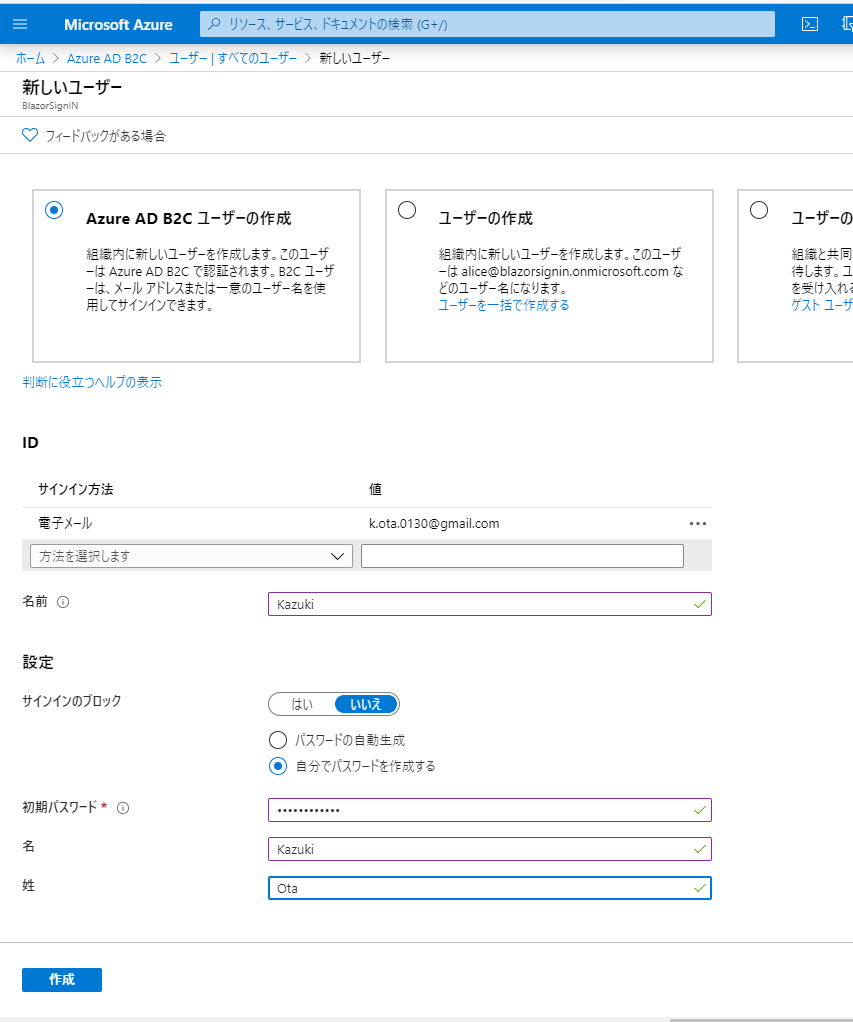
ユーザーを追加できたら気を取り直して、アプリを再実行してログイン画面にユーザー ID とパスワードを入れます。そしてサインインをすると無事 API が呼べて結果が画面に表示されました!
ユーザーデータをとってみよう
Azure AD B2C で表示名を返すようにしていたので表示名はクライアント側でとれるはずです。表示してみましょう。
Index.razor をちょっと変更してサインインしていない場合は「サインインしていません」と表示して、サインインしている場合は「こんにちは〇〇さん」と表示してみたいと思います。名前は @context.User.Identity.Name で取れます。
これも便利なコンポーネントがあってログインしているとき、していないときでデータを出しわけることが簡単に出来るようになっています。ついでなのでサインアウト処理も作ってみましょう。
@page "/"
@using Microsoft.AspNetCore.Components.Authorization
@using Microsoft.AspNetCore.Components.WebAssembly.Authentication
@inject NavigationManager Navigation
@inject SignOutSessionStateManager SignOutManager

<h1>Hello, world!</h1>

Welcome to your new app.


<AuthorizeView>
    <Authorized>
        こんにちは @context.User.Identity.Name さん。
        <button class="nav-link btn btn-link" @onclick="BeginLogout">サインアウト</button>
    </Authorized>
    <NotAuthorized>
        <a href="authentication/login">サインイン</a>
    </NotAuthorized>
</AuthorizeView>

@code{
    private async Task BeginLogout(MouseEventArgs args)
    {
        await SignOutManager.SetSignOutState();
        Navigation.NavigateTo("authentication/logout");
    }
}
AuthorizeView の Authorized タグの中がサインインしているときの表示の定義になります。NotAuthorized タグの中がサインインしていないときの見た目の定義になります。
サインアウトのボタンを押したらサインアウトの処理を呼び出して、Authentication.razor に処理を回しています。Authentication.razor ではログインの時と同じでログアウトとかの状態の RemoteAuthenticatorView に見た目をお願いしています。
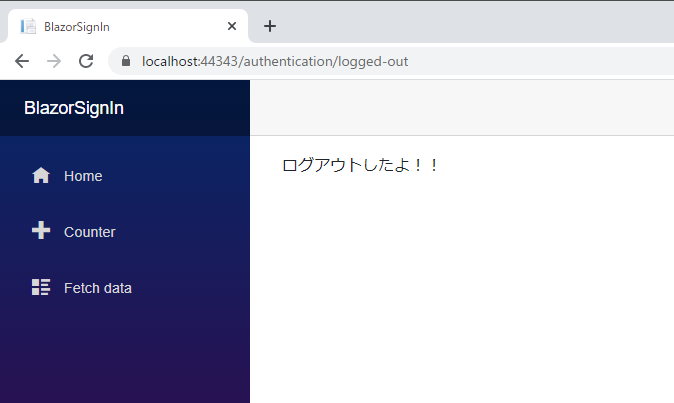
例えばログアウトが終わった時の見た目はデフォルトだとそっけない英語メッセージなので、そっけない日本語にしたかったら以下のように見た目を自分で定義できます。
@page "/authentication/{action}"
@using Microsoft.AspNetCore.Components.WebAssembly.Authentication
<RemoteAuthenticatorView Action="@Action">
    <LogOutSucceeded>
        ログアウトしたよ!!
    </LogOutSucceeded>
</RemoteAuthenticatorView>

@code{
    [Parameter] public string Action { get; set; }
}
この見た目のカスタマイズで、何がカスタマイズできるかは以下のドキュメントにあります。
この状態で実行して Index.razor を開くと以下のようになります。
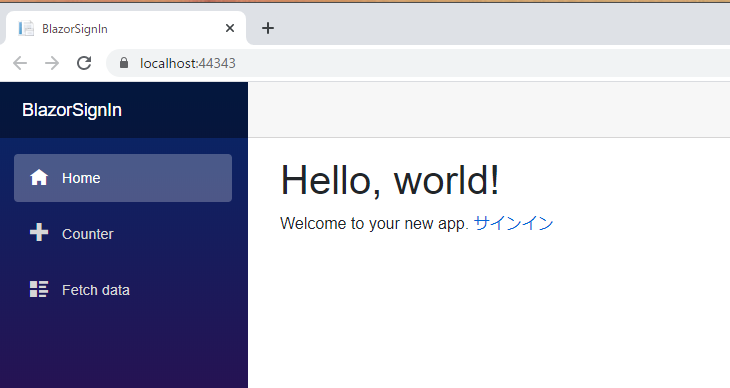
ログインすると名前が出ますね。

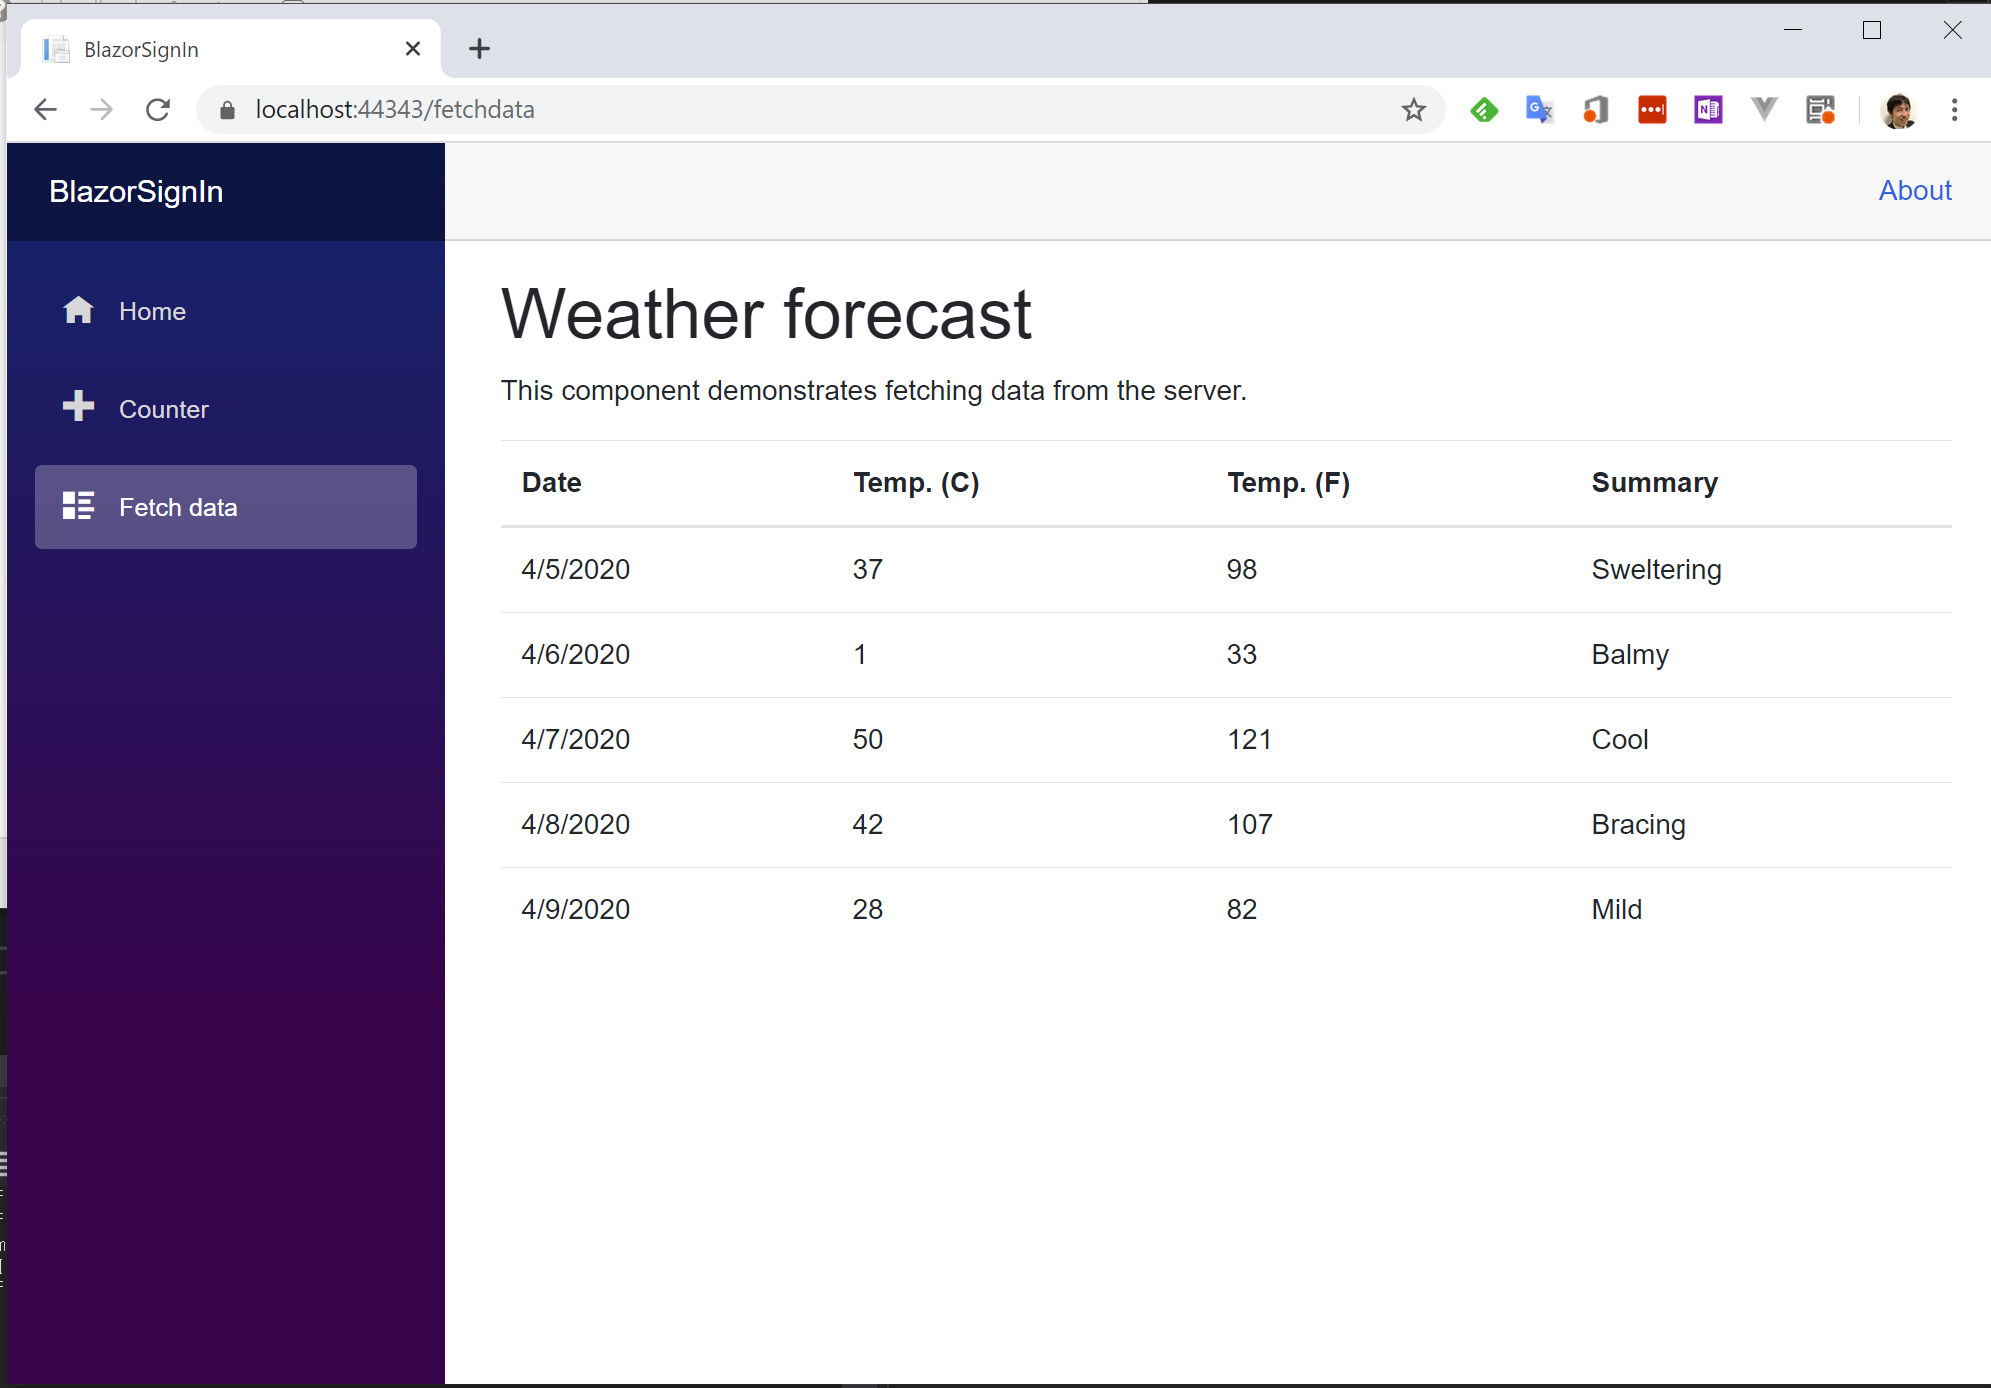
この状態で Fetch data にいくと当然ですがログインしているので、ログインダイアログが出ずに、ちゃんとデータが出ます。
Home に戻ってログアウトすると以下のように、ちゃんとそっけない日本語が出ます。
まとめ
ということで、試しながらつらつらと書いていってみました。Blazor WebAssembly 結構期待できるのでは!?という感じの仕上がりになってきてますね。
乞うご期待。