WindowsやMacは通常マウスとキーボードで操作しますが、Androidでは通常タッチパネルで操作します。
そこで、Androidのタッチパネル操作をWindowsから検知するようにして、Androidをペンタブレット化してみます。
実際には、AndroidをBLEペリフェラルにして、Windowsかはブラウザ経由でAndroidにつなぎます。
これをやる目的は、毎度の通り勉強のためでして、以下のノウハウを得ることを目的にしています。
- Androidをペリフェラル化できるようになる。
- Androidのタッチイベントを操れるようになる。
- ブラウザからペリフェラルにアクセスできるようになる。
この環境が整うと、ちょっとした機能をちょこちょこつけるモチベーションが上がってきます。ということで、ついでに以下のような機能をAndroidペンタブレットにつけます。
- Androidの地磁気センサー、ジャイロスコープ、加速度センサーを検出して、Windowsに通知する。
- AndroidのGPS情報を取得し、Windowsに通知する。
- AndroidでQRコードをスキャンし、Windowsに通知する。
- Androidで音声認識して、Windowsに通知する。
- AndroidのクリップボードにWindowsからコピーやペーストする。
- Androidのペンタブレットのパネルを1つではなく2つにする。
- AndroidにWindowsからToastを表示する。
- Androidで複数のボタンの押下を検出して、Windowsに通知する。
作っていくうちに、だんだん盛りだくさんになってしまいました。。。
今回はまずはAndroid側のタッチイベントを作成し、次にAndroidのその他機能を実装し、最後の投稿でWindows側のブラウザからAndroidを操ってみます。
ソース一式は以下のGitHubに置いておきました。
poruruba/sensor_pen_tablet
https://github.com/poruruba/sensor_pen_tablet
Androidネイティブアプリなので、以降Android Studioを使います。
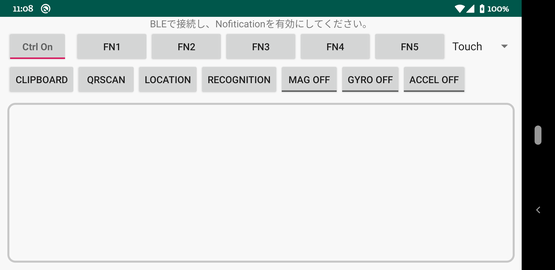
こんな感じの画面です。
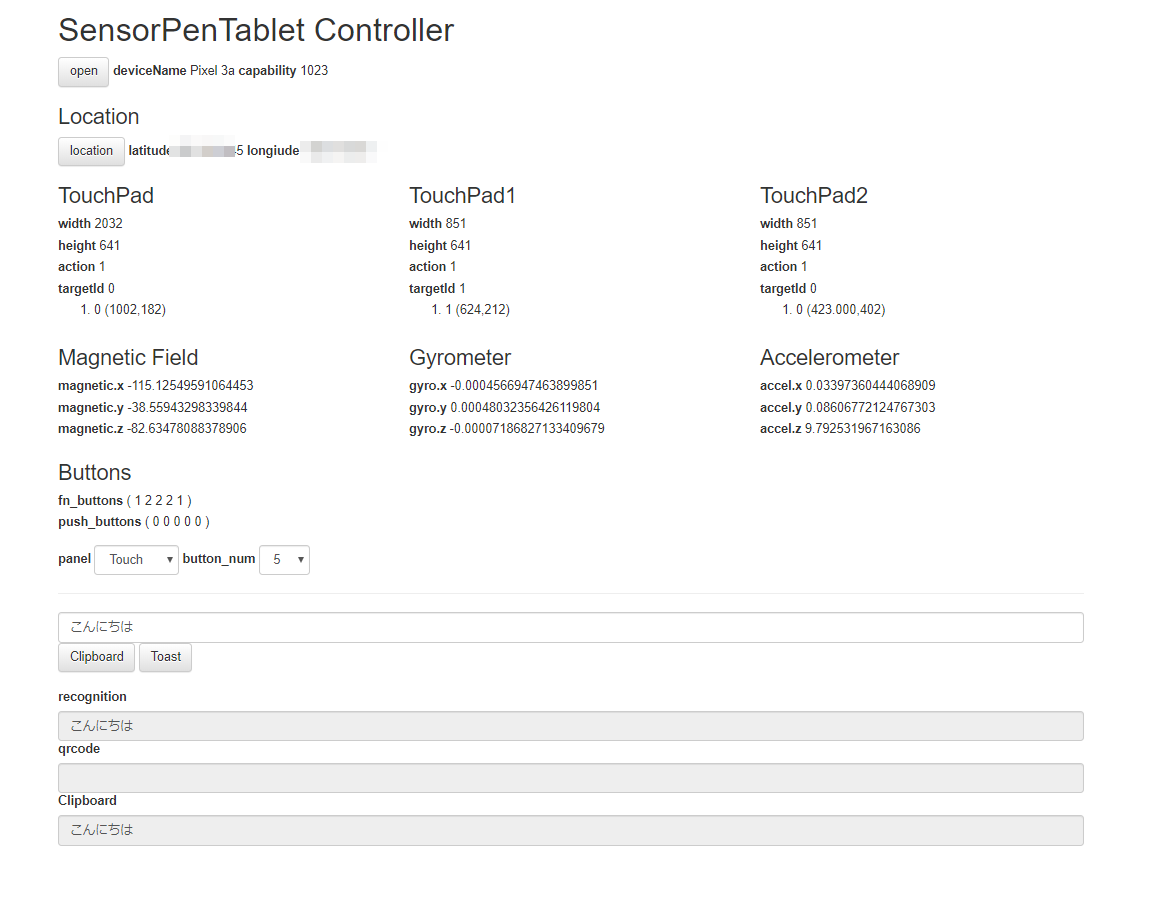
BLEセントラル側は、Chromeブラウザを使いました。こんな画面です。2つ作成します。
ブラウザですので、Macでも動作します。ただし、Web Bluetooth APIに対応している必要があります。
以下、続編です。
Androidをペンタブレットにする(2/3)
Androidをペンタブレットにする(3/3)
まずはBLEペリフェラル化する
BLEを使うので、AndroidManifest.xmlに許可の宣言を追記します。
    <uses-feature android:name="android.hardware.bluetooth_le" android:required="true"/>
    <uses-permission android:name="android.permission.BLUETOOTH" />
    <uses-permission android:name="android.permission.BLUETOOTH_ADMIN" />
キャラクタリスティックの構成は以下の3つにしました。
① Write用:Writeのみ
② Read用:Readのみ
③ Notification用:WriteおよびNotificationのみ
これで一通りの使い方がマスターできます。
ちなみに、NotificationにWrite権限が必要なのは、Notification通知を有効にしたり無効にしたりするときに書き込みを行うためです。
それが決まれば、以下のように実装します。
onCreateのところ
        mBleManager = (BluetoothManager) getSystemService(Context.BLUETOOTH_SERVICE);
        if( mBleManager != null ) {
            mBleAdapter = mBleManager.getAdapter();
            if (mBleAdapter != null)
                prepareBle();
        }
その実装
    private void prepareBle(){
        mBtGattServer = mBleManager.openGattServer(this, mGattServerCallback);

        btGattService = new BluetoothGattService(Const.UUID_SERVICE, BluetoothGattService.SERVICE_TYPE_PRIMARY);

        mWriteCharacteristic = new BluetoothGattCharacteristic(Const.UUID_WRITE, BluetoothGattCharacteristic.PROPERTY_WRITE, BluetoothGattCharacteristic.PERMISSION_WRITE);
        btGattService.addCharacteristic(mWriteCharacteristic);
        mReadCharacteristic = new BluetoothGattCharacteristic(Const.UUID_READ, BluetoothGattCharacteristic.PROPERTY_READ, BluetoothGattCharacteristic.PERMISSION_READ);
        btGattService.addCharacteristic(mReadCharacteristic);
        mNotifyCharacteristic = new BluetoothGattCharacteristic(Const.UUID_NOTIFY, BluetoothGattCharacteristic.PROPERTY_NOTIFY, BluetoothGattCharacteristic.PERMISSION_READ);
        btGattService.addCharacteristic(mNotifyCharacteristic);
        BluetoothGattDescriptor dataDescriptor = new BluetoothGattDescriptor(Const.UUID_DESC, BluetoothGattDescriptor.PERMISSION_WRITE | BluetoothGattDescriptor.PERMISSION_READ);
        mNotifyCharacteristic.addDescriptor(dataDescriptor);
        mBtGattServer.addService(btGattService);

        startBleAdvertising();
    }

    private void startBleAdvertising(){
        mBtAdvertiser = mBleAdapter.getBluetoothLeAdvertiser();
        if( mBtAdvertiser == null ){
            Toast.makeText(this, "BLE Peripheralモードが使用できません。", Toast.LENGTH_SHORT).show();
            return;
        }

        AdvertiseData.Builder dataBuilder = new AdvertiseData.Builder();
        dataBuilder.setIncludeTxPowerLevel(true);
        dataBuilder.addServiceUuid(new ParcelUuid(Const.UUID_SERVICE));

        AdvertiseSettings.Builder settingsBuilder = new AdvertiseSettings.Builder();
        settingsBuilder.setAdvertiseMode(AdvertiseSettings.ADVERTISE_MODE_BALANCED);
        settingsBuilder.setTxPowerLevel(AdvertiseSettings.ADVERTISE_TX_POWER_MEDIUM);
        settingsBuilder.setTimeout(0);
        settingsBuilder.setConnectable(true);

        AdvertiseData.Builder respBuilder = new AdvertiseData.Builder();
        respBuilder.setIncludeDeviceName(true);

        mBtAdvertiser.startAdvertising(settingsBuilder.build(), dataBuilder.build(), respBuilder.build(), new AdvertiseCallback(){
            @Override
            public void onStartSuccess(AdvertiseSettings settingsInEffect) {
                Log.d(TAG, "onStartSuccess");
            }
            @Override
            public void onStartFailure(int errorCode) {
                Log.d(TAG, "onStartFailure");
            }
        });
    }
より詳しく知りたい方は、以下をご参照ください。
AndroidをBLEペリフェラルにしよう
BLEペリフェラルとして起動した後、BLEセントラル側からの書き込みや読み出し要求が来た時の処理は、以下の部分で設定した自作のクラスで実装します。
mBtGattServer = mBleManager.openGattServer(this, mGattServerCallback);
Read要求は単純です。private byte[] readValue のところに、読み出しに応えたい任意の値を格納しておきます。そして、onCharacteristicReadRequest のところで、以下を呼び出しているだけです。
mBtGattServer.sendResponse(device, requestId, BluetoothGatt.GATT_SUCCESS, offset, readValue);
何を返しているかというと、WriteやNotificationで送受信するパケットの最大長と、どのような機能を実装したかをビットで表現しています。(これらの値は、今回のアプリの機能実装で使うもので、通常は任意の値で良いです)
以下その実装です。Write要求であるonCharacteristicWriteRequestはあとで説明します。
    private BluetoothGattServerCallback mGattServerCallback = new BluetoothGattServerCallback() {
        private byte[] readValue = new byte[]{ (byte)((Const.UUID_VALUE_SIZE >> 8) & 0xff), (byte)(Const.UUID_VALUE_SIZE & 0xff),
                (byte)((cap >> 24) & 0xff), (byte)((cap >> 16) & 0xff), (byte)((cap >> 8) & 0xff), (byte)((cap >> 0) & 0xff) };

        @Override
        public void onMtuChanged (BluetoothDevice device, int mtu){
            Log.d(TAG, "onMtuChanged(" + mtu + ")");
        }

        @Override
        public void onConnectionStateChange(android.bluetooth.BluetoothDevice device, int status, int newState) {
            Log.d(TAG, "onConnectionStateChange");

            if(newState == BluetoothProfile.STATE_CONNECTED){
                mConnectedDevice = device;
                mIsConnected = true;
                Log.d(TAG, "STATE_CONNECTED:" + device.toString());
            }
            else{
                mIsConnected = false;
                Log.d(TAG, "Unknown STATE:" + newState);
            }
        }

        public void onCharacteristicReadRequest(android.bluetooth.BluetoothDevice device, int requestId, int offset, BluetoothGattCharacteristic characteristic) {
            Log.d(TAG, "onCharacteristicReadRequest");

            if( characteristic.getUuid().compareTo(Const.UUID_READ) == 0) {
                mBtGattServer.sendResponse(device, requestId, BluetoothGatt.GATT_SUCCESS, offset, readValue);
            }else{
                mBtGattServer.sendResponse(device, requestId, BluetoothGatt.GATT_FAILURE, offset, null );
            }
        }

        public void onCharacteristicWriteRequest(android.bluetooth.BluetoothDevice device, int requestId, BluetoothGattCharacteristic characteristic, boolean preparedWrite, boolean responseNeeded, int offset, byte[] value) {
            Log.d(TAG, "onCharacteristicWriteRequest");

            if( characteristic.getUuid().compareTo(Const.UUID_WRITE) == 0 ){

// *****
// 後述します。
// *****
            }else{
                mBtGattServer.sendResponse(device, requestId, BluetoothGatt.GATT_FAILURE, offset, null);
            }
        }

        public void onDescriptorReadRequest(BluetoothDevice device, int requestId, int offset, BluetoothGattDescriptor descriptor) {
            Log.d(TAG, "onDescriptorReadRequest");

            if( descriptor.getUuid().compareTo(Const.UUID_DESC) == 0 ) {
                mBtGattServer.sendResponse(device, requestId, BluetoothGatt.GATT_SUCCESS, offset, notifyDescValue);
            }
        }

        public void onDescriptorWriteRequest(BluetoothDevice device, int requestId, BluetoothGattDescriptor descriptor, boolean preparedWrite, boolean responseNeeded, int offset, byte[] value) {
            Log.d(TAG, "onDescriptorWriteRequest");

            if( descriptor.getUuid().compareTo(Const.UUID_DESC) == 0 ) {
                notifyDescValue[0] = value[0];
                notifyDescValue[1] = value[1];

                mBtGattServer.sendResponse(device, requestId, BluetoothGatt.GATT_SUCCESS, offset, null);
            }
        }
    };
タッチパネルのイベントをフックする
それでは、今回の主題であるタッチパネルのイベントを扱っていきます。
タッチパネルのイベントをフックするために、新たにViewクラスを作成します。TouchViewというクラス名にしました。
Viewクラスを親クラスとして派生させます。
そこに、以下のメソッドをオーバライドすれば、タッチのたびに呼び出されるようになります。
    @Override
    public boolean onTouchEvent(MotionEvent event) {
その中で、受信したイベントの内容を簡単に整理したうえで、上位に通知します。
通知先は、あらかじめsetOnTouchEventLister でリスナーを設定してもらう前提です。
複雑な実装ではないので、以下に示しておきます。
public class TouchView extends View{
    private OnTouchEventListener listener = null;
    private int id;

    public class PointerXY{
        public int pointerid = -1;
        public float x = 0.0f;
        public float y = 0.0f;

        public PointerXY(){
        }
    }

    public class TouchViewEvent{
        public int id;
        public int action;
        public int targetId;
        public PointerXY[] pointers;

        public TouchViewEvent(int id, int count){
            this.id = id;
            this.pointers = new PointerXY[count];
            for( int i = 0 ; i < count; i++ )
                this.pointers[i] = new PointerXY();
        }
    }

    public interface OnTouchEventListener {
        void onTouchEvent(TouchViewEvent event);
    }

    public TouchView(Context context) {
        this(context, null);
    }

    public TouchView(Context context, AttributeSet attrs) {
        super(context, attrs);
    }

    public void setOnTouchEventLister(int id, OnTouchEventListener listener){
        this.id = id;
        this.listener = listener;
    }

    public void removeOnTouchEventLister(){
        this.listener = null;
    }

    @Override
    public boolean onTouchEvent(MotionEvent event) {
        if( this.listener == null )
            return true;

        TouchViewEvent ev = new TouchViewEvent(id, event.getPointerCount());

        ev.action = event.getActionMasked();
        int pointerIndex = event.getActionIndex();
        ev.targetId = event.getPointerId(pointerIndex);
        for (int i = 0; i < ev.pointers.length; i++) {
            ev.pointers[i].pointerid = event.getPointerId(i);
            ev.pointers[i].x = event.getX(i);
            ev.pointers[i].y = event.getY(i);
        }

        if( this.listener != null )
            this.listener.onTouchEvent(ev);

        return true;
    }
}
メインのActivityでリスナを登録します。
        TouchView touchview;
        touchview = findViewById(R.id.view_touch);
        touchview.setOnTouchEventLister(0, this);
        touchview = findViewById(R.id.view_touch1);
        touchview.setOnTouchEventLister(1, this);
        touchview = findViewById(R.id.view_touch2);
        touchview.setOnTouchEventLister(2, this);
複数登録するため、0、1、2という識別子を設定し、区別しています。
実際のTouchViewは、静的にLayout XMLに指定します。
        <LinearLayout
            android:id="@+id/layout_touch"
            android:layout_width="match_parent"
            android:layout_height="match_parent"
            android:layout_weight="1"
            android:visibility="gone"
            android:orientation="horizontal">

            <com.example.sensorpentablet.TouchView
                android:id="@+id/view_touch"
                android:layout_margin="10dp"
                android:background="@drawable/border_style"
                android:layout_width="match_parent"
                android:layout_height="match_parent" />

        </LinearLayout>

        <LinearLayout
            android:id="@+id/layout_2touch"
            android:layout_width="match_parent"
            android:layout_height="match_parent"
            android:layout_weight="1"
            android:visibility="gone"
            android:orientation="horizontal">

            <com.example.sensorpentablet.TouchView
                android:id="@+id/view_touch1"
                android:layout_weight="1"
                android:layout_marginRight="60dp"
                android:layout_marginLeft="10dp"
                android:layout_marginBottom="10dp"
                android:layout_marginTop="10dp"
                android:background="@drawable/border_style"
                android:layout_width="match_parent"
                android:layout_height="match_parent" />

            <com.example.sensorpentablet.TouchView
                android:id="@+id/view_touch2"
                android:layout_weight="1"
                android:layout_marginRight="10dp"
                android:layout_marginLeft="60dp"
                android:layout_marginBottom="10dp"
                android:layout_marginTop="10dp"
                android:background="@drawable/border_style"
                android:layout_width="match_parent"
                android:layout_height="match_parent" />

        </LinearLayout>
@drawable/border_style はViewに四角の囲いを描画して、どこがタッチ範囲なのかがわかるようにしています。
<?xml version="1.0" encoding="utf-8"?>
<shape xmlns:android="http://schemas.android.com/apk/res/android"
    android:shape="rectangle">

    <stroke android:width="3dp" android:color="#c9c9c9"/>
    <corners android:radius="10dp" />
    <solid android:color="#00000000" />

</shape>
Android画面いっぱいの1つのTouchViewとして使う場合と、2つのTouchViewを左右に配置し使う、2つの方式を用意しています。
visibilityをgoneにしているのはそのためで、使う方をvisibleにして、使わない用をgoneにします。
private void selectPanel(String item)が実装の部分です。割愛しまが。
visibilityを設定したのち、変わったことをNotificationで上位に伝えています。
また、どっちの方式にするかを選択するためのSpinnerも配置しています。
BLEパケットの通信仕様
ここで、BLEパケットの通信仕様を明示しておきます。
今回は、1回で送信できるパケット長を最大20バイトとしています。MTU交換によって伸張したサイズで、やってもいいのですが、処理が複雑になるので、固定サイズにしています。実は、これはFIDOのCTAPを参考にさせていただいています。
必ず先頭が0x83で、続いて2バイトでビッグエンディアンがあり、送信したいデータ(20バイトに収まる分)が続きます。
そのあとに、20バイトきっかりずつ分割受信されてきます。ただし、2つ目以降の受信パケットの先頭が0x00、次が0x01、その次が0x02でインクリメントされます。20バイトぴったりで受信している時点ではまだ次があると考え、20バイトより小さかったらそれが最後のパケットとみなします。
受信の場合のことを書きましたが、Notificationの場合も同じルールで通知します。
実装としてはこんな感じです。
受信処理は、BluetoothGattServerCallbackのonCharacteristicWriteRequest の部分です。
                if( expected_len > 0 && value[0] != expected_slot )
                    expected_len = 0;
                if( expected_len == 0 ) {
                    if (value[0] != (byte)0x83) {
                        mBtGattServer.sendResponse(device, requestId, BluetoothGatt.GATT_FAILURE, offset, null);
                        return;
                    }
                    recv_len = 0;
                    expected_len = (((value[1] << 8) & 0x00ff) | (value[2] & 0x00ff));
                    System.arraycopy(value, 3, recv_buffer, recv_len, value.length - 3);
                    recv_len += value.length - 3;
                    expected_slot = 0x00;
                }else{
                    System.arraycopy(value, 1, recv_buffer, recv_len, value.length - 1);
                    recv_len += value.length - 1;
                    expected_slot++;
                }

                mBtGattServer.sendResponse(device, requestId, BluetoothGatt.GATT_SUCCESS, offset, null);

                if( recv_len >= expected_len ) {
                    processCommand();
                    expected_len = 0;
                }
通知処理は以下の部分です。
    public void sendBuffer(byte[] send_buffer, int send_len){
        if( !isNotification() )
            return;

        int offset = 0;
        int slot = 0x00;
        int packet_size = 0;
        byte[] value = charValue;

        do{
            if(offset == 0){
                packet_size = send_len - offset;
                if( packet_size >= (Const.UUID_VALUE_SIZE - 3) ) {
                    packet_size = Const.UUID_VALUE_SIZE - 3;
                }else{
                    value = new byte[packet_size + 3];
                }
                value[0] = (byte)0x83;
                value[1] = (byte)((send_len >> 8) & 0xff);
                value[2] = (byte)(send_len & 0xff);
                System.arraycopy(send_buffer, offset, value, 3, packet_size);

                offset += packet_size;
                packet_size += 3;
            }else{
                packet_size = send_len - offset;
                if( packet_size >= (Const.UUID_VALUE_SIZE - 1) ){
                    packet_size = Const.UUID_VALUE_SIZE - 1;
                }else{
                    value = new byte[packet_size + 1];
                }
                value[0] = (byte)slot++;
                System.arraycopy(send_buffer, offset, value, 1, packet_size);

                offset += packet_size;
                packet_size += 1;
            }
            mNotifyCharacteristic.setValue(value);
            mBtGattServer.notifyCharacteristicChanged(mConnectedDevice, mNotifyCharacteristic, false);
        }while(packet_size >= Const.UUID_VALUE_SIZE);
    }
最後に、TouchViewからコールバックされたタッチイベントをBLEセントラルに通知する部分の処理です。
    @Override
    public void onTouchEvent(TouchView.TouchViewEvent event) {
        Log.d(TAG,"onTouchEvent : " + event.action + ", " + event.targetId);
        for( int i = 0 ; i < event.pointers.length ; i++ )
            Log.d(TAG,"\t[" + i + "] " + event.pointers[i].pointerid + " (" + event.pointers[i].x + "," + event.pointers[i].y + ")");
        int float_unit = Float.SIZE / Byte.SIZE;
        int int_unit = Integer.SIZE / Byte.SIZE;
        byte[] send_buffer = new byte[2 + 2 * int_unit + 1 + event.pointers.length * (int_unit + float_unit * 2)];
        send_buffer[0] = Const.RSP_TOUCH_EVENT;
        send_buffer[1] = (byte)event.id;
        setIntBytes(send_buffer, 2, event.action);
        setIntBytes(send_buffer, 2 + int_unit, event.targetId);
        send_buffer[2 + 2 * int_unit] = (byte)event.pointers.length;
        for( int i = 0 ; i < event.pointers.length ; i++ ){
            setIntBytes(send_buffer, 2 + 2 * int_unit + 1 + i * (int_unit + 2 * float_unit), event.pointers[i].pointerid);
            setFloatBytes(send_buffer, 2 + 2 * int_unit + 1 + i * (int_unit + 2 * float_unit) + int_unit, event.pointers[i].x);
            setFloatBytes(send_buffer, 2 + 2 * int_unit + 1 + i * (int_unit + 2 * float_unit) + int_unit + float_unit, event.pointers[i].y);
        }
        sendBuffer(send_buffer, send_buffer.length);
    }
ここでちょっと補足します。以下のような関数を作っています。intやfloatといった既定の型は、CPUのエンディアンに依存してメモリに配置されています。したがってそのままBLEセントラルに送信すると、エンディアンが違った場合正しく受け取れないことになります。そこで、BLEセントラルに送るデータとしてはビッグエンディアン固定にしています。
    public static int setIntBytes(byte[] buffer, int offset, int value){
        int arraySize = Integer.SIZE / Byte.SIZE;
        ByteBuffer bytebuffer = ByteBuffer.allocate(arraySize);
        bytebuffer.order(ByteOrder.BIG_ENDIAN);
        byte[] array = bytebuffer.putInt(value).array();

        System.arraycopy(array, 0, buffer, offset, arraySize);

        return arraySize;
    }

    public static int setFloatBytes(byte[] buffer, int offset, float value){
        int arraySize = Float.SIZE / Byte.SIZE;
        ByteBuffer bytebuffer = ByteBuffer.allocate(arraySize);
        bytebuffer.order(ByteOrder.BIG_ENDIAN);
        byte[] array = bytebuffer.putFloat(value).array();

        System.arraycopy(array, 0, buffer, offset, arraySize);

        return arraySize;
    }
最後に
とりあえず、Androidのタッチイベント処理を実装してみました。
それだけでも結構説明が長くなってしまいました。
次回は、BLEセントラルであるブラウザ側の処理に入る前に、寄り道して、Androidの各種センサやGPSなど、ついでの機能の実装を説明予定です。
以上