Chromebooks are great for cheap, easy-to-use internet access. As a stand-alone platform, however, Google’s Chrome OS is far newer than Windows and MacOS. There’s a definite learning curve when moving away from Apple and Microsoft.
- Use the shortcut map
- Type Unicode characters
- Utilize overview mode
- Create new desktops
- Change the Shelf position
- Adjust resolution and zoom
- Multitask like a pro
- Snap a screenshot
- Get your Caps Lock back
- Load the Task Manager
- Check the system information
- Check your storage
- Show hidden files and folders
- Get Chromebook perks
- Wipe your Chromebook
If you’re new to Chromebooks, familiarize yourself with all the nooks and crannies for an overall better experience. To help get you started, here are a few tips that will advance you to “power user” status in no time.
Use the shortcut map

We could fill up an entire post listing all the keyboard shortcuts crammed into Chrome OS, but why bother? You can see all of them for yourself at any time by pressing the following keys simultaneously:
Ctrl + Alt + ?
This opens a window listing all keyboard shortcuts divided into six categories. To close the shortcut map, just click the X button.
Type Unicode characters
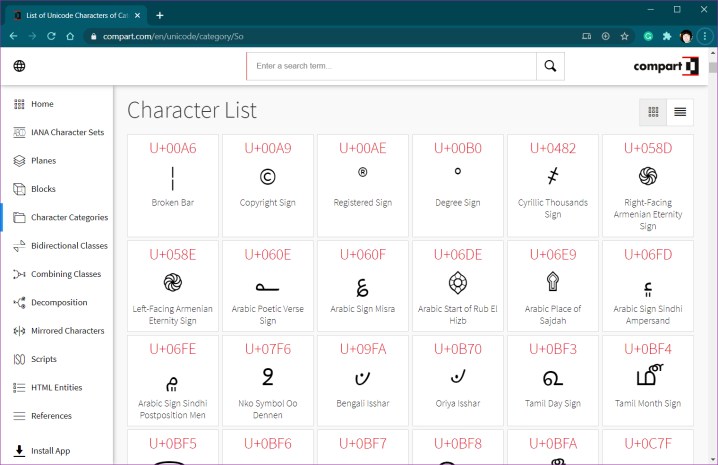
Need to type Unicode characters? You can do that on a Chromebook. All you need to know is the Unicode’s number, listed here, and the key combination. Here’s what to type:
Ctrl + U + number
For example, to get the trademark symbol, type Ctrl + U + 2122.
Utilize overview mode

Want to see all the windows and desktops you have open on one screen? Simply swipe three fingers down on your touchscreen or trackpad to activate this mode.
You can also press the Show windows button key, or F5.
Create new desktops

Like Windows and MacOS, Chromebooks have the native ability to create new virtual desktops. This allows you to assign different groups of windows to different desktops, arranging more complicated projects effortlessly without getting them too confused or overloading any single desktop.
To add a virtual desktop, press the following keys simultaneously:
Shift + Search + =
You can also create and manage virtual desktops using the following steps:
Step 1: Use three fingers to swipe down on your touchscreen or trackpad. Alternatively, press the Show windows button key, or F5.
Step 2: Tap or click New Desk located in the top right corner.
You’ll see the new desktop listed next to your original desktop in a ribbon running along the top edge of your screen. You can delete a virtual desktop by clicking the “x” on the desktop’s thumbnail.
Change the Shelf position

By default, the Shelf sits at the bottom of the screen, but it doesn’t have to live there indefinitely. If you like your taskbar on the top or sides, Chrome OS offers that customization too.
Step 1: Right-click on the Shelf.
Step 2: Hover the cursor over Shelf Position listed on the pop-up menu.
Step 3: Select Left, Bottom, or Right on the extended menu.
Adjust resolution and zoom

If you find text or images a little too hard to see on your Chromebook (especially on newer high-resolution screens), you have two options.
Your first option is display scaling, which scales fonts, icons, and so on without reducing visual fidelity no matter the setting. This is different from changing the resolution as seen in Windows, which can result in ugly visuals if it’s reduced lower than your screen’s native resolution.
Step 1: Click on the system clock.
Step 2: Click the gear icon on the pop-up menu. This opens the settings panel.
Step 3: Click Device listed on the left.
Step 4: Click to expand Displays listed on the right.
As shown above, you’ll see a slider ranging from Small to Large. By default, it’s set to Small or 100%, which is your display’s native resolution. You can move the slider in nine increments up to 200%, but it’s still based on your screen’s native resolution.
For instance, a 1,920 x 1,080 screen scaled at 200% looks like 960 x 540, but everything is scaled up and remains crisp. If you grabbed a screenshot, the resulting image is still 1,920 x 1,080 despite all the larger elements.
There are keyboard shortcuts that do something similar:
- Scale up = Ctrl + Shift + “plus”
- Scale down = Ctrl + Shift + “minus”
- Reset scale = Ctrl + Shift + 0
If the menus and other interface elements are acceptable but you want to change the scale of text and images on one specific website, type the following:
- Zoom in = Ctrl + “plus”
- Zoom out = Ctrl + “minus”
- Reset zoom = Ctrl + 0

To change the default zoom and font size for all web pages, do the following:
Step 1: Open Chrome
Step 2: Click the three-dot Customize and Control icon in the top right corner.
Step 3: Select Settings on the drop-down menu.
Step 4: Click Appearance listed on the left.
Step 5: Use the drop-down menu next to Font Size to switch between five font settings.
Step 6: Use the pop-up menu next to Page Zoom to adjust the zoom between 25% and 500%.
Multitask like a pro
Like Snap Assist in Windows 10, Chrome OS allows you to “snap” windows to the sides of your display, essentially splitting your screen in two. For instance, you can have a browser open on the left and Google Docs open on the right, filling the entire screen — no stacked or floating windows.
Step 1: Select your first window and press Alt + [ to snap it to the left. Type it again later to “un-snap.”
Step 2: Select your second window and press Alt + ] to snap it to the right. Type it again later to “un-snap.”
Alternatively, you can simply click and hold on a window and drag it to the left or right edge of your screen. Release the mouse button when it fills the target half. Rinse and repeat with your second window.
Snap a screenshot

Screenshot captures work differently on every operating system, which can get frustrating if you are switching to a Chromebook keyboard, as it doesn’t support the Print Screen key. But fear not: Taking a screenshot is just as easy albeit slightly different:
Ctrl + Switch window (F5)
For more help on taking a screenshot on a Chromebook, check out our dedicated guide.
Get your Caps Lock back

By default, Chromebooks replace the Caps Lock key in the standard keyboard layout with a Search button that activates the Google Search popup. If you rely on a conventional Caps Lock key (or you just like shouting at people with all-caps text), there’s an easy way to get it back.
Step 1: Click on the system clock.
Step 2: Select the gear icon on the pop-up menu. This opens the settings panel.
Step 3: Click Device located on the left menu.
Step 4: Click to expand Keyboard listed on the right under Device.
Step 5: Click the drop-down menu next to Search and select Caps Lock.
In addition to the Search key, you can reassign the Ctrl, Alt, Esc, and Backspace keys. You can disable all five as well.
Load the Task Manager

Despite its web-based roots, Chrome OS provides a Task Manager like Windows and MacOS. With this tool, you can see what’s eating your Chromebook’s memory, CPU, and network bandwidth. To open Task Manager, type the following:
Search + Esc
Alternatively, you can access Task Manager from Chrome:
Step 1: Click the three-dot Customize and Control button in the top right corner.
Step 2: Highlight More Tools in the drop-down menu until a roll-out menu appears.
Step 3: Click Task Manager.
You can end a task by selecting it on the list and clicking the End Process button.
Check the system information

Unlike Windows and MacOS, you won’t find a detailed hardware list. Instead, you must open Chrome and load the About System page. Even then, the average Chromebook owner may not understand what the information provides save for the current Chrome OS version.
To access this information, type the following in Chrome’s Omnibox:
chrome://system
Check your storage

A Chromebook isn’t ideal if you need lots of space, as it is primarily web-focused. Even with Android functionality, Chromebooks tend to have 16GB or 32GB of space. You can expand the storage with an SD card if your Chromebook supports it. They are easy to find and even easier to set up.
To see how much space is available on your local drive, do the following:
Step 1: Click the Files icon on the Shelf. It resembles a folder.
Step 2: With the app open, click the three-dot More button located in the top right corner. The storage amount is displayed at the bottom of the menu.
To see the amount of storage you have on an SD card, do the following:
Step 1: Click the Files icon on the Shelf. It resembles a folder.
Step 2: Click on the SD Card listed on the left.
Step 3: With the app open, click the three-dot More button located in the top right corner. The storage amount is displayed at the bottom of the menu.
Show hidden files and folders

Chrome OS intentionally hides all files and folders with names that begin with a period by default. You can uncover them by following these two steps:
Step 1: Click the folder icon on the Shelf. This opens the Files app.
Step 2: Press the Ctrl and Period keys.
Repeating these steps will hide the files.
Get Chromebook perks

Upon acquiring your new Chromebook, Google supplies you with a variety of perks. You, therefore, have an excellent opportunity to test apps and services you wouldn’t otherwise get the chance to use. While the list of perks is everchanging, here is a list of the perks at present:
- One month of Calm Premium
- Two months of Clipchamp Business Platinum
- Three months of Disney+
- Three months of YouTube Premium
- Six months of Squid Premium
- Twelve months of Dropbox storage (100GB)
- Twelve months of Google One (100GB)
- One year VSCO membership
- Three months of Stadia Pro
- Three months of Nvidia GeForce Now
- Free Project Highrise game
- Free House of Da Vinci game
- Free Fallout Shelter in-app item pack
- Free Duet Display app
Wipe your Chromebook

If you want to sell your computer, you’re going to want to eliminate your files and any other extraneous apps or downloads you may have executed. Powerwash is the feature that makes your computer new again by eliminating personal information and returning your computer to the way it was when you bought it. However, you can’t keep files on the device and merely reset the operating system settings as in Windows 10. For Powerwash to work, you must first remove all files from your computer and upload them to an external hard drive.
Editors' Recommendations
- 9 best 2-in-1 laptops in 2024: tested and reviewed
- Does ExpressVPN work on a Chromebook?
- The best MacBook to buy in 2024
- Best HP laptop deals: Get a 17-inch workhorse for $270 and more
- Best laptop deals: Save on the Dell XPS 14, MacBook Pro 16 and more