


Using Laravel Sanctum/Airlock with NuxtJS


A little side track from what I’ve been working on (yes, I’ve finally gotten around to writing the API Driven Development book which will fully run through SPA to Cordova and Electron).
On January 8th, Taylor Otwell announced the upcoming Laravel Sanctum package (https://twitter.com/taylorotwell/status/1215022507478138882) which will make authentication a breeze! I wanted to hop in and mess around with the package since most of my work revolves around API Driven Application development and see if I could set it up with NuxtJS and the NuxtJS auth module. The documentation is beautifully written and it’s easy to mess around with. I just had a few configuration issues. However, NuxtJS working with Sanctum has some tricks. I wanted to share what I figured out.
This should be an open ended tutorial and if anyone has a better idea on how to set this up DEFINITELY LET ME KNOW! There’s a comment section below or reach out on Twitter (https://twitter.com/danpastori). I’d love to learn with you!
After working through a few configuration issues, and compiling a lot of advice on CORS and configuring the session domain properly, along with some NuxtJS side configurations, I finally got it figured out (mostly) and wanted to share how I did it. We had quite a thread going on in GitHub (https://github.com/laravel/sanctum/issues/11), and I figured I’d share what I’ve learned (what works, what doesn’t work) and we will step through the process with two fresh installs of Laravel and NuxtJS. This is more focused on getting it working with the first class NuxtJS auth module https://auth.nuxtjs.org/ so we can use all of its amazing features.
Since Laravel Sanctum has beautiful documentation, this tutorial will revolve around a lot of the NuxtJS set up. The tutorial will also be using the first class NuxtJS Auth module which will make the whole checking for authentication, middleware setup, and logging in and out a breeze and supported.
Pre-Requisites
- Fresh Install of Laravel 6.x (app keys generated, database connection made, initial user migration complete)
- Fresh Install of NuxtJS
From this base level, we will install all of the different packages and features used to make everything work together!
The structure of my application stack is as follows:
/sanctum-nuxt
/sanctum-nuxt/api → This is my Laravel install
/sanctum-nuxt/frontend → This is my NuxtJS install
If you want to skip the tutorials and look at the code, here are the repos:
API – https://github.com/serversideup/airlock-laravel-api
Front End – https://github.com/serversideup/airlock-nuxt-frontend
Installing Laravel Sanctum
The first thing we will do is install Laravel Sanctum. The documentation is beautiful, simple, and steps through the process (https://github.com/laravel/sanctum). With installing Laravel Sanctum, there is nothing that needs to be changed with these steps to make it work with NuxtJS. I’ll run through this set up quickly, because the documentation does all the explaining that you need and I’ll focus on how to make it work with NuxtJS. You will just need a terminal to your API and run the commands in order.
First, you require it with composer:
composer require laravel/sanctum
Then publish the migrations and config:
php artisan vendor:publish --provider="Laravel\Sanctum\SanctumServiceProvider" Last, run the recently published database migrations:
php artisan migrate
You should see /config/sanctum.php file in your /config directory and a personal_access_tokens table in the database. We are good to go with the Sanctum install!
Configuring Sanctum
Now that Sanctum is installed, we need to configure it. Once again, the docs (https://github.com/laravel/sanctum#configuring-your-domains) do a wonderful job explaining this process. I’m going to share what I have, just so you can see what I have and follow along.
Add your domain to /config/sanctum.php . For us at 521 Dimensions, we have a 521.test domain that we set up locally to work with. I created a quick Laravel install and set that as my stateful domain. For this, my sanctum.php file looks like:
return [

    /*
    |--------------------------------------------------------------------------
    | Stateful Domains
    |--------------------------------------------------------------------------
    |
    | Requests from the following domains / hosts will receive stateful API
    | authentication cookies. Typically, these should include your local
    | and production domains which access your API via a frontend SPA.
    |
    */

    'stateful' => [
        'sanctum-nuxt-frontend.521.test',
    ],

    /*
    |--------------------------------------------------------------------------
    | Expiration Minutes
    |--------------------------------------------------------------------------
    |
    | This value controls the number of minutes until an issued token will be
    | considered expired. If this value is null, personal access tokens do
    | not expire. This won't tweak the lifetime of first-party sessions.
    |
    */

    'expiration' => null,

];
Next we need to add the Sanctum middleware to our API web group. To do this, open up the app/Http/Kernel.php file and add the following code to the use declarations at top:
use Laravel\Sanctum\Http\Middleware\EnsureFrontendRequestsAreStateful;
Then add the following to your api array:
/**
 * The application's route middleware groups.
 *
 * @var array
 */
protected $middlewareGroups = [
    'web' => [
        \App\Http\Middleware\EncryptCookies::class,
        \Illuminate\Cookie\Middleware\AddQueuedCookiesToResponse::class,
        \Illuminate\Session\Middleware\StartSession::class,
        // \Illuminate\Session\Middleware\AuthenticateSession::class,
        \Illuminate\View\Middleware\ShareErrorsFromSession::class,
        \App\Http\Middleware\VerifyCsrfToken::class,
        \Illuminate\Routing\Middleware\SubstituteBindings::class,
    ],

    'api' => [
        EnsureFrontendRequestsAreStateful::class,
        'throttle:60,1',
        'bindings',
    ],
];
The docs walk you through these steps, and right now we’ve pretty much just followed along.
Install CORS Library
This was one of the first places that things start to be different. We will need to work with CORS (Cross-origin Resource Sharing). This allows other origins (such as your SPA or mobile app) to access your API. This can be a huge problem if you don’t have this configured right (which right away, I didn’t). The documentation tells you what is required: https://github.com/laravel/sanctum#cors–cookies
For this, we will need to install a CORS library. After reading the tweet thread on the Laravel Sanctum announcement, the fruitcake/laravel-cors (https://github.com/fruitcake/laravel-cors) package will be baked in the 7x release (https://twitter.com/taylorotwell/status/1216198072319037440) so we might as well install that.
To install the library, simply run:
composer require fruitcake/laravel-cors
Know the best thing about Laravel libraries? The documentation is typically amazing and fruitcake/laravel-cors is no exception. The documentation is beautiful, clean and easy to follow, and we will be stepping through the installation process and only discussing what we need to change.
After the library has been installed, we need to add the middleware to the end of the global HTTP middleware like so:
/**
 * The application's global HTTP middleware stack.
 *
 * These middleware are run during every request to your application.
 *
 * @var array
 */
protected $middleware = [
    \App\Http\Middleware\TrustProxies::class,
    \App\Http\Middleware\CheckForMaintenanceMode::class,
    \Illuminate\Foundation\Http\Middleware\ValidatePostSize::class,
    \App\Http\Middleware\TrimStrings::class,
    \Illuminate\Foundation\Http\Middleware\ConvertEmptyStringsToNull::class,
    \Fruitcake\Cors\HandleCors::class,
];
Next, we need to publish the config using the following command:
php artisan vendor:publish --tag="cors"
This will allow us to make customizations so Sanctum works with Nuxt. You will see a /config/cors.php file where we will make those changes.
Let’s open up that file. The first change we need to add is we want CORS on 4 route groups so add this to the paths key in the config:
/*
 * You can enable CORS for 1 or multiple paths.
 * Example: ['api/*']
 */
'paths' => [
    'sanctum/csrf-cookie',
    'login',
    'api/*'
],
The first path will be the route we use to receive our CSRF Cookie with Laravel Sanctum. The second is the POST request to the /login route. This is handled by the default Laravel Auth (which we will set up in a minute). If you are doing registration through the default /register route, add that here as well. We won’t be touching on that, we will just seed our database with a user and password to right to the Laravel Sanctum implementation. The final route, is all of our /api routes. We want all API routes to be accessible through CORS from our SPA, mobile, or desktop app.
The final thing we want to change in the /config/cors.php file is at the very bottom. There’s a config for adding the Access-Control-Allow-Credentials header. This is CRUCIAL to enable since we will be sending authentication requests to CORS enabled routes. Axios will require this header to be valid and accessible.
To enable this header, simply change the supports_credentials key from false to true like this:
/*
 * Sets the Access-Control-Allow-Credentials header.
 */
'supports_credentials' => true,
Now it’s time to set up the Laravel Auth!
Set Up Laravel Auth Route
This is an extremely important step. We will need to create a /login route that will handle a POST request with an email and password. The reason I created this route and not use the Authentication scaffolding is I didn’t want to have a redirect 302 request returned on a successful login. To be honest, I don’t know much about the Laravel authentication scaffolding since I mainly handle it all with Laravel Passport in the day to day.
What I did for brevity was create a route in the /routes/web.php file like this:
Route::post('/login', function( ){
    $email = Request::get('email');
    $password = Request::get('password');


    if (Auth::attempt([
        'email' => $email,
        'password' => $password
    ])) {
        return response()->json('', 204 );
    }else{
        return response()->json([
            'error' => 'invalid_credentials'
        ], 403);
    }
});
What this does is simply grab the email and password fields from the request and attempt to authenticate the user. If successful, return a 204 empty response. If unsuccessful return a 403 error. This will work great for our API and we don’t have to work with redirects.
If you are interested in the Laravel Auth routes, you can read as much as you want about the Auth system here: https://laravel.com/docs/6.x/authentication. For us, we just installed what we needed.
Now, let’s move over to our NuxtJS install.
Background on NuxtJS Install
So real quick. When Installing NuxtJS you get a TON of options. To be clear about how I set up my NuxtJS install, this is what I did:
First I ran the install script:
npx create-nuxt-app frontend
Remember in the “Pre-Requisite” section, my NuxtJS install lives at /sanctum-nuxt/frontend. The frontend is a directory that our NuxtJS install lives in.
The options I selected are:
1. Project Name: Sanctum Nuxt
2. Project Description: Testing Laravel Sanctum with Nuxt
3. Author Name: Dan
4. Package Manager: NPM
5. UI Framework: Tailwind CSS (just to make life easy)
6. Custom Server Framework: None
7. Choose Nuxt.js modules: Axios IMPORTANT!!!! The NuxtJS axios module is critical to calling our API and authenticating users.
8. Choose linting tools: Prettier
9. Choose test framework: None
10. Choose Rendering Mode: Single Page App
11. Choose Development Tools: jsconfig.json → I use VSCode, so it makes things beautiful
Once you have this installed, you are ready to go.
Install and Configure Nuxt Auth Module
So Nuxt has a module that handles your authentication for you. It’s extremely convenient! Especially since it’s a first party module, developed by the NuxtJS team. You can read more about it here: https://auth.nuxtjs.org/.
This module comes with a lot of configuration options that we will need to shell out to make work with Laravel Sanctum. I’m going to assume you are familiar with NuxtJS, so I won’t go into details on how it works with Vuex stores and checks for user authentication. I will however, show you what I did to configure it to work with Laravel Sanctum.
First, we need to install the module. Since we installed the Nuxt Axios module on install, we just need to install the auth module. The Axios module is a dependency and if you didn’t set it up, you’d have to do that now. To install the auth module open a terminal in your NuxtJS install directory and run:
npm install @nuxtjs/auth
Now that we have @nuxtjs/auth installed we have to add it to the modules used by Nuxt. To do this, open up your nuxt.config.js and find the modules key. It should already contain the @nuxtjs/axios module and we will need to add the @nuxtjs/auth right after it like this:
/*
** Nuxt.js modules
*/
modules: [
  // Doc: https://axios.nuxtjs.org/usage
  '@nuxtjs/axios',
  '@nuxtjs/auth'
],
Now NuxtJS is aware of the auth module and we can use it in our application.
To ensure that NuxtJS has access to the Vuex store, ensure that you have it enabled by having literally any file in the /store directory. In our basic install, we just added an empty index.js file to make sure the Vuex store is active.
Once that is completed, we will have to configure the Auth pacakge. We will be using the local scheme which supports Cookie based authentication: https://auth.nuxtjs.org/schemes/local.html#options.
To configure the auth module, open up the nuxt.config.js file in the root of your NuxtJS install folder and let’s add some configuration:
...
auth: {
    strategies: {
        local: {
            endpoints: {
                login: {
                    url: '/login',
                    method: 'post',
                    withCredentials: true,
                    headers: {
                        'X-Requested-With': 'XMLHttpRequest',
                        'Content-Type': 'application/json'
                    }
                },
                user: {
                    url: '/api/user',
                    method: 'get',
                    propertyName: false,
                                        withCredentials: true,
                            headers: {
                            'X-Requested-With': 'XMLHttpRequest',
                            'Content-Type': 'application/json'
                            }
                }
            },
            tokenRequired: false,
            tokenType: false
        }
    }
},
...
Let’s break this down. First, we are creating an auth key in our config that will be used by the authentication module to work with our API. Next, we are configuring our local auth strategy. There are a lot of strategies supported by the NuxtJS auth module including Laravel Passport.
Quick side note here. If there is one thing I love about Laravel Sanctum is that you can easily set up the Auth module to work WITHOUT the recommendation of sending the client_secret and client_id as they recommend when doing with Laravel Passport. Since NuxtJS is javascript, you’d have to set these and they’d be accessible through the browser. I did get the local auth working with Laravel Passport by distributing Personal Access Tokens after a successful authentication and will talk about it in my upcoming book. However, Laravel Sanctum solves this fluidly.
Next, we set up our endpoints. The first one we define is the endpoint to submit the log in credentials. By default, in Laravel’s auth routes, this is a POST request to the /login URL. Before we get too far a head of ourselves and start thinking well, this is relative and our API will be on a different sub domain, don’t worry, we will get to that. We then set the withCredentials: true which will pass credentials to our API like the X-XSRF-TOKEN cookies we need. We then add two headers that make the whole process work seamless with CORS. The first is the 'X-Requested-With': 'XMLHttpRequest', which signals we are making an HTTP request, the second is the Content-Type which is set to application/json meaning we are sending JSON data. If you look at the Nuxt Auth module (https://auth.nuxtjs.org/schemes/local.html#endpoints), there’s a little snippet that explains that when setting up these, strategies, we are actually passing the data to axios by extending the request config. It is ESSENTIAL to have the withCredentials: true set so we can pass the cookies.
After the login route, we set up the route that retrieves the logged in user. This will store nicely in our Vuex data store. We need to set this route (and we will build it in a few steps once we get Sanctum working) to the URL that will return the authenticated user. This will be a GET request to the /api/user route. We also have a propertyName key set to false. Sometimes you make a request and return JSON like { user: {...} }. We will be returning the actual user object itself. This was tricky the first time I was setting it up because NuxtJS wasn’t storing my user in the local state and the Auth module kept thinking we were not logged in. We also add the proper headers and withCredentials: true to this route as well. All of our API requests need the withCredentials: trueadded or it won’t work at all. The NuxtJS Axios module will have these added by default if requesting the baseURL (see below).
Finally, we have two other options tokenRequired and tokenType. Since we aren’t using tokens, but using cookies, we set both of these to false . We are now ready to add 2 routes (one for logging in and one to show the authenticated user).
Before we move to the next step, we need to set up the base URL for our Axios requests. We do this in the nuxt.config.js file by finding the axios key and adding the baseURL::
/*
** Axios module configuration
** See https://axios.nuxtjs.org/options
*/
axios: {
  baseURL: 'http://URL_OF_YOUR_API'
},
Seed a User
Before we can even log in, let’s seed a user in the API database so let’s switch back to the Laravel API really quick. This will be just a simple account to prove that Laravel Sanctum works within NuxtJS. For more information on database seeding, check out the Laravel docs here: https://laravel.com/docs/6.x/seeding. We will be speeding through this process simply to get to the Laravel Sanctum + NuxtJS implementation so hold on tight! It’s just a few commands.
To do this, first create a seed:
php artisan make:seeder UsersTableSeeder
This will create a simple file in the /database/seeds directory called UsersTableSeeder.php. Open up that file and add the following code to the run() method:
 DB::table('users')->insert([
        'name' => 'Dan',
        'email' => '[email protected]',
        'password' => bcrypt('Your Password'),
 ]);
Next, open up the /database/seeds/DatabaseSeeder.php file and uncomment out the following line:
$this->call(UsersTableSeeder::class);
We are ready to rock and seed the table! To do this, simply run:
php artisan db:seed
If you look in your database you will see the user you just added and it will have the email and password you set up in the seed for you to log in!
Add API User Route
For now, just open up the /routes/api.php file and add the following code:
Route::middleware('auth:sanctum')->get('/user', function (Request $request) {
    return $request->user();
});
This will make an api/user route that responds to a GET request. It will then in-turn return the authenticated authenticated user. Notice the middleware is the auth:sanctum guard. This returns the currently authenticated user that gets injected to the request if a valid token or session cookie is present!
Add NuxtJS Login Route
Let’s create simple route that allows the user to enter their email and password to authenticate with Laravel Sanctum! It’s time to test it out!
First, let’s add a simple page that has our log in form. To do this, I simply add a /login route within NuxtJS by adding a /pages/login.vue file with this code:
Template
<template>
    <div>
        <label class="block">Email</label>
        <input type="text" class="border border-gray-900" v-model="email"/>

        <br>

        <label class="block">Password</label>
        <input type="password" class="border border-gray-900" v-model="password"/>

        <br>
        <br>

        <button v-on:click="login()" class="cursor border border-gray-900 p-2">Login</button>
    </div>
</template>
Script
export default {
    data(){
        return {
            email: '',
            password: ''
        }
    },

    methods: {
        login(){
            this.$axios.get('/sanctum/csrf-cookie', {
                headers: {
                    'X-Requested-With': 'XMLHttpRequest'
                },
                withCredentials: true,
            })
            .then( function(){
                this.$auth.loginWith('local', {
                    data: {
                        email: this.email,
                        password: this.password
                    },
                });
            }.bind(this))
        }
    }
}
Here we go! Let’s break it down.
The template is pretty straight forward. We have two inputs, an email and password. These are both mapped to the local data model for email and password. We then have a button that when clicked calls the login() method. This is where we start building our function call. I added a border and padding to the elements since we defaulted with TailwindCSS just so we can see them and it’s somewhat usable.
In the login() method, the first thing we do is use the local NuxtJS axios module to call the /sanctum/csrf-cookie route. This will set the XSRF-COOKIE used for authentication. We set the headers to use the X-Requested-With to be an XMLHttpRequest header. This is for security reasons. If you want to learn more, read here: https://stackoverflow.com/questions/17478731/whats-the-point-of-the-x-requested-with-header. We also set the withCredentials: true so we ensure to pass along any cookies to the request.
Upon completion, we use the NuxtJS auth module to login with the local strategy we configured and pass the email and password as parameters. As you might have guessed, this module uses axios to make this request.
The form is very simple, but we have to see how it works. Let’s bring up our NuxtJS install by running the following command:
npm run dev
By default, your NuxtJS install will be running on http://localhost:3000 , so navigate to that URL and you should see:
Awesome! Now let’s navigate to https://localhost:3000/login and you should see our simple log in form.
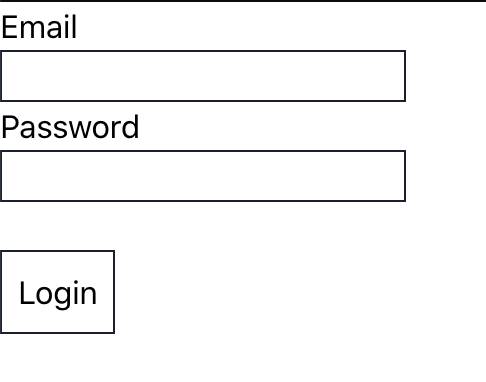
We can now enter our user name and password and see if we log in. First, I’d recommend opening up the inspector on the browser you are using and navigate to the Network tab. Unfortunately, if it’s like my set up, it will fail. Go ahead and enter your email and password and click Login. You should 4 requests initially (shown below):
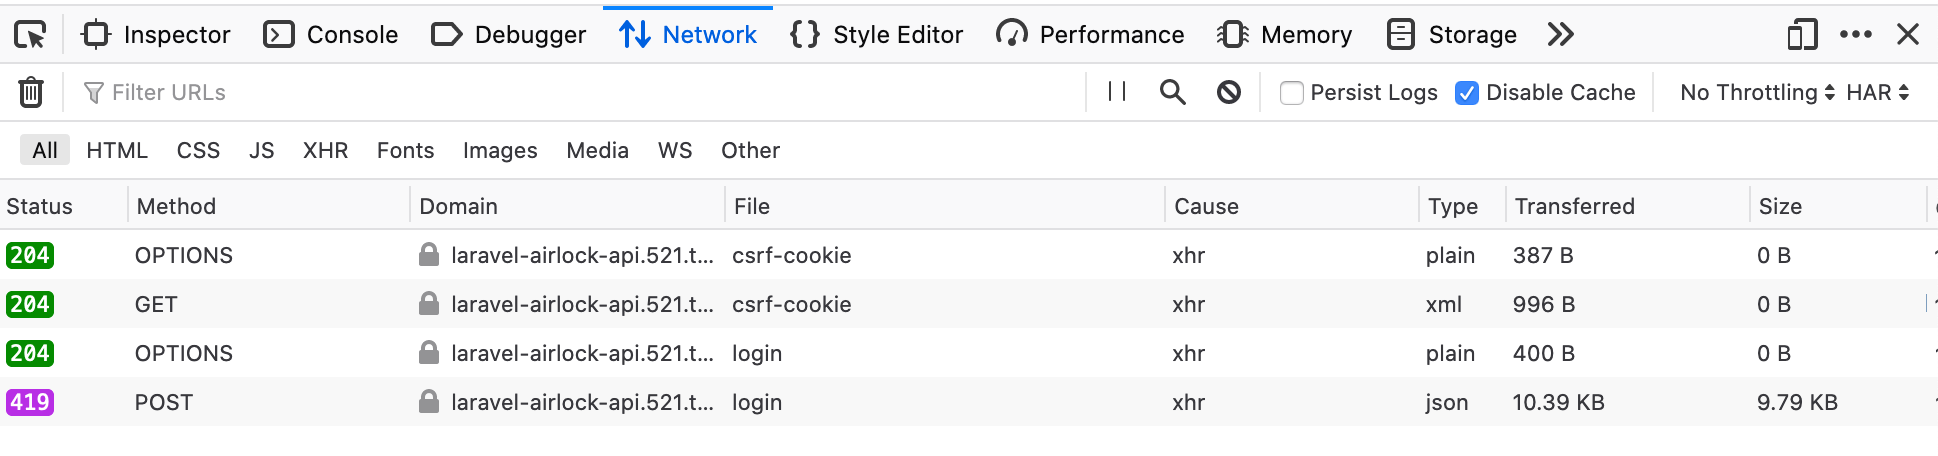
Let’s break these down and I’ll go through how to fix it. The first request is a pre-flight request to our API which we have running on our test server. Before we go any farther, let me explain my testing set up. This might differ than what you are running since I have it running on my personal testing environment. However, this is all replicable. My development environment runs off of a local top level domain 521.test . So my API is running at laravel-sanctum-api.521.test. Whatever your testing environment is is fine (except for possibly http://localhost which I’ll explain later explaining what I might have gotten wrong), just keep it in mind for later.
Anyway our first OPTIONS pre-flight request works, so we call the /sanctum/csrf-cookie successfully to set the XSRF-TOKEN as a cookie on our domain. If we inspect that further in the inspector, you will see the response header tells the browser to set the cookie XSRF-TOKEN:
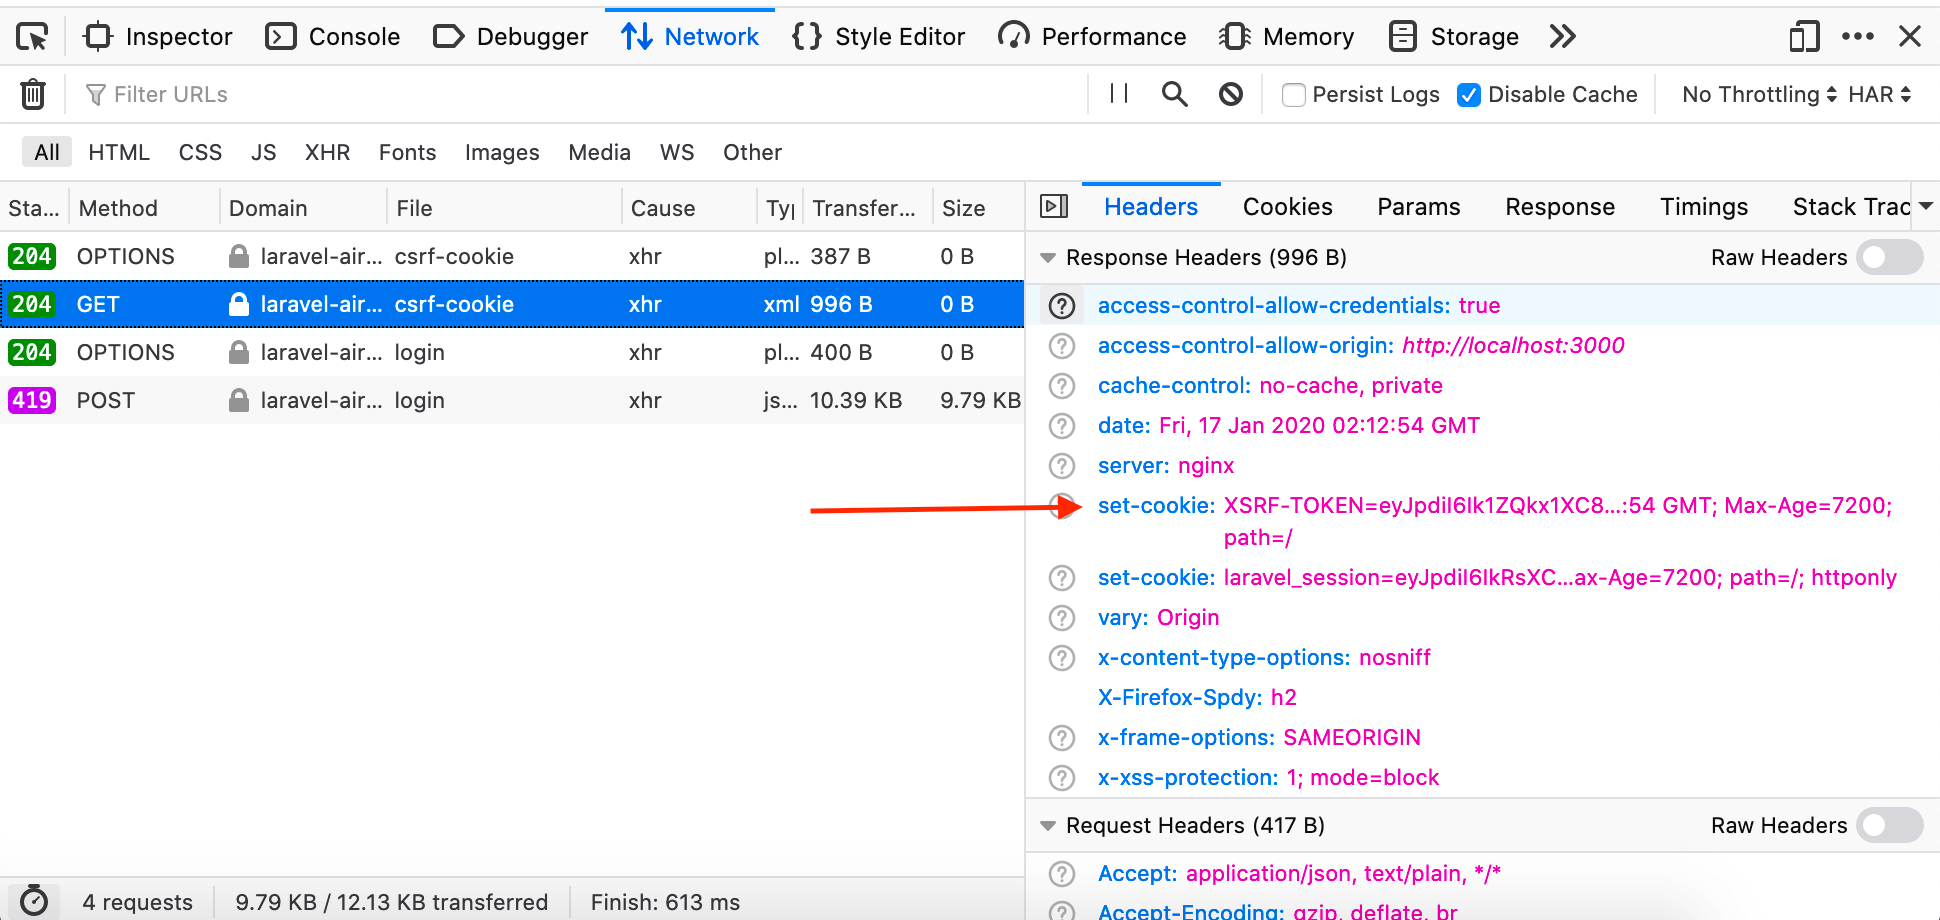
This is good! But if you look at the next 2 requests, you will see it is NOT passing this cookie. By default axios is set up to pass this cookie as the X-XSRF-TOKEN header and in the POST request that received the 419 you will see that it did not:
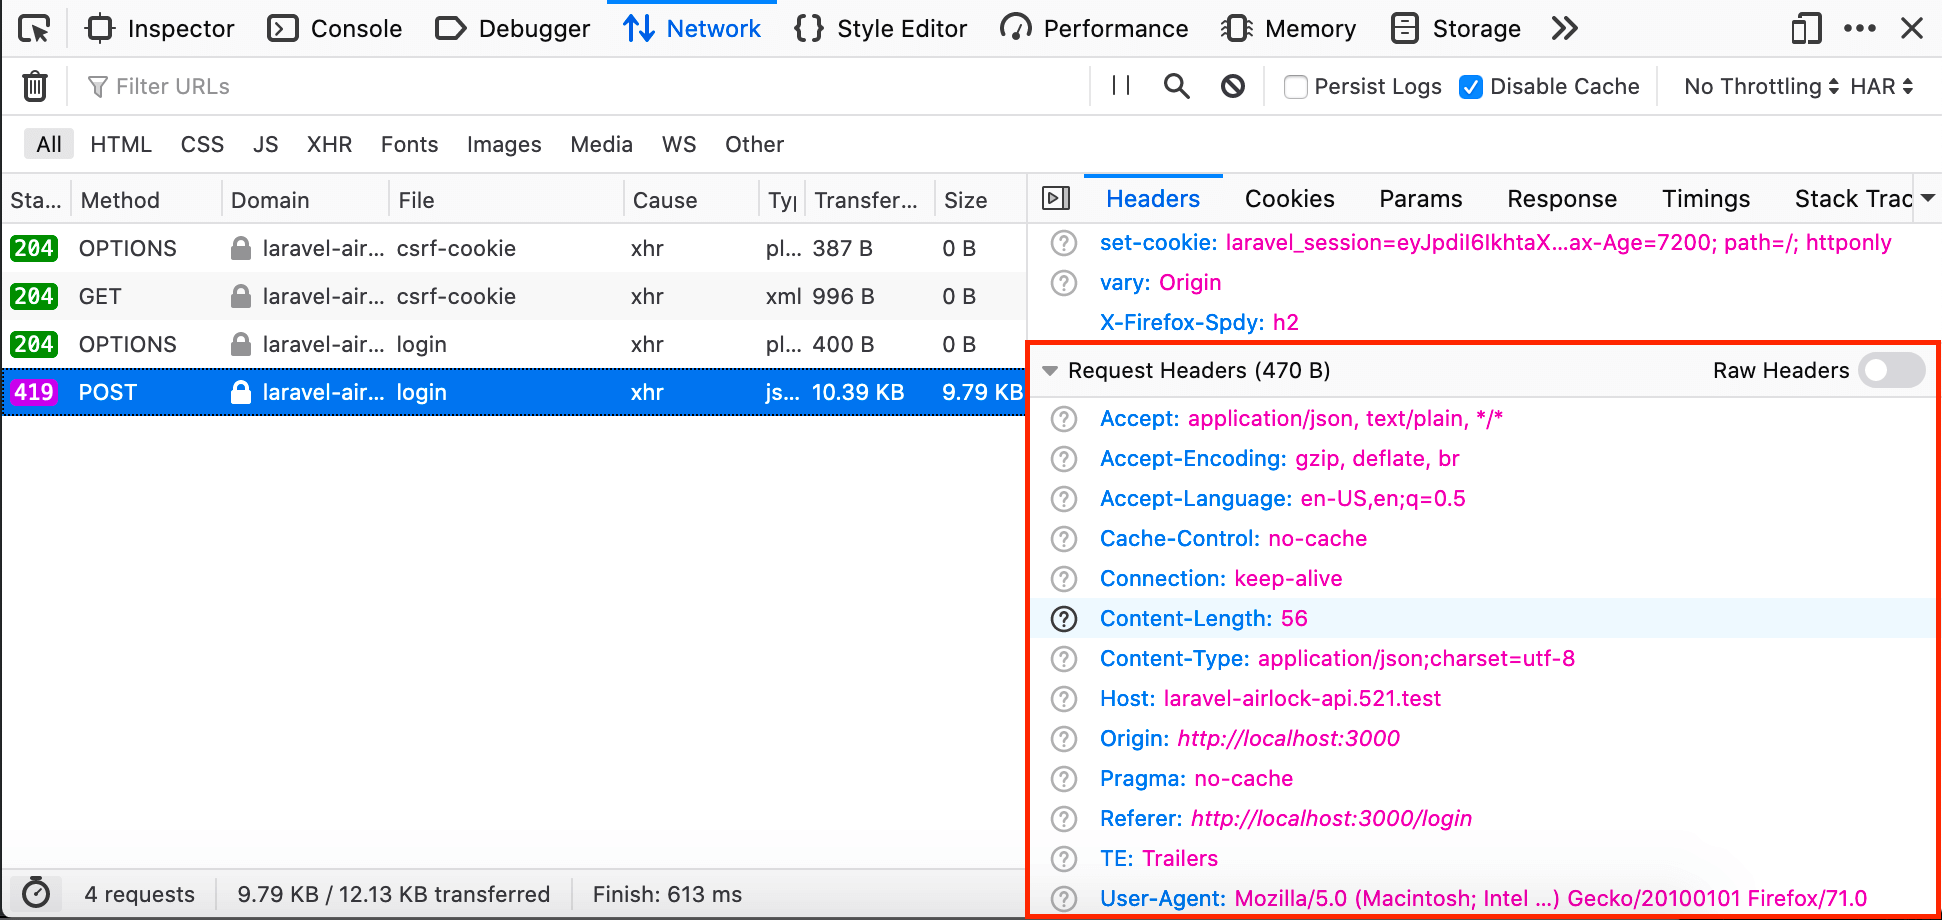
This is where I got confused and here is what I did to resolve the issue and what questions I still have remaining.
Configure Session Domain & Session Driver
This part was crucial and has been added to the Laravel Sanctum documentation: https://github.com/laravel/sanctum#cors–cookies. What we need to do, is open up our config/session.php and add the top level domain that we are testing on in the Session Cookie Domain configuration under the domain key:
'domain' => '.521.test'
Notice the . before 521.test? That opens up the session domain to sub domains. When you push to a production environment, make sure you store these in your .env file so your cookies get set correctly and authentication can be made.
Now the next question, how do you get NuxtJS to run on something other than [localhost:3000](http://localhost:3000) ? Well, and to be completely open, you will have to mess around with your local development machine and follow the instructions here: https://nuxtjs.org/api/configuration-server/ . Personally, I’m running Docker that Jay configured and this is a HUGE custom step that needs to be set up and configured that I won’t diving into, but is essential to making everything flow together.
Now that we have our session domain set up, I’m going to bring up the EXACT SAME NuxtJS install, just routed through a subdomain of 521.test and try again and see what happens:
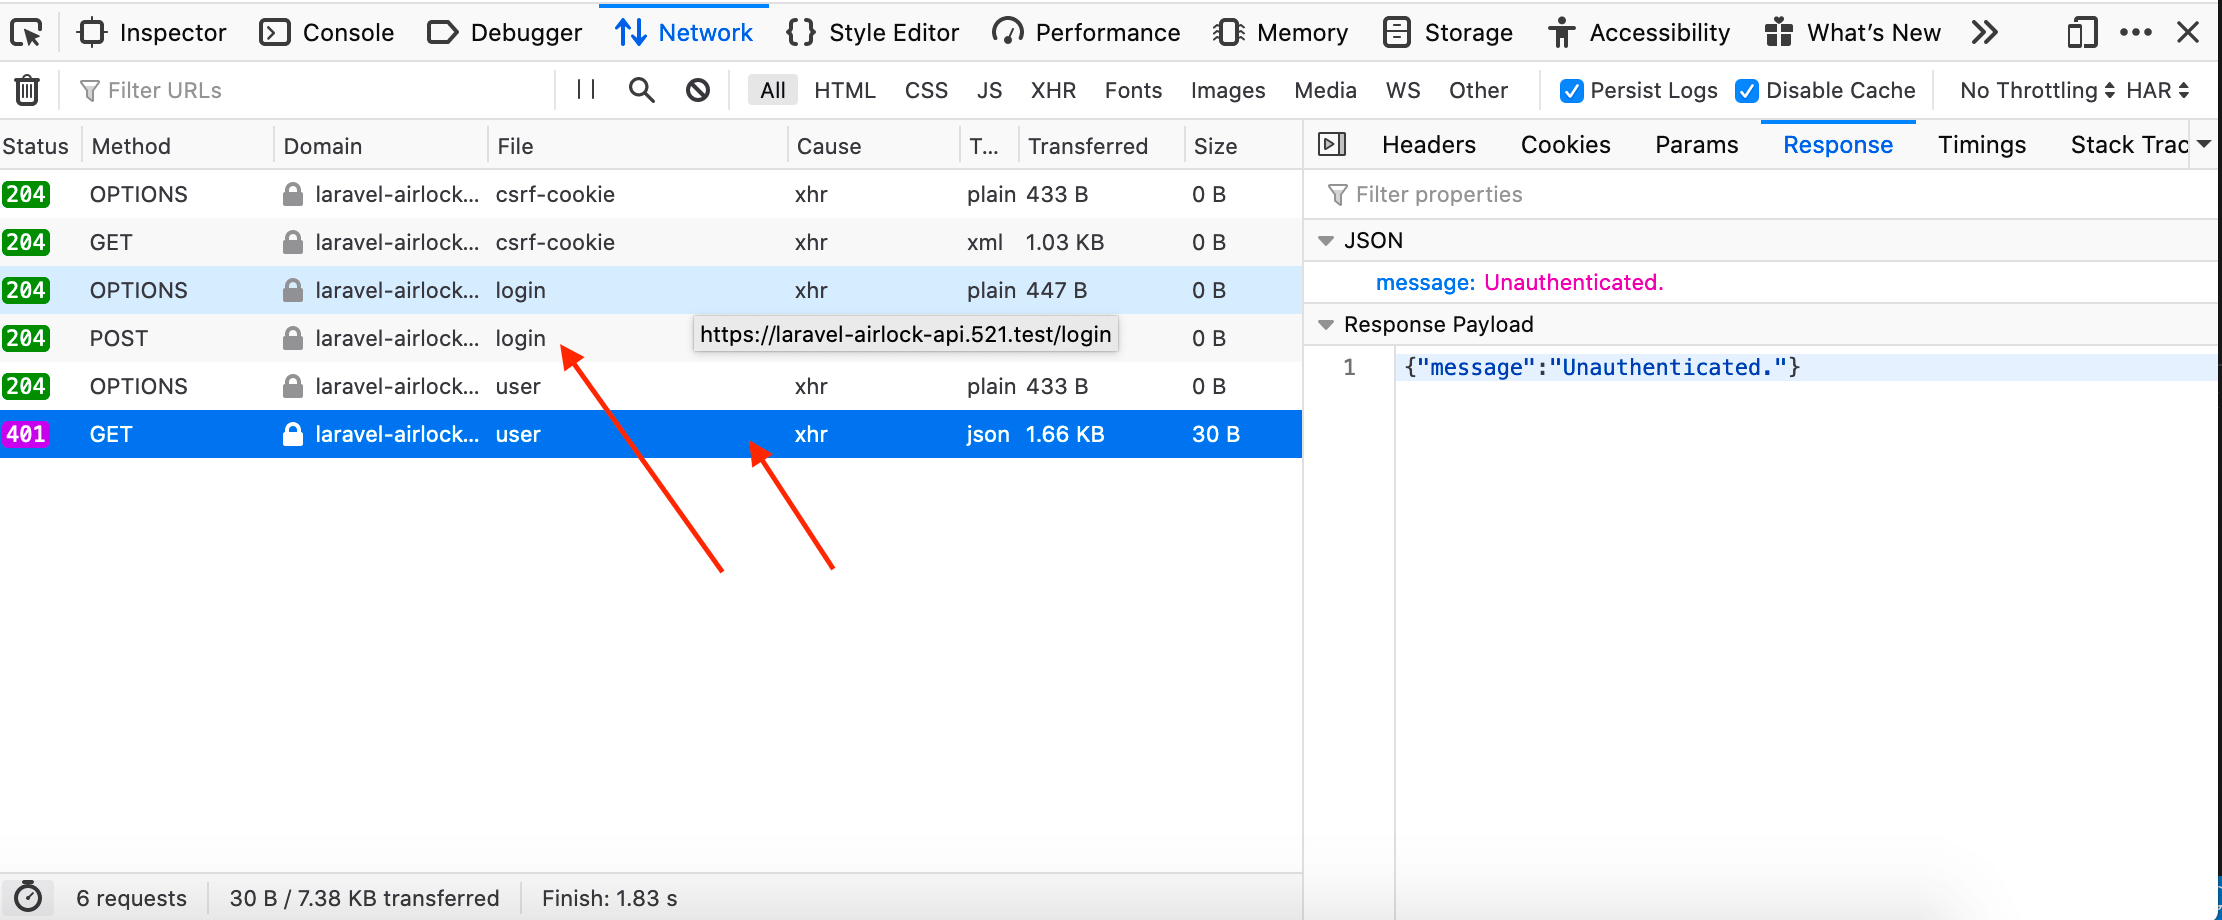
There we go! We made it through the login and it worked! Now we get a 401 response when the NuxtJS Auth Module makes a request to the /api/user route. This one was a trick to find, but luckily, the solution was to change the SESSION_DRIVER in Laravel to be cookie. The clues to this were found in these thread: https://github.com/laravel/sanctum/issues/43 & https://github.com/laravel/sanctum/issues/41 & https://github.com/laravel/sanctum/issues/11. Once I made that change, we get 200 responses across the board AND the Nuxt Auth module redirects us back to the / home page! It’s working!

We get our user returned and we can take full advantage of the Nuxt Auth module!
Other Options That I Got Working
I also got this working by just issueing access tokens (https://github.com/laravel/sanctum#issuing-api-tokens) and using the Nuxt Auth module with a token based approach. This would work across ANY domain set up. The goal of this tutorial was simply to get it working through the SPA login and with the NuxtJS auth module natively. If anyone wants me to go through this process I gladly will, just reach out!
Conclusion
- Changed the domain for the session cookies and setting the SESSION_DRIVER to be cookie
- Ensure Nuxt modules pass right headers ALWAYS
- Made custom login that didn’t redirect after authentication
I hope this helped with some of the installation and using Laravel Sanctum with NuxtJS! I want to consider this a living, breathing post. If there is any insight on better ways how to do this, changes, etc. reach out on Twitter (https://twitter.com/danpastori) or in the comment section below and I will make the changes. Please, let me know what you think and if you have any corrections, honestly, it will only help me understand it better. Laravel Sanctum is a beautiful package that makes working with an amazing front end (NuxtJS) a breeze!


 Become a Sponsor