This article demonstrates some of Magit’s most essential features in order to give you an impression of how the interface works. It also hints at some of the design principles behind that interface.
But this is only the tip of the iceberg. Magit is a complete interface to Git, which does not limit itself to the “most essential features everyone needs”. I hope that this article succeeds in demonstrating how Magit’s focus on work-flows allows its users to become more effective Git users. Here we concentrate on some essential work-flows, but note that more advanced features and work-flows have been optimized with the same attention to detail.
If you would rather concentrate on the big picture, then read the article Magit the magical Git interface instead (or afterwards).
Almost everything you see in a Magit buffer can be acted on by pressing some key, but that’s not obvious from just seeing how Magit looks. The screenshots below are accompanied by text explaining how what you see can be used to perform a variety of actions.
Regardless of where in a Magit buffer you are, you can always show more details about (or an alternative view of) the thing at point without having to type or copy-paste any information, as you often would have to do on the command line.
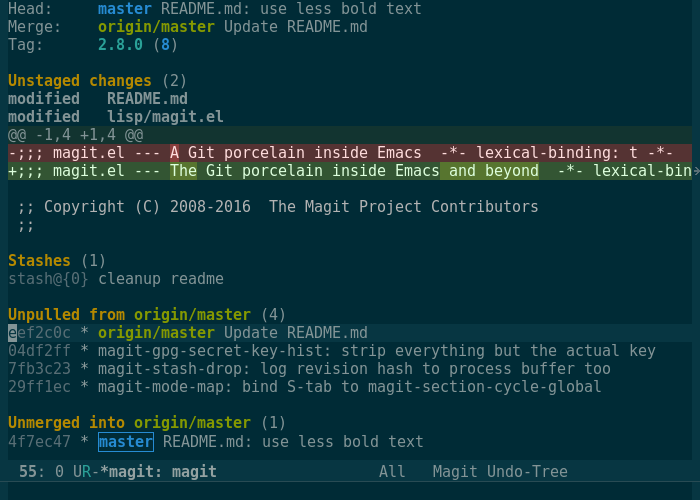
The status buffer, which can be shown while inside a Git repository by
typing C-x g (Control+x followed by g 1), is
Magit’s equivalent of typing git status in a shell. It shows a
quick overview of the current repository.
As you can see, Magit shows more information than Git. On the command
line, you would have to also use git diff, git diff --cached, git
log --oneline origin/master.., git log --oneline ..origin/master,
and a few other commands to get the same information.
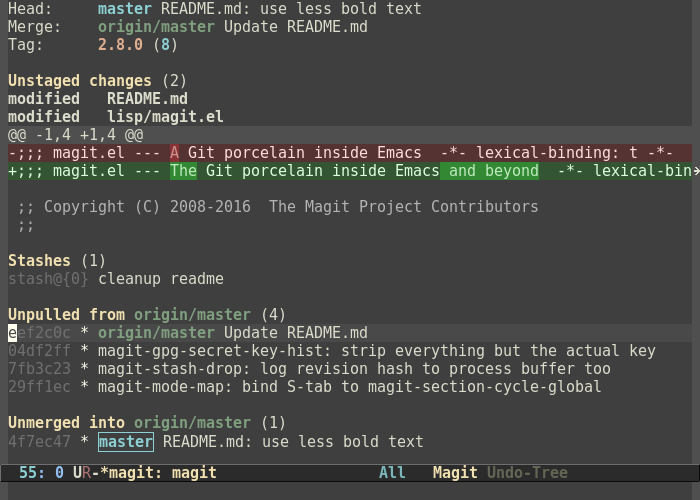
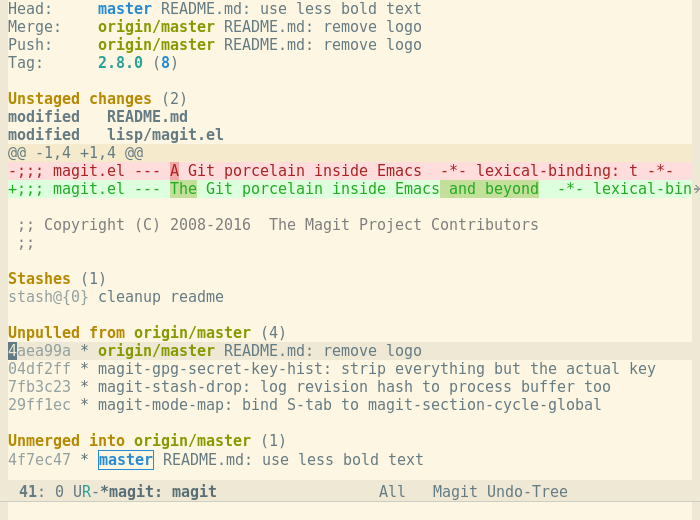
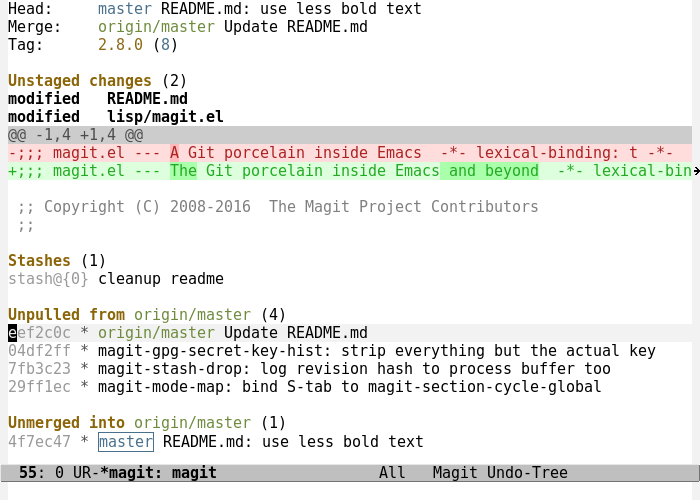
Many themes exist for Emacs. Throughout this guide we use the Solarized light theme, but here is how the status buffer looks when using some other popular themes:
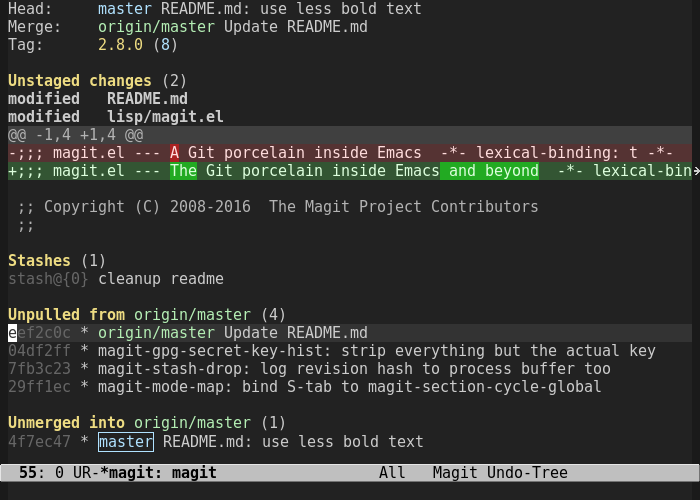
You might have noticed that some diff hunks, those for README.md,
are not shown. That’s because the respective sections have been
collapsed. You can collapse diff sections and any other section
(which are larger than a single line) by moving the cursor into it and
then pressing TAB.
Note that the current section is highlighted with a different background color so that you always know the extent of the current section. If you moved up one line, “Unpulled from origin/master” would become the current section. The current line as well as all the commits that follow would be highlighted
If you don’t currently need to know any details about the unpulled
commits, then you could now type TAB. After doing so you still
see the name of the upstream branch and how many commits it is ahead
of master, but the details (the individual commits in this case) are
hidden.
If you want to see them, just type TAB again. On the command
line you would have to type something like git log --oneline
..@{upstream}.
In Magit’s status buffer you can always show as much or little as currently appropriate without having to remember both the command that shows little or much information. Instead you can temporally hide or show details as needed by pressing a single key.
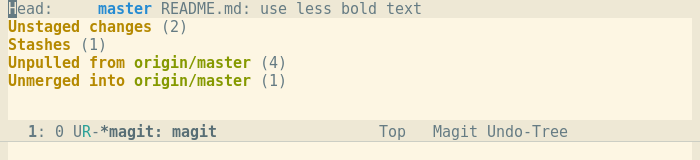
After hiding as much as possible, a status buffer looks like this:
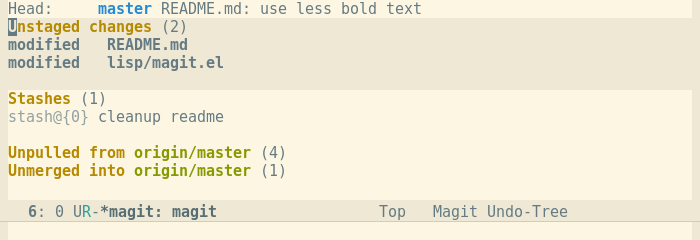
Here is the same buffer, showing a little more than that:
If you use Emacs to edit and save a file which is located inside the repository or if you use Magit to perform some action such as staging a change, then the status buffer is automatically updated.
And if you change something outside of Emacs, then you can press g to refresh the current status buffer or G to refresh all Magit buffers.
A major advantage Magit has over Git on the command line is that nearly everything you see in a Magit buffer can be acted on. Hiding and showing a section is just one example of that.
Besides TAB, another key that works nearly everywhere is RET (return). It shows a more detailed view of the thing at point, be that a commit, branch, diff, hunk, stash, …
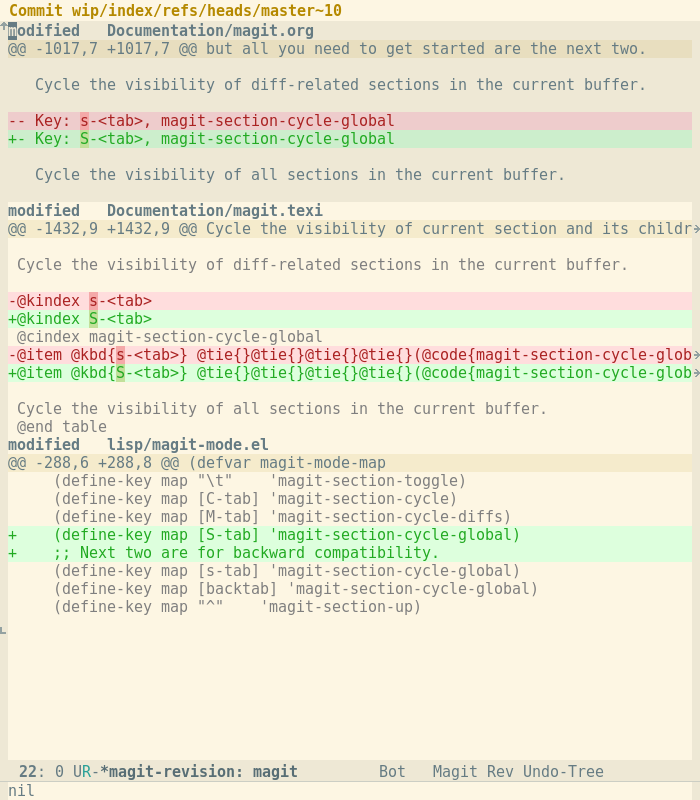
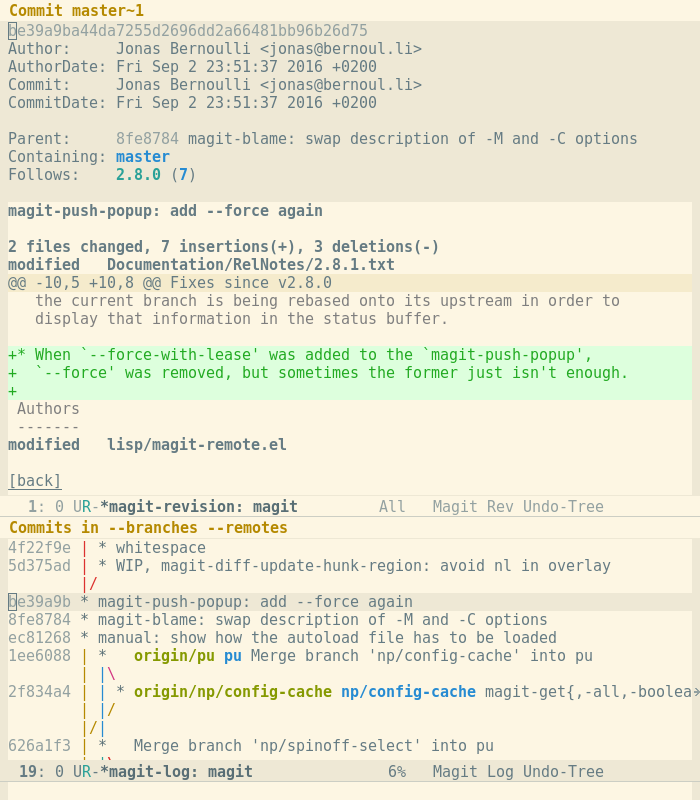
For example, if you type RET while the cursor is on a commit, then the message and diff for that commit are shown.
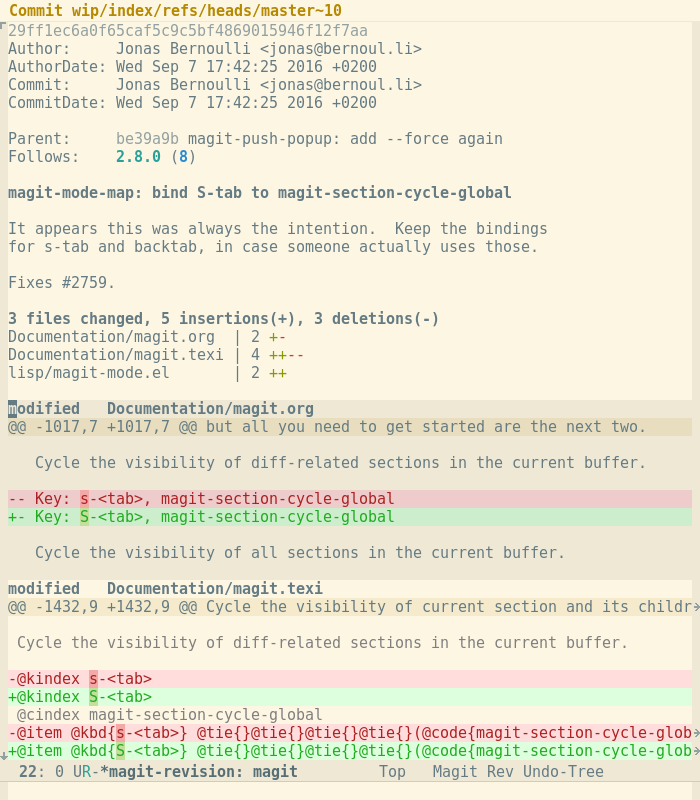
In this case the diff does not completely fit into the window. You could hide some sections — the metadata, commit, and diffstat at the top — to bring the complete diff into view, or you could move down a few sections to view the rest of the diff.
The basic keys movement keys are C-p to move up one section, and C-n to move down one section. M-p (i.e. Meta+p, also commonly known as Alt+p) and M-n would move to the previous or next section on the same level as the current section. The latter two commands can be used to navigate Magit buffers more quickly by skipping child sections. For example, you could jump from one file to another without having to step through the hunks of the first.
If you were only interested in the diff but not the commit message in the first place, you could have typed d d (d by itself and then d again) in the status buffer instead of RET.
But you already pressed RET, now what? Type q to quit (i.e. hide) the current Magit buffer, in this case the commit buffer, to go back to the previous buffer (more precisely the previous window configuration). In this case that would take you back to the status buffer.
So while RET performs the most likely action for the thing at point, there are many other keys which perform other, equally useful actions. There is d to show a diff, l to show a log, and dozens more, some of which will be mentioned below.
If the cursor is on the thing you want to act on, then it is very convenient that many commands default to acting on that thing. But sometimes you do want to act on some other thing. It might be inconvenient to first move to its representation in the current buffer, or the thing you want to act on might not even be present in the current buffer. Many commands therefore also allow you to act on some other thing.
Above we pressed d twice to show the diff for the commit at point. Pressing d just once actually does something by itself: it shows the “diff popup”, which you can see below.
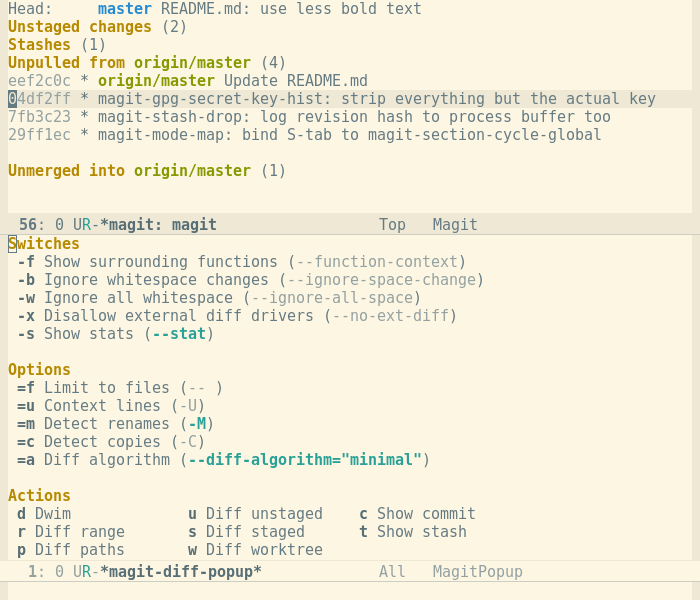
The window is split into two panes. (Note that in Emacs, which predates window systems, one would say the frame is split into two windows.) The pane at the top still shows the status buffer, while the pane at the bottom shows the diff popup.
The diff popup shows some actions at the bottom and some arguments, which you know from your command line use of Git, at the top.
Previously we pressed d again. That causes the popup buffer/window to disappear and the “dwim” (do what I mean) diff variant to be invoked. As with most dwim variants, this particular one acts on the thing at point. Alternatively, you could press any letter show under “Actions” (such as s to show the index).
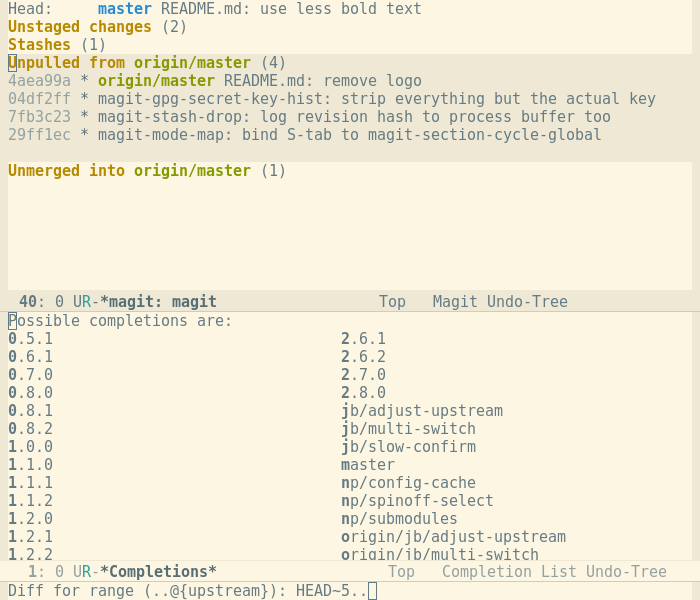
Or you might want to show the diff for an arbitrary range, in which case you would press r. After doing so, you can type the range with completion:
Most popups also allow users to set arguments which will then be used
when the invoked action calls Git. In the diff popup, for example,
one can enable the use of the --function-context argument by typing
- f before invoking an action. When an argument takes a value,
then that is read from the user, using completion when appropriate.
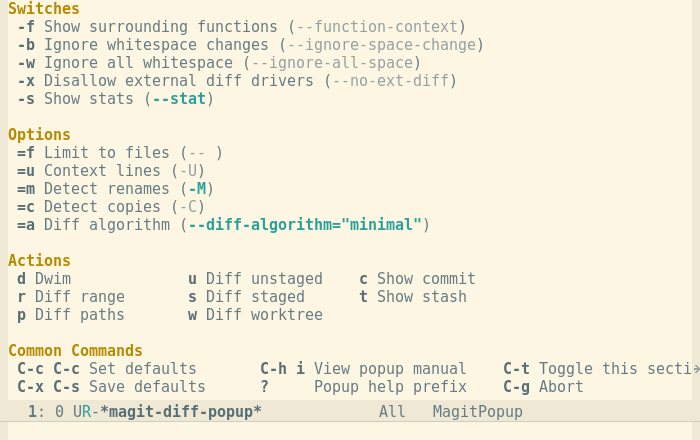
Usually arguments are just used once. When you later enter the same popup again, then it is not enabled anymore. However, you can save the arguments you want to be used by default. To do so, enter the popup, set the arguments as desired, and then instead of invoking an action, type C-c C-c to save them as the default for the current popup. These settings persist between Emacs sessions.
C-c C-c is only one of the commands that is available in all popups. To show them all, type C-t.
There are many popups. For the most commonly used ones, you will quickly learn the keys you have to press because they are mnemonic. Until then, or when you need to do something you rarely do, then the “popup of popups” comes to the rescue. Show it by typing ?.
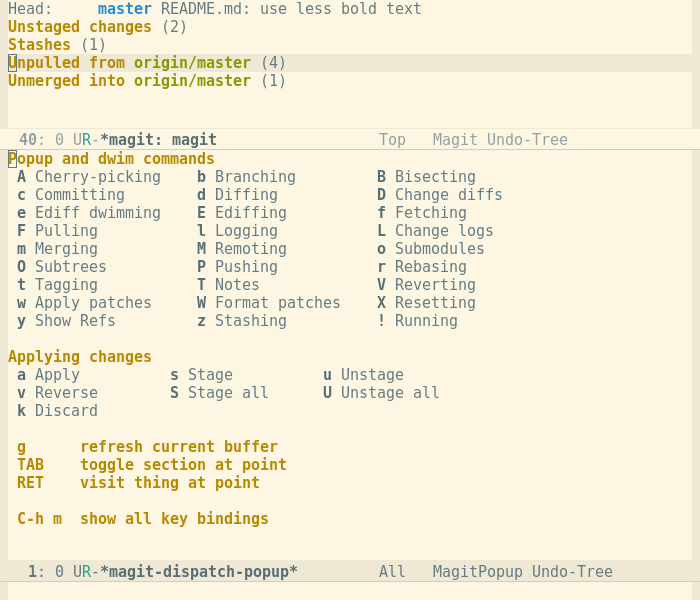
Many Magit commands are invoked by first showing the available variants and then picking one of those variants. (For many popups, it is possible to press the same key twice to invoke the most common variant, often a dwim variant.) But there are also many commands which are not implemented using such a popup. We have seen the hide/show command (TAB) and the visit command (RET) so far. Other such commands are staging (s) and unstaging (u), which always act on the file or hunk at point. These and similar commands will be discussed below.
Magit makes it very simple to stage and later commit only some changes, while leaving other changes in the working tree to be committed separately.
On the command line you have to invoke special staging and unstaging
sessions using git add --patch or git reset --patch, which is
quite cumbersome as you have to go through all the available hunks one
by one and in order.
In Magit, just act on what you see. To stage only the -59,7 +60,7
hunk you would move there and simply press s, without having to
first tell Git that you don’t want to stage -45,13 +45,14 and then
also that you don’t want to stage -69,7 +70,7.
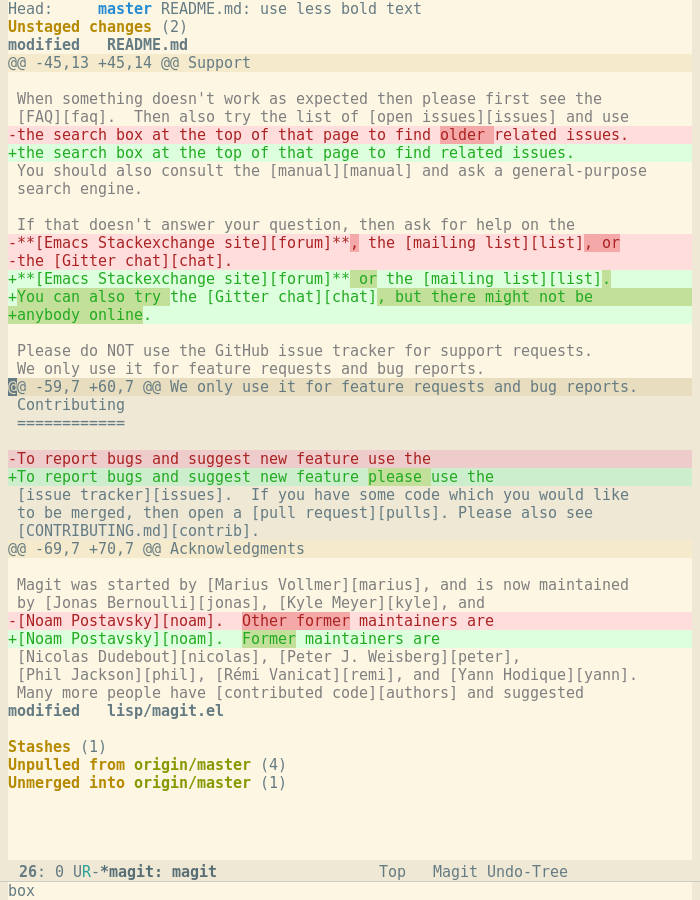
After you have done so, the buffer automatically updates and the cursor is moved to the next hunk. Therefore you can stage multiple hunks by pressing s multiple times, if that’s what you want. If not, then Magit won’t bother you with the other hunks like Git does. The staged hunk now appears inside the “Staged changes” section.
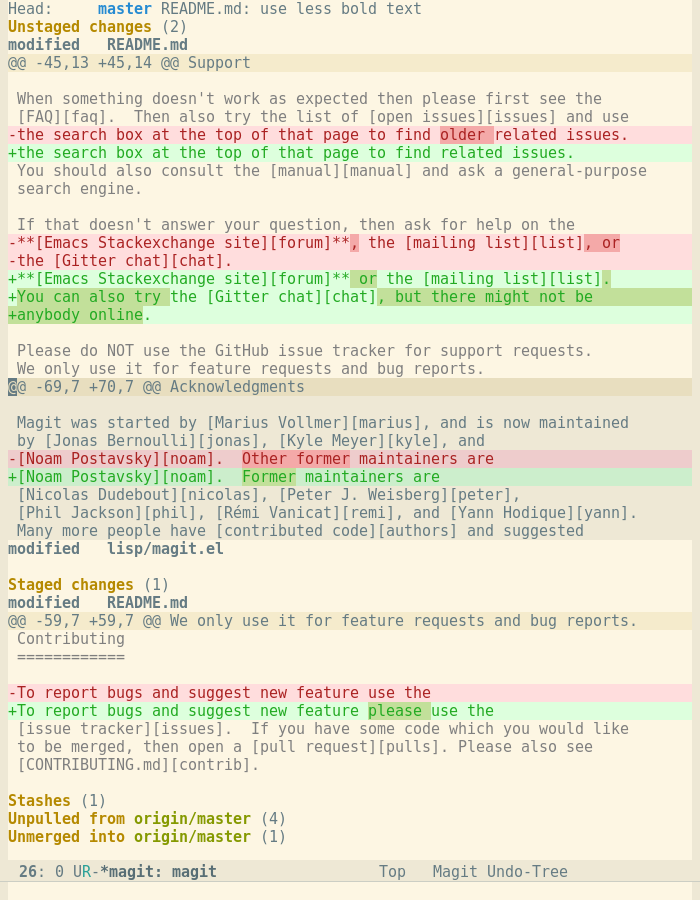
Unstaging of course works the same way. Move to a staged change and press u. You can also stage or unstage everything at once by pressing S or U.
You can also stage multiple files or hunks at once. To do so, mark these sibling sections using the region. (The region is an Emacs term for “the selected text”.)
First press C-SPC to mark one end of the region, and then move
the cursor until you reach what should be the other end of it.
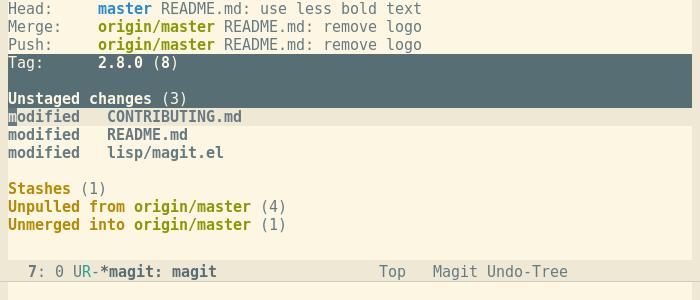
Alternatively you could use the mouse. If the region constitutes a
valid “Magit selection” which can be acted on as a unit, then it looks
like the example below, where both CONTRIBUTING.md and README.md
are selected but lisp/magit.el is not.

When such a selection is active, many commands which would normally act on the current section instead act on the selection (i.e. all the marked sections). Staging (s) is such a command.
If a region is active, but it does not constitute a valid selection because the sections that fall into it are not siblings of one another, then the region looks as it usually does in Emacs. That makes it trivial to see if you are about to act on the current section only or on the selection.
Besides sibling selections, Magit supports a second selection, the “hunk internal region”. You can mark just part of a hunk using the region and then only stage (or unstage or otherwise apply) just that part of the hunk.
Here you can see what it looks like when only the part of the hunk which removes the word “older” is selected using the region:
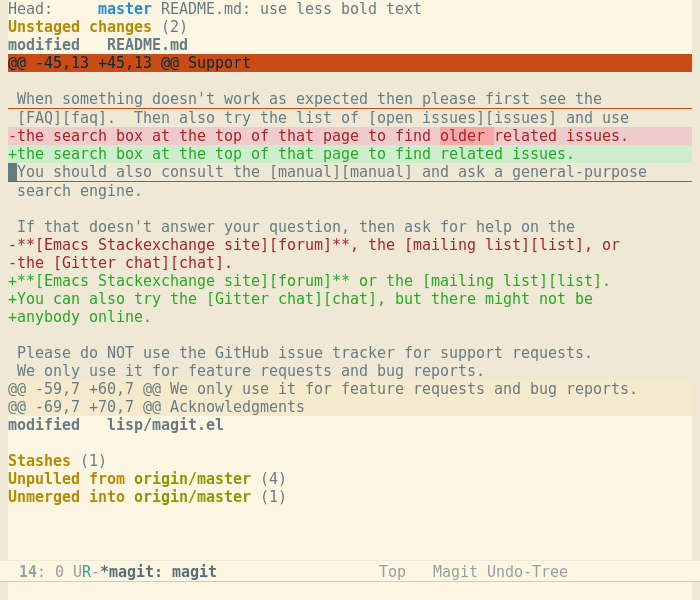
If you pressed s now, then only that part would be staged, resulting in:

(Note how conveniently the cursor is placed. We take pride in such details. This particular detail might not be all that important when looked at in isolation, but we go that little extra step in many places, and that does make a difference.)
Instead of using a hunk internal region to just stage parts of the
hunk, you could also have told Git to make the hunks smaller using
the -U argument. To do so, press - until the hunk in question
breaks up into two. Use + to do the opposite.
This works in the status buffer as well as all other buffers that may contain diffs. So far we have seen plain diff buffers and commit buffers.
As we have seen above, you can specify several arguments when using the diff popup to create the diff buffer. But when showing the status buffer by pressing C-x g or when showing the commit buffer by pressing RET, then that is not possible. You can however change the diff arguments used in the current buffer. Press D to bring the diff arguments popup. It is very similar to the diff popup in that it offers the same arguments, but instead of actions which show some diff in another buffer, it offers actions which affect the current buffer.

Press g to use the arguments that are currently selected in the popup in the current buffer. s sets these arguments as the default for buffers of the same type, so if you did that in the status buffer of some repository, then the same arguments would be used for status buffers of other repositories that you subsequently create. But this only lasts until you restart Emacs; to permanently save new defaults use w.
A similar “log arguments” popup exists on L.
Some other graphical tools approach Magit when it comes to the staging features described above, but I don’t think any one of them quite makes it. One more thing that sets Magit apart from these tools, however, is that these features are not only available for staging and unstaging, but also when “otherwise applying changes”.
With Magit you can also discard, reverse, or apply, the file, files, hunk, hunks, or region at point using the exact same interface as described above. For more information about these apply variants consult the manual.
If you noticed that the diff popup lacked your favorite argument, then fear not. It is easy to add arguments to an existing popup, as described in the manual.
Some arguments are missing because they are not actually required.
--cached falls into that category; it’s not needed because you
simply use the “staged changes” diff variant (s) to show the
cached changes (those in the index) .
Other arguments, e.g. --irreversible-delete, are missing because we
have to strike a balance between making every argument available that
anyone might ever need and not overwhelming beginners with arguments
that “nobody will ever need”.
(While it is fairly easy for a user to add additional arguments to a popup, I intend to make it trivial. It will be possible to temporally show all supported arguments and then select which ones should be shown by default, using a checkbox or similar. In other words, users will no longer have to “add additional arguments”. Instead they can choose the ones they need.)
Like it is possible to show a diff in a separate buffer, that is of course also possible for logs. To do so press l to show the log popup, which looks like this:

After choosing what log you want to see, that log is shown in the actual log buffer, which looks quite similar to what you would get on the command line. Here is an example of the “show all branches” variant (notice the arguments displayed at the top):
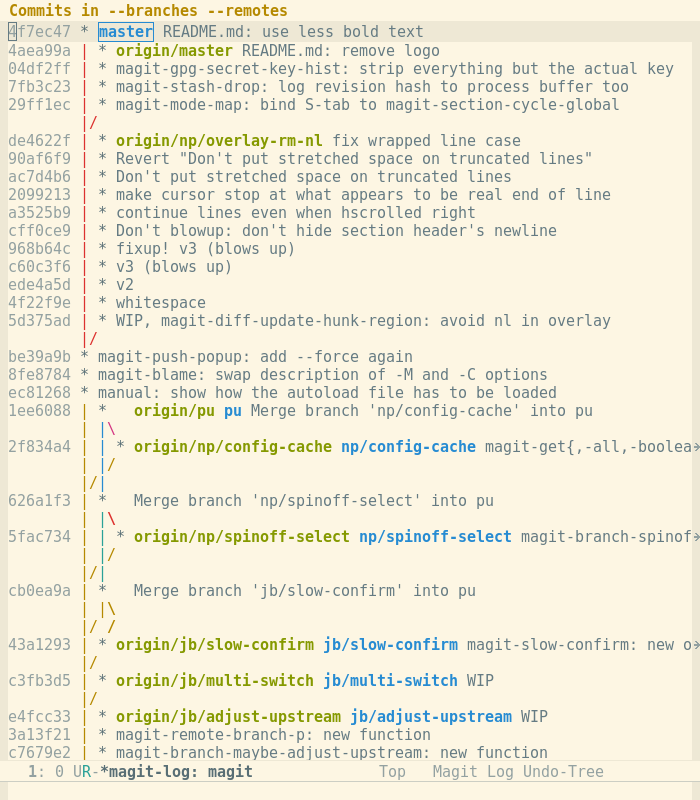
Things get more interesting once you press RET to show the commit at point in a separate buffer. Actually in this case it is better to press SPC, which displays the same buffer but the current log buffer remains the current buffer. If you now move through the log buffer using C-p and C-n, the commit buffer is automatically updated to show the commit which the cursor is on in the log buffer.
As we have seen, Magit provides commands that allow invoking certain
variant of Git commands without having to remember and type many
arguments. The “show diff for staged” changes, for example, is such
command that saves you from having to remember and type --cached.
That, while useful, isn’t all that innovative by itself. Also many
experienced users of the Git command line have probably created
aliases for that sort of thing by now.
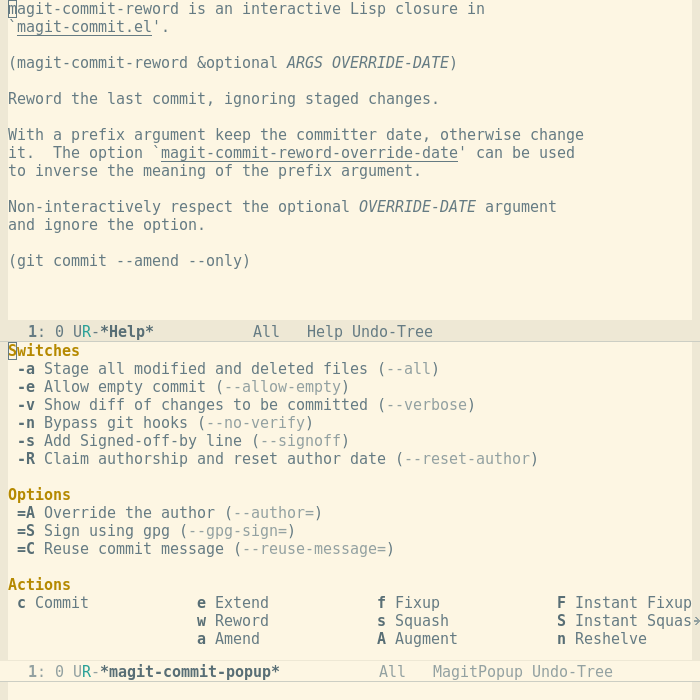
But Magit also provides many truly innovative commands which go beyond what you could do with aliases. These include, among others, commands for committing, rebasing, stashing, and branching.
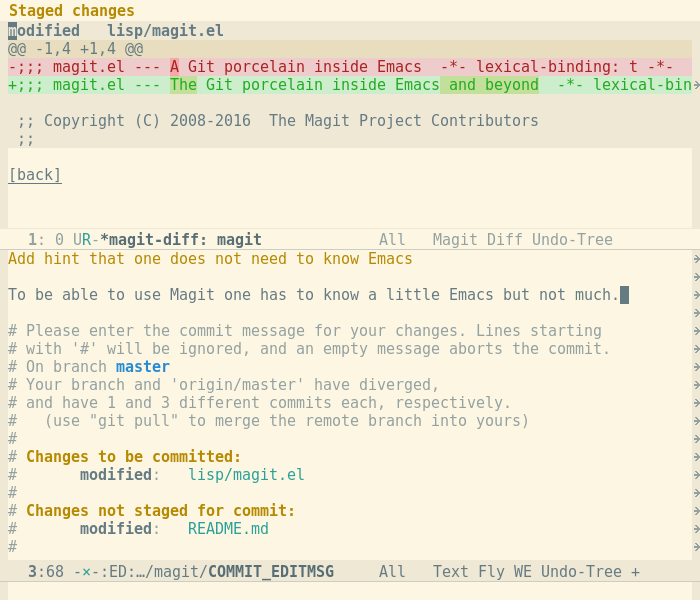
Press c to show the committing popup and then c to
create a regular new commit. This calls git commit and arranges for
the current Emacs session to be used as the $GIT_EDITOR. The commit
message buffer is opened in one buffer, and another buffer shows the
changes about to be committed. When done, press C-c C-c.
You can also amend to HEAD by pressing a. This is just like
git commit --amend. While editing the message while amending, press
C-c C-d to toggle between showing only the changes that are
being added to HEAD and all changes that will make it into the amended
commit.
There are also fixup and squash variants. And then there are some variants that don’t exist in Git. Because the terms used here do not correspond to terms you might be familiar with from Git, this might be a good time to show you how to get more information about a popup action or argument. To show information about the “reword” variant, type ? and then w, which gives you this:
So “reword” lets you change HEAD’s message without adding any
changes to it. Similarly “extend” adds the staged changes without
forcing you to review the message, which is quite useful for simple
typo fixes.
“Instant fixup and squash” let you pick a commit to be modified with
the staged changes, but then they immediately initiate a rebase.
“Instand fixup” is mostly like “extend” but on commits other than
HEAD.
The commit to be modified is picked using a specialized log buffer.
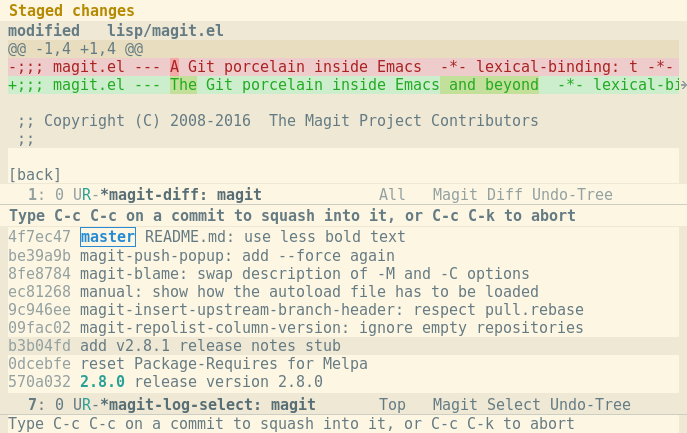
The rebasing popup also provides a variety of commands that are unique to Magit.
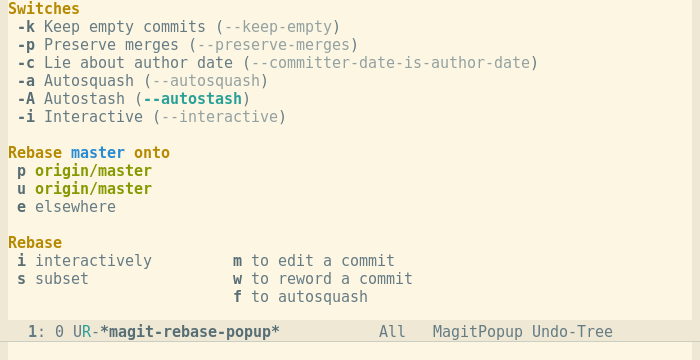
There is one variant which lets you edit a single commit, without having to go through a list of commits to be rebased. Simply go to the commit you want to rebase in any log (of course including the log of unpushed commits in the status buffer), press r to enter the rebase popup, and then m to modify that commit. Likewise there is a variant which allows only editing the message of a single commit.
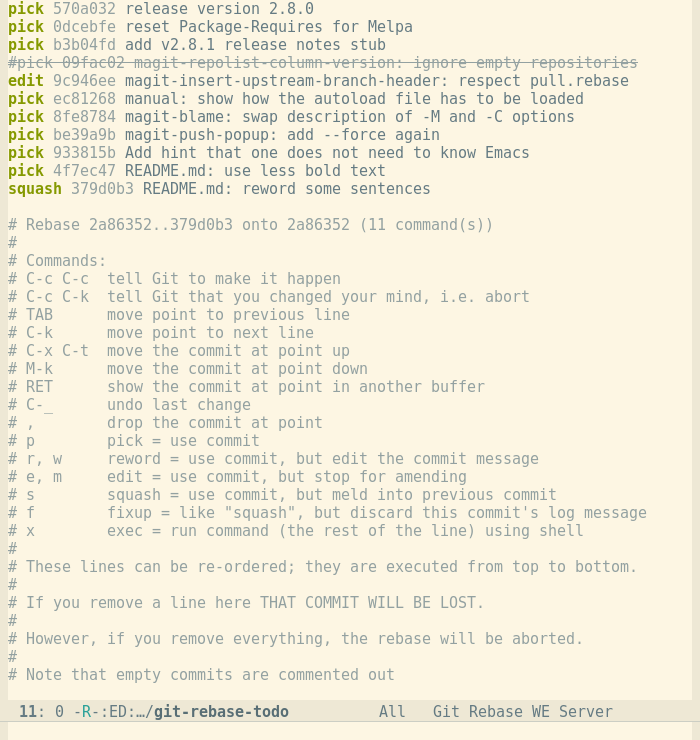
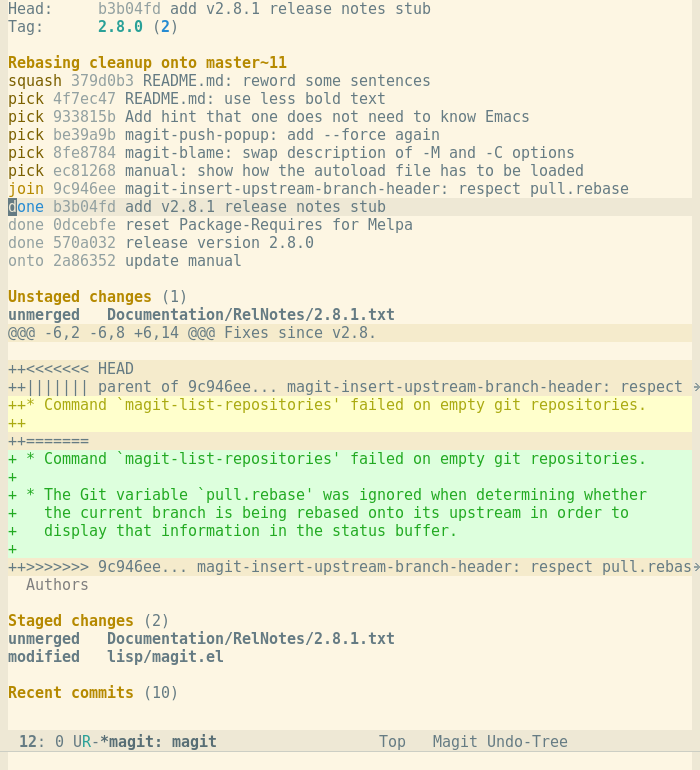
When performing an interactive rebase (which is supposed to affect more
than a single commit), then this is done as usual by editing the file
git-rebase-todo, but Magit makes a few additional key bindings and
other convenience features available:
When a rebase sequence is in progress, then a log-like section with information about the rebase is shown in the status buffer. Like in a regular log, you can of course perform various actions on the listed commits, like viewing them. And of course conflicts are shown too.
You can resolve the conflict by visiting the file. After pressing RET on a conflict hunk you would see something like this:
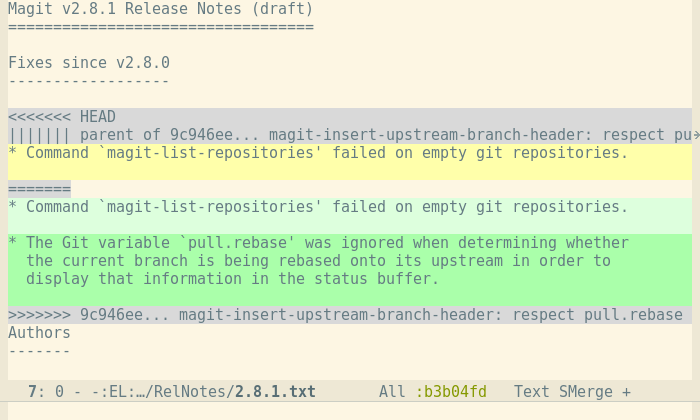
There you can use the Smerge package to do so in style, or you can just edit the file. You can also use the Ediff package, which shows the two sides and optionally the common ancestor in separate windows. Magit wraps the features provided by these packages, but since they are not actually part of Magit, we skip looking at them in detail.
Of course you could also abort the rebase by pressing r again and then a:

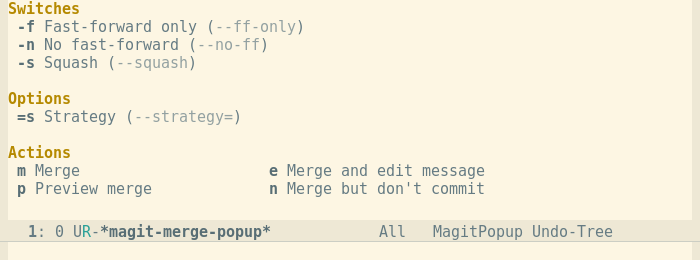
The merging popup is quite simple.
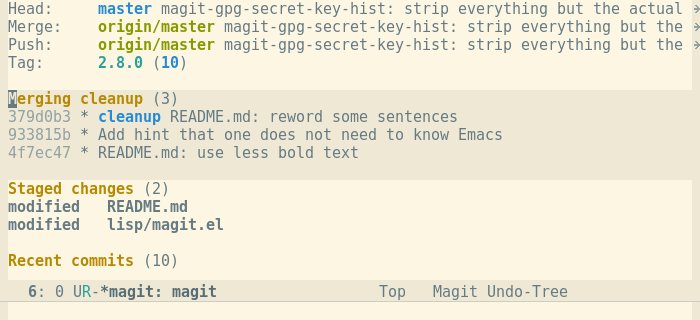
When a merge is in progress, then the status buffer shows information about that:
Without going into any details, here are the popups for fetching, pulling and pushing.
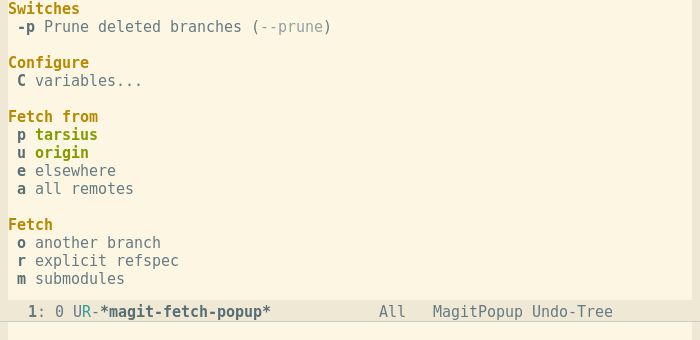
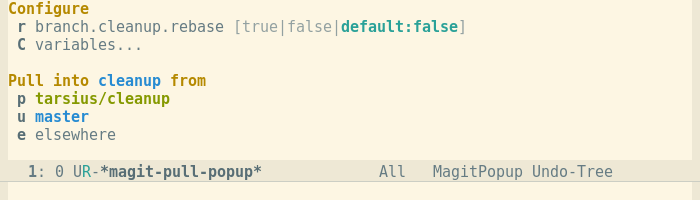
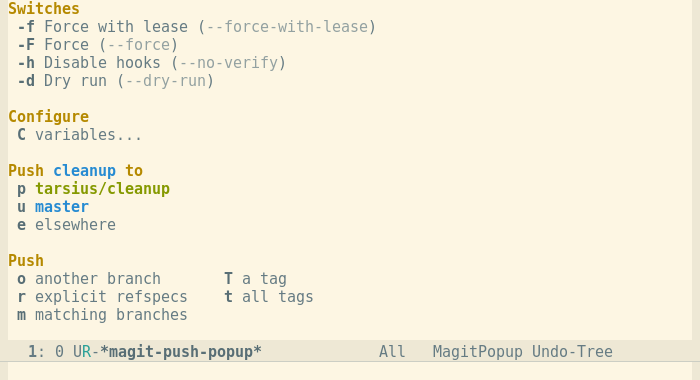
One thing worth noting though is that all of these popups feature a “push-remote”, an “upstream”, and an “elsewhere” variant. A branch’s “push-remote” is somewhat similar to the “upstream”, but it usually is a different branch. The “push-remote” is actually a Git feature, but not many Git users know about it because it is hardly documented. To learn more about the “push-remote” and how it is different from the “upstream”, see this
The branching popup is used to edit, create, and/or checkout a branch.
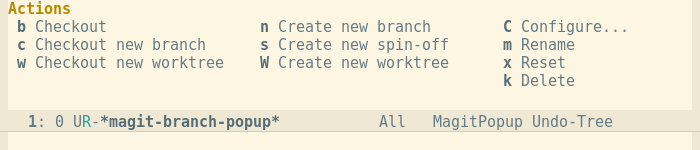
The “create new spin-off” variant is particularly interesting. It
creates and checks out a new branch whose upstream is the previously
checked out branch. Then it rewinds that branch to its upstream.
This is useful when you began working on some new feature directly on
master and then realize that you should be using a feature branch.
The branching popup is also one of the few popups that have a sub-popup. Press C to show the branch configuration popup.
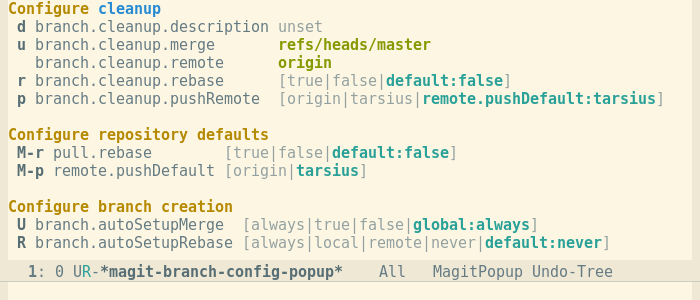
In that popup you can see the values of some important Git variables concerning the current branch. The values obviously can be changed using the shown keys.

Footnotes:
C-x g is actually only the recommended binding for the
command magit-status. To use this binding add (global-set-key
(kbd "C-x g") 'magit-status) to the init file ~/.emacs.d/init.el. ↩