In June 2019, Prisma 2 Preview was released. Prisma 1 changed the way we interact with databases. We could access databases through plain JavaScript methods and objects without having to write the query in the database language itself. Prisma 1 acted as an abstraction in front of the database so it was easier to make CRUD (create, read, update and delete) applications.
Prisma 1 architecture looked like this:
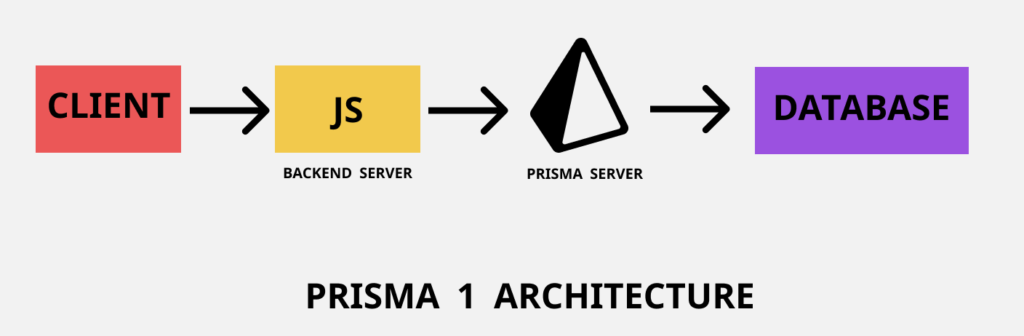
Notice that there’s an additional Prisma server required for the back end to access the database. The latest version doesn’t require an additional server. It’s called The Prisma Framework (formerly known as Prisma 2) which is a complete rewrite of Prisma. The original Prisma was written in Scala, so it had to be run through JVM and needed an additional server to run. It also had memory issues.
The Prisma Framework is written in Rust so the memory footprint is low. Also, the additional server required while using Prisma 1 is now bundled with the back end, so you can use it just like a library.
The Prisma Framework consists of three standalone tools:
- Photon: a type-safe and auto-generated database client (“ORM replacement”)
- Lift: a declarative migration system with custom workflows
- Studio: a database IDE that provides an Admin UI to support various database workflows.
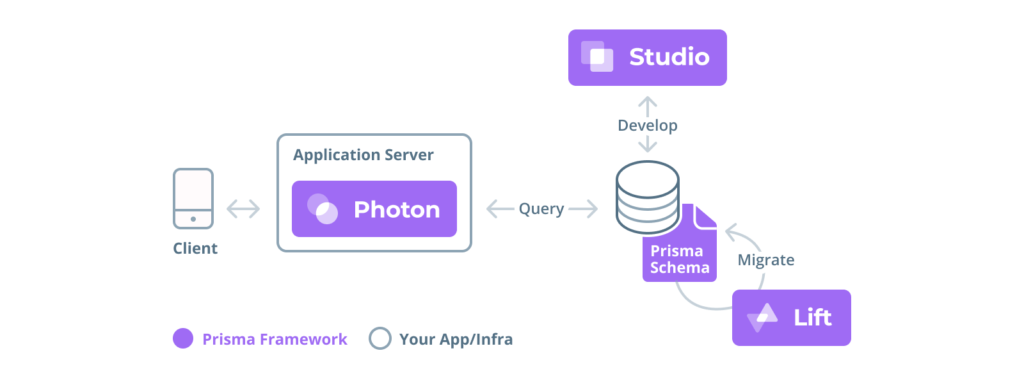
Photon is a type-safe database client that replaces traditional ORMs, and Lift allows us to create data models declaratively and perform database migrations. Studio allows us to perform database operations through a beautiful Admin UI.
Why use Prisma?
Prisma removes the complexity of writing complex database queries and simplifies database access in the application. By using Prisma, you can change the underlying databases without having to change each and every query. It just works. Currently, it only supports mySQL, SQLite and PostgreSQL.
Prisma provides type-safe database access provided by an auto-generated Prisma client. It has a simple and powerful API for working with relational data and transactions. It allows visual data management with Prisma Studio.
Providing end-to-end type-safety means developers can have confidence in their code, thanks to static analysis and compile-time error checks. The developer experience increases drastically when having clearly defined data types. Type definitions are the foundation for IDE features — like intelligent auto-completion or jump-to-definition.
Prisma unifies access to multiple databases at once (coming soon) and therefore drastically reduces complexity in cross-database workflows (coming soon).
It provides automatic database migrations (optional) through Lift, based on a declarative datamodel expressed using GraphQL’s schema definition language (SDL).
Prerequisites
For this tutorial, you need a basic knowledge of React. You also need to understand React Hooks.
Since this tutorial is primarily focused on Prisma, it’s assumed that you already have a working knowledge of React and its basic concepts.
If you don’t have a working knowledge of the above content, don’t worry. There are tons of tutorials available that will prepare you for following this post.
Throughout the course of this tutorial, we’ll be using yarn. If you don’t have yarn already installed, install it from here.
To make sure we’re on the same page, these are the versions used in this tutorial:
- Node v12.11.1
- npm v6.11.3
- npx v6.11.3
- yarn v1.19.1
- prisma2 v2.0.0-preview016.2
- react v16.11.0
Folder Structure
Our folder structure will be as follows:
streaks-app/
  client/
  server/
The client/ folder will be bootstrapped from create-react-app while the server/ folder will be bootstrapped from prisma2 CLI.
So you just need to create a root folder called streaks-app/ and the subfolders will be generated while scaffolding it with the respective CLIs. Go ahead and create the streaks-app/ folder and cd into it as follows:
$ mkdir streaks-app && cd $_
The Back End (Server Side)
Bootstrap a new Prisma 2 project
You can bootstrap a new Prisma 2 project by using the npx command as follows:
$ npx prisma2 init server
Alternatively, you can install prisma2 CLI globally and run the init command. The do the following:
$ yarn global add prisma2 // or npm install --global prisma2
$ prisma2 init server
Run the interactive prisma2 init flow & select boilerplate
Select the following in the interactive prompts:
- Select Starter Kit
- Select JavaScript
- Select GraphQL API
- Select SQLite
Once terminated, the init command will have created an initial project setup in the server/ folder.
Now open the schema.prisma file and replace it with the following:
generator photon {
 provider = "photonjs"
}

datasource db {
 provider = "sqlite"
 url = "file:dev.db"
}

model Habit {
 id String @default(cuid()) @id
 name String @unique
 streak Int
}
schema.prisma contains the data model as well as the configuration options.
Here, we specify that we want to connect to the SQLite datasource called dev.db as well as target code generators like photonjs generator.
Then we define the data model Habit, which consists of id, name and streak.
id is a primary key of type String with a default value of cuid().
name is of type String, but with a constraint that it must be unique.
streak is of type Int.
The seed.js file should look like this:
const { Photon } = require('@generated/photon')
const photon = new Photon()

async function main() {
  const workout = await photon.habits.create({
    data: {
      name: 'Workout',
      streak: 49,
    },
  })
  const running = await photon.habits.create({
    data: {
      name: 'Running',
      streak: 245,
    },
  })
  const cycling = await photon.habits.create({
    data: {
      name: 'Cycling',
      streak: 77,
    },
  })
  const meditation = await photon.habits.create({
    data: {
      name: 'Meditation',
      streak: 60,
    },
  })
  console.log({
    workout,
    running,
    cycling,
    meditation,
  })
}

main()
  .catch(e => console.error(e))
  .finally(async () => {
    await photon.disconnect()
  })
This file creates all kinds of new habits and adds it to the SQLite database.
Now go inside the src/index.js file and remove its contents. We’ll start adding content from scratch.
First go ahead and import the necessary packages and declare some constants:
const { GraphQLServer } = require('graphql-yoga')
const {
 makeSchema,
 objectType,
 queryType,
 mutationType,
 idArg,
 stringArg,
} = require('nexus')
const { Photon } = require('@generated/photon')
const { nexusPrismaPlugin } = require('nexus-prisma')
Now let’s declare our Habit model just below it:
const Habit = objectType({
  name: 'Habit',
  definition(t) {
    t.model.id()
    t.model.name()
    t.model.streak()
  },
})
We make use of objectType from the nexus package to declare Habit.
The name parameter should be the same as defined in the schema.prisma file.
The definition function lets you expose a particular set of fields wherever Habit is referenced. Here, we expose id, name and streak field.
If we expose only the id and name fields, only those two will get exposed wherever Habit is referenced.
Below that, paste the Query constant:
const Query = queryType({
  definition(t) {
    t.crud.habit()
    t.crud.habits()

    // t.list.field('habits', {
    //   type: 'Habit',
    //   resolve: (_, _args, ctx) => {
    //     return ctx.photon.habits.findMany()
    //   },
    // })
  },
})
We make use of queryType from the nexus package to declare Query.
The Photon generator generates an API that exposes CRUD functions on the Habit model. This is what allows us to expose t.crud.habit() and t.crud.habits() method.
t.crud.habit() allows us to query any individual habit by its id or by its name. t.crud.habits() simply returns all the habits.
Alternatively, t.crud.habits() can also be written as:
t.list.field('habits', {
  type: 'Habit',
  resolve: (_, _args, ctx) => {
    return ctx.photon.habits.findMany()
  },
})
Both the above code and t.crud.habits() will give the same results.
In the above code, we make a field named habits. The return type is Habit. We then call ctx.photon.habits.findMany() to get all the habits from our SQLite database.
Note that the name of the habits property is auto-generated using the pluralize package. It’s therefore recommended practice to name our models singular — that is, Habit and not Habits.
We use the findMany method on habits, which returns a list of objects. We find all the habits as we have mentioned no condition inside of findMany. You can learn more about how to add conditions inside of findMany here.
Below Query, paste Mutation as follows:
const Mutation = mutationType({
  definition(t) {
    t.crud.createOneHabit({ alias: 'createHabit' })
    t.crud.deleteOneHabit({ alias: 'deleteHabit' })

    t.field('incrementStreak', {
      type: 'Habit',
      args: {
        name: stringArg(),
      },
      resolve: async (_, { name }, ctx) => {
        const habit = await ctx.photon.habits.findOne({
          where: {
            name,
          },
        })
        return ctx.photon.habits.update({
          data: {
            streak: habit.streak + 1,
          },
          where: {
            name,
          },
        })
      },
    })
  },
})
Mutation uses mutationType from the nexus package.
The CRUD API here exposes createOneHabit and deleteOneHabit.
createOneHabit, as the name suggests, creates a habit whereas deleteOneHabit deletes a habit.
createOneHabit is aliased as createHabit, so while calling the mutation we call createHabit rather than calling createOneHabit.
Similarly, we call deleteHabit instead of deleteOneHabit.
Finally, we create a field named incrementStreak, which increments the streak of a habit. The return type is Habit. It takes an argument name as specified in the args field of type String. This argument is received in the resolve function as the second argument. We find the habit by calling ctx.photon.habits.findOne() while passing in the name parameter in the where clause. We need this to get our current streak. Then finally we update the habit by incrementing the streak by 1.
Below Mutation, paste the following:
const photon = new Photon()

new GraphQLServer({
  schema: makeSchema({
    types: [Query, Mutation, Habit],
    plugins: [nexusPrismaPlugin()],
  }),
  context: { photon },
}).start(() =>
  console.log(
    `🚀 Server ready at: http://localhost:4000\n⭐️ See sample queries: http://pris.ly/e/js/graphql#5-using-the-graphql-api`,
  ),
)

module.exports = { Habit }
We use the makeSchema method from the nexus package to combine our model Habit, and add Query and Mutation to the types array. We also add nexusPrismaPlugin to our plugins array. Finally, we start our server at localhost:4000. Port 4000 is the default port for graphql-yoga. You can change the port as suggested here.
Let’s start the server now. But first, we need to make sure our latest schema changes are written to the node_modules/@generated/photon directory. This happens when you run prisma2 generate.
If you haven’t installed prisma2 globally, you’ll have to replace prisma2 generate with ./node_modules/.bin/prisma2 generate. Then we need to migrate our database to create tables.
Migrate your database with Lift
Migrating your database with Lift follows a 2-step process:
- Save a new migration (migrations are represented as directories on the file system)
- Run the migration (to migrate the schema of the underlying database)
In CLI commands, these steps can be performed as follows (the CLI steps are in the process of being updated to match):
$ prisma2 lift save --name 'init'
$ prisma2 lift up
Again, you’d have to replace prisma2 with ./node_modules/.bin/prisma2 if you haven’t installed it globally.
Now the migration process is done. We’ve successfully created the table. Now we can seed our database with initial values.
Go ahead and run the following command in the terminal:
$ yarn seed
This will seed our database with eight habits, as specified in our seed.js file.
Now you can run the server by typing:
$ yarn dev
This will run your server at localhost:4000, which you can open and query all the APIs you’ve made.
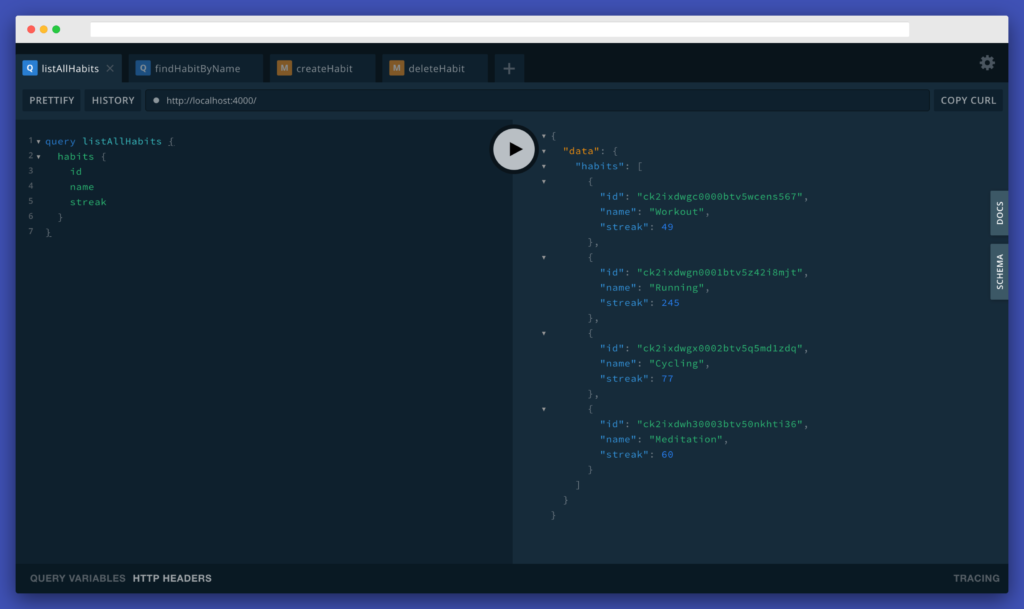
List all habits
query habits {
  habits {
    id
    name
    streak
  }
}
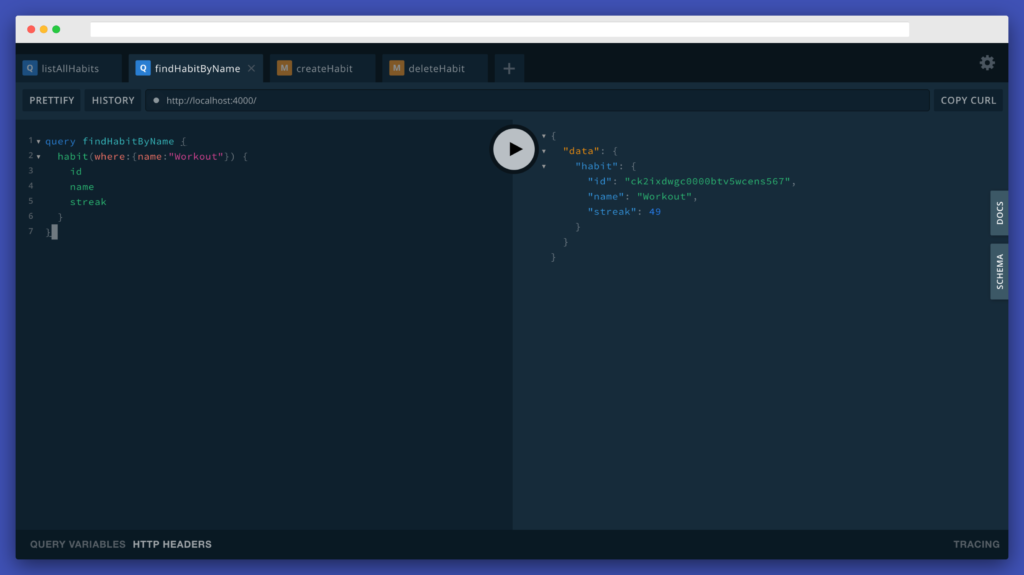
Find habit by name
query findHabitByName {
  habit(where: { name: "Workout" }) {
    id
    name
    streak
  }
}
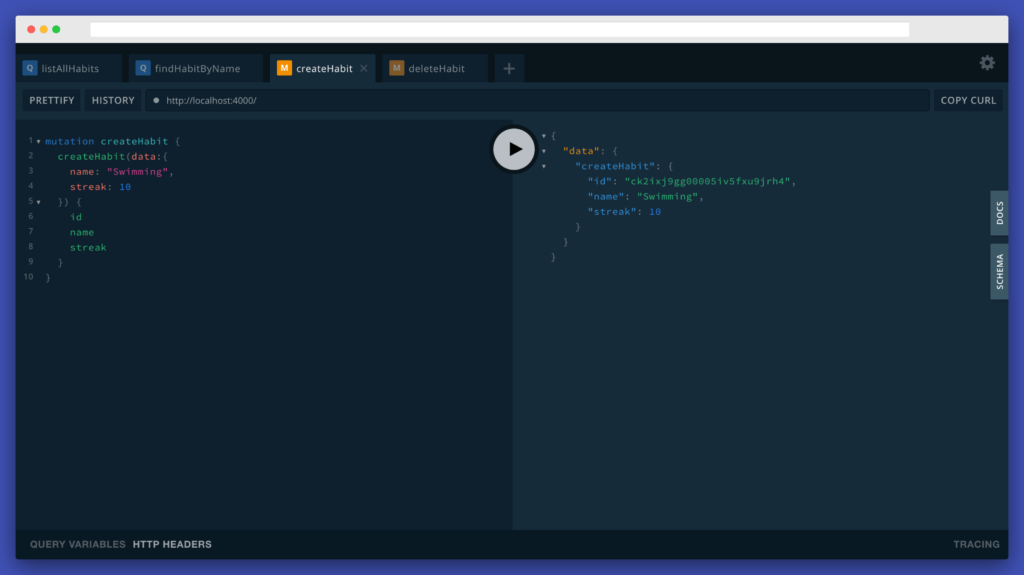
Create habit
mutation createHabit {
  createHabit(data: { name: "Swimming", streak: 10 }) {
    id
    name
    streak
  }
}
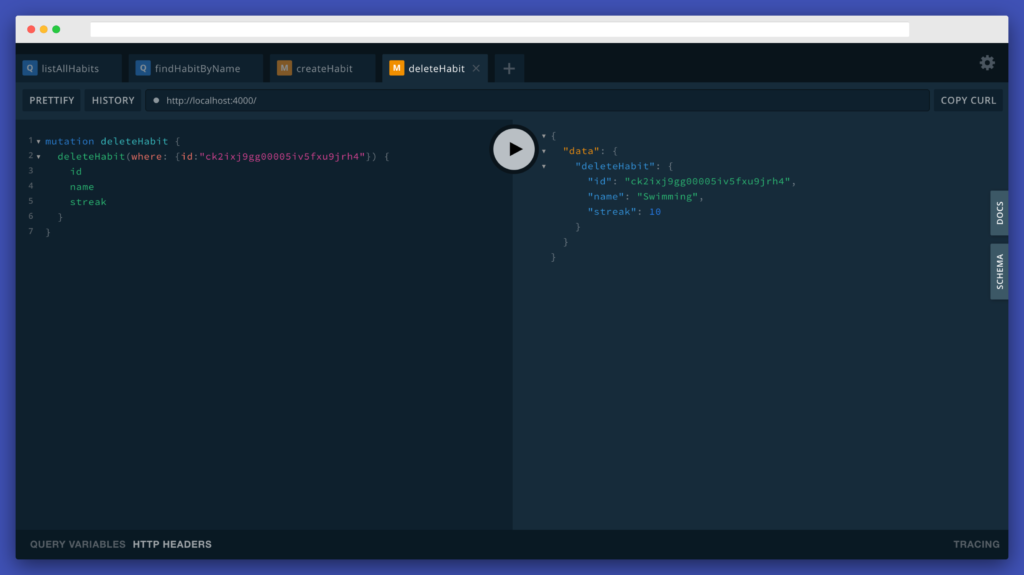
Delete habit
mutation deleteHabit {
  deleteHabit(where: { id: "ck2kinq2j0001xqv5ski2byvs" }) {
    id
    name
    streak
  }
}
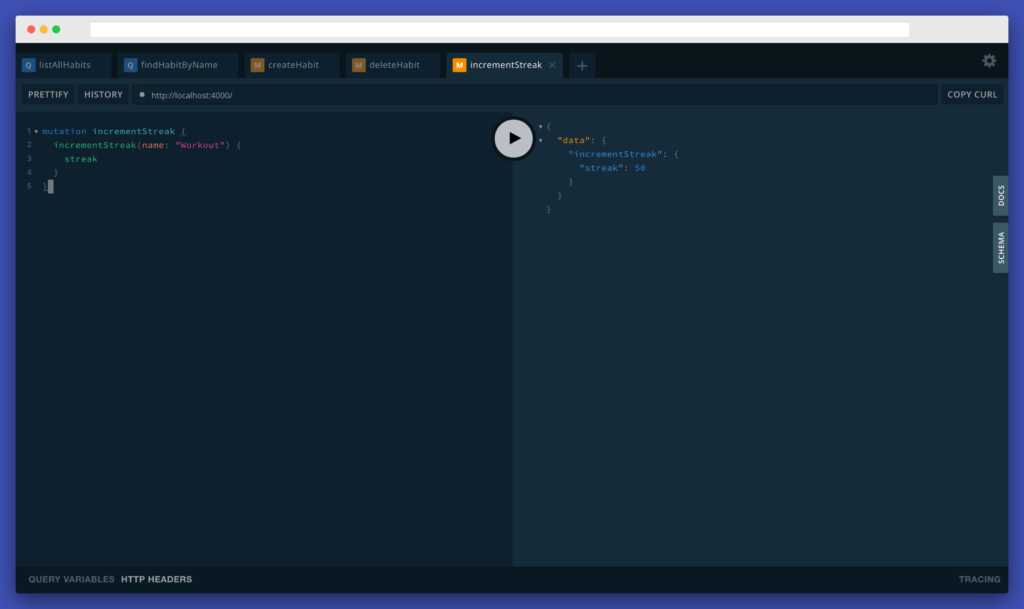
Increment streak
mutation incrementStreak {
  incrementStreak(name: "Workout") {
    streak
  }
}
This is all we need for the back end. Let’s work on the front end now.
Front End (Client Side)
Bootstrap a new React project
Bootstrap a new React project by using create-react-app. Use npx to bootstrap a new project without having to install create-react-app globally by doing the following:
$ npx create-react-app client
Alternatively, you can install create-react-app globally and bootstrap a new React Project, then do this:
$ yarn global add create-react-app // or npm install --global create-react-app
$ create-react-app client
This bootstraps a new React project using create-react-app.
Now go into the client/ directory, run the project, and type this:
$ cd client
$ yarn start
This will run the client side on localhost:3000.
It should now look like this:

Now go into the src/ directory and remove unneeded files like App.css, App.test.js, index.css and logo.svg:
$ cd src
$ rm App.css App.test.js index.css logo.svg
Remove the references to the removed files from index.js and App.js.
index.js should now look like this:
import React from "react";
import ReactDOM from "react-dom";
import App from "./App";
import * as serviceWorker from "./serviceWorker";

ReactDOM.render(<App />, document.getElementById("root"));

// If you want your app to work offline and load faster, you can change
// unregister() to register() below. Note this comes with some pitfalls.
// Learn more about service workers: https://bit.ly/CRA-PWA
serviceWorker.unregister();
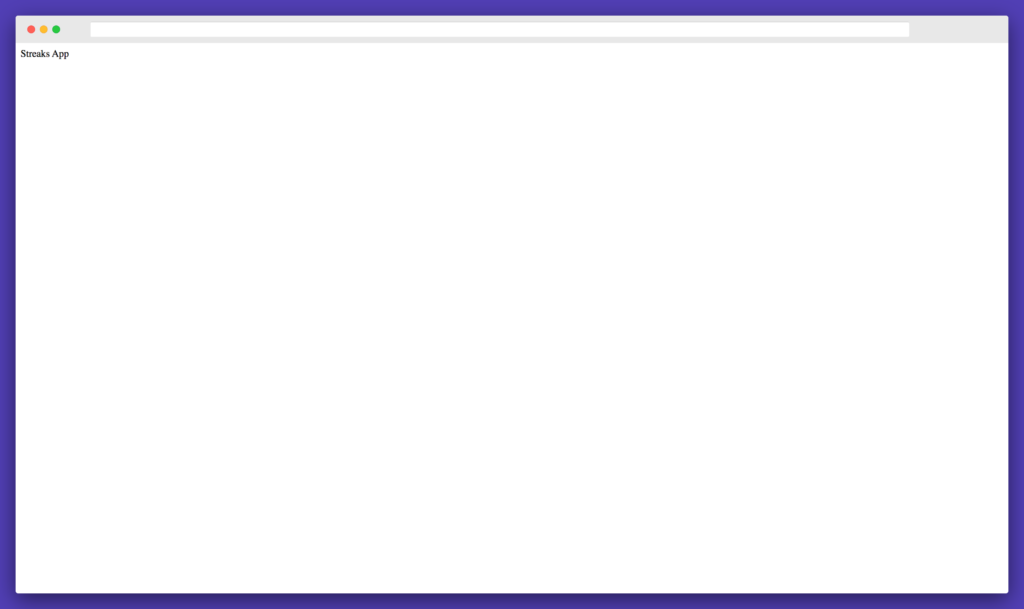
And make sure your App.js looks like this:
import React from 'react'

function App() {
 return <div>Streaks App</div>
}

export default App
urql: Universal React Query Language
Go ahead and first install urql, which is an alternative of Apollo Client. We also need to install graphql, as it’s a peer dependency of urql. You can do so by typing the following command in the terminal:
$ cd .. // come out of the 'src/' directory and into the 'client/' directory
$ yarn add urql graphql
Now connect urql to the Prisma GraphQL back end by changing App.js to the following:
import React from 'react'
import { createClient, Provider } from 'urql'

const client = createClient({
  url: 'http://localhost:4000/'
})

const App = () => (
  <Provider value={client}>
    <div>Streaks App</div>
  </Provider>
)

export default App
Here, we use urql‘s createClient function by passing in our back-end url and then passing it as a value prop to the Provider component. This allows us to query, mutate or subscribe to any component which is the child of the Provider component.
It should now look like this:
Chakra UI
In this tutorial, we’ll be using Chakra UI as our component library to make beautiful applications faster. This is a different kind of component library built for accessibility and speed in mind. It is completely themeable and composable. To install it, type the following in the terminal:
$ yarn add @chakra-ui/core @emotion/core @emotion/styled emotion-theming
Chakra uses Emotion under the hood, so we need to install it and its peer dependencies.
In this tutorial, we also need graphql-tag to parse our GraphQL queries, react-icons to show beautiful icons, @seznam/compose-react-refs to compose multiple refs and react-hook-form to create Forms.
Make sure to install them as well by typing the following in the terminal:
$ yarn add graphql-tag react-icons @seznam/compose-react-refs react-hook-form
Now go ahead and change App.js to the following:
import { Text, ThemeProvider } from '@chakra-ui/core'
import React from 'react'
import { createClient, Provider } from 'urql'

const client = createClient({
  url: 'http://localhost:4000/'
})

const App = () => (
  <Provider value={client}>
    <ThemeProvider>
      <>
        <Text fontSize='5xl' textAlign='center'>
          Streaks App
        </Text>
      </>
    </ThemeProvider>
  </Provider>
)

export default App
We imported Text and ThemeProvider from @chakra-ui/core.
Text component is used to render text and paragraphs within an interface. It renders a <p> tag by default.
We make our Text components fontSize as 5xl and we align it to the center.
We also wrap the whole thing inside ThemeProvider. ThemeProvider lets us add a theme to our application by passing in the theme object as a prop. Chakra UI comes with a default theme which we see if we wrap ThemeProvider on top of our components. The layout now looks like this:
Try removing ThemeProvider to see how it affects the layout. It looks like this:
Put it back in. Now, let’s code our application.
Now go ahead and create a components and a graphql folder:
$ mkdir components graphql
Go inside the graphql folder and create files named createHabit.js, deleteHabit.js, incrementStreak.js, listAllHabits.js and index.js.
$ cd graphql
$ touch createHabit.js deleteHabit.js incrementStreak.js listAllHabits.js index.js
List all habits query
Open up listAllHabits.js and paste the following:
import gql from 'graphql-tag'

export const LIST_ALL_HABITS_QUERY = gql`
  query listAllHabits {
    habits {
      id
      name
      streak
    }
  }
`
Notice that the above query is similar to what we typed in the GraphiQL editor. This is how GraphQL is used. First, we type the query or mutation in the GraphiQL editor and see if it gives the data that we need and then we just copy-paste it into the application.
Create habit mutation
Inside createHabit.js, paste the following:
import gql from 'graphql-tag'

export const CREATE_HABIT_MUTATION = gql`
  mutation createHabit($name: String!, $streak: Int!) {
    createHabit(data: { name: $name, streak: $streak }) {
      id
      name
      streak
    }
  }
`
Again we have copied the mutation from our GraphiQL editor above. The main difference is we have replaced the hardcoded value with a variable noted by $ so we can type in whatever user has specified. The above mutation will be used to create a habit.
Delete habit mutation
Paste the following in deleteHabit.js:
import gql from 'graphql-tag'

export const DELETE_HABIT_MUTATION = gql`
  mutation deleteHabit($id: ID!) {
    deleteHabit(where: { id: $id }) {
      id
      name
      streak
    }
  }
`
The above mutation will be used to delete a habit.
Increment streak mutation
Paste the following in incrementStreak.js:
import gql from 'graphql-tag'

export const INCREMENT_STREAK_MUTATION = gql`
  mutation incrementStreak($name: String) {
    incrementStreak(name: $name) {
      streak
    }
  }
`
The above mutation will be used to increment the streak of a given habit.
Finally, to make it easy to import everything from one file, paste the following in index.js:
export * from './createHabit'
export * from './deleteHabit'
export * from './incrementStreak'
export * from './listAllHabits'
This lets us import stuff from a single file instead of four different files. This is beneficial when we have 10s of queries and mutations.
Now go inside of components/ directory and create files named CreateHabit.js, DeleteHabit.js, Habit.js, ListAllHabits.js and index.js.
$ cd ../components/
$ touch CreateHabit.js DeleteHabit.js Habit.js ListAllHabits.js index.js
We will touch the rest of the files later in this tutorial, but for now open up index.js and paste the following:
export * from './Common/Error'
export * from './Common/Loading'
export * from './CreateHabit'
export * from './DeleteHabit'
export * from './Habit'
export * from './ListAllHabits'
Now create a Common/ folder and inside that create Loading.js and Error.js:
$ mkdir Common && cd $_
$ touch Loading.js Error.js
cd $_ allows us to go inside the Common directory immediately after it’s created. Then we create Loading.js and Error.js inside it.
Now create a utils/ folder inside the src/ directory with two files inside it — getIcon.js and index.js:
$ cd ../../
$ mkdir utils/ && cd $_
$ touch getIcon.js index.js
Create icons for habits
Now open up getIcon.js and paste the following:
import { AiOutlineQuestion } from 'react-icons/ai'
import { FaCode, FaRunning, FaSwimmer } from 'react-icons/fa'
import { FiPhoneCall } from 'react-icons/fi'
import {
  GiCycling,
  GiMeditation,
  GiMuscleUp,
  GiTennisRacket,
} from 'react-icons/gi'
import { MdSmokeFree } from 'react-icons/md'

const icons = [
  {
    keywords: ['call', 'phone'],
    pic: FiPhoneCall,
  },
  {
    keywords: ['workout', 'muscle', 'body-building', 'body building'],
    pic: GiMuscleUp,
  },
  {
    keywords: ['cycling', 'cycle'],
    pic: GiCycling,
  },
  {
    keywords: ['running', 'run'],
    pic: FaRunning,
  },
  {
    keywords: ['swimming', 'swim'],
    pic: FaSwimmer,
  },
  {
    keywords: ['racket', 'tennis', 'badminton'],
    pic: GiTennisRacket,
  },
  {
    keywords: [
      'smoke',
      'smoking',
      'no smoking',
      'no-smoking',
      'smoke free',
      'no smoke',
    ],
    pic: MdSmokeFree,
  },
  {
    keywords: ['code', 'code everyday', 'program', 'programming'],
    pic: FaCode,
  },
  {
    keywords: ['meditate', 'meditation'],
    pic: GiMeditation,
  },
]

export const getIcon = name => {
  let icon = AiOutlineQuestion
  for (let i = 0; i < icons.length; i++) {
    const { keywords, pic } = icons[i]
    const lowerCaseName = name.toLowerCase()
    const doesKeywordExistInName = keywords.some(keyword =>
      lowerCaseName.includes(keyword),
    )
    if (doesKeywordExistInName) {
      icon = pic
      break
    }
  }

  return icon
}
This is a helper file that contains a single function named getIcon. It takes in a habit name and returns an appropriate icon. To add more icons, you need to add an object to the icons array with an appropriate keywords and pic, which can be imported from react-icons.
Let’s import this function from index.js so we can easily import it without having to remember the file name. This isn’t required here but it’s helpful when the application gets big.
Open index.js and paste the following one-liner:
export * from './getIcon'
Go ahead and open up Loading.js and paste the following:
import { Flex, Spinner } from '@chakra-ui/core'
import React from 'react'

export const Loading = () => (
  <Flex justify='center' flexWrap='wrap'>
    <Spinner
      thickness='4px'
      speed='0.65s'
      emptyColor='gray.200'
      color='blue.800'
      size='xl'
    />
  </Flex>
)
We show a nice Spinner which we imported from the Chakra UI library. We wrap it in a Flex component which makes it easy to apply Flexbox without having to write CSS. In my opinion, Chakra makes it easy to make beautiful applications faster without having to write custom CSS.
Now open up Error.js and paste the following:
import {
  Alert,
  AlertDescription,
  AlertIcon,
  AlertTitle,
  Flex,
} from '@chakra-ui/core'
import React from 'react'

export const Error = () => (
  <Flex justify='center' flexWrap='wrap'>
    <Alert status='error'>
      <AlertIcon />
      <AlertTitle mr={2}>Whoops,</AlertTitle>
      <AlertDescription>
        there has been an error. Please try again later!
      </AlertDescription>
    </Alert>
  </Flex>
)
Here, we show an error box. You can easily find the above code on the Chakra UI docs. No rocket science here. Just plain old copy-paste.
Display a single habit
Open up Habit.js and paste the following:
import { Badge, Box, Flex, Text } from '@chakra-ui/core'
import React from 'react'
import { useMutation } from 'urql'
import { INCREMENT_STREAK_MUTATION } from '../graphql/index'
import { getIcon } from '../utils/index'

const colors = [
  'tomato',
  'green.400',
  'yellow.300',
  'cornflowerblue',
  'antiquewhite',
  'aquamarine',
  'lightpink',
  'navajowhite',
  'red.500',
  'lightcoral'
]

export const Habit = ({ index, habit }) => {
  const { id, name, streak } = habit
  const bgColor = colors[index % colors.length]
  const [res, executeMutation] = useMutation(INCREMENT_STREAK_MUTATION) // eslint-disable-line no-unused-vars

  return (
    <Flex
      align='center'
      justify='flex-end'
      direction='column'
      bg={bgColor}
      width='300px'
      height='300px'
      borderRadius='40px'
      margin='16px'
      padding='16px'
    >
      <Box as={getIcon(name)} size='144px' />
      <Text fontWeight='hairline' fontSize='3xl' textAlign='center'>
        {name}
        <Badge
          as='span'
          fontWeight='hairline'
          fontSize='xl'
          rounded='full'
          mx='2'
          px='3'
          textTransform='lowercase'
          cursor='pointer'
          onClick={() => executeMutation({ name })}
        >
          {streak}
        </Badge>
      </Text>
    </Flex>
  )
}
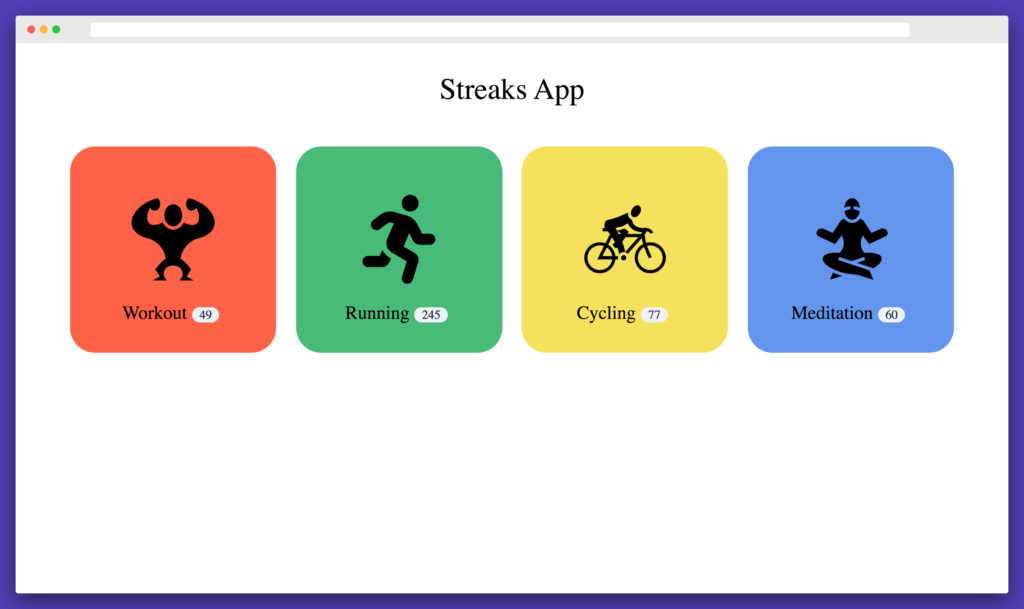
The Habit component displays a single habit with a streak badge. It takes in index and habit. We use index to rotate the background colors of a habit from the colors array. Once the last color is displayed it will go back to the first one.
Inside the Flex component, we display an icon by calling in the Box component with an as prop. The as prop is used to replace the Box component’s default div with anything that is specified in the as prop. So in this case, we’ll replace it with the return value of getIcon, which is an icon from react-icons.
Next up, we display the name inside the Text component and wrap the streak with the Badge component. The streak, when clicked, calls the INCREMENT_STREAK_MUTATION, which we’ve defined above with urql‘s useMutation function. We pass the appropriate habit name to the function so that we can increment that specific habit.
Display a list of habits
Open ListAllHabits.js and paste the following:
import { Flex, Text } from '@chakra-ui/core'
import React from 'react'
import { useQuery } from 'urql'
import { LIST_ALL_HABITS_QUERY } from '../graphql/index'
import { Error, Habit, Loading } from './index'

export const ListAllHabits = () => {
  const [{ fetching, error, data }] = useQuery({ query: LIST_ALL_HABITS_QUERY })

  if (fetching) return <Loading />
  if (error) return <Error />
  const noHabits = !data.habits.length

  return (
    <Flex
      justify='center'
      align='center'
      flexWrap='wrap'
      flexDirection={noHabits ? 'column' : 'row'}
    >
      {noHabits && (
        <Text fontWeight='bold' fontSize='3xl' color='tomato'>
          You currently track 0 habits. Add one.
        </Text>
      )}
      {data.habits.map((habit, i) => (
        <Habit key={habit.id} index={i} habit={habit} />
      ))}
    </Flex>
  )
}
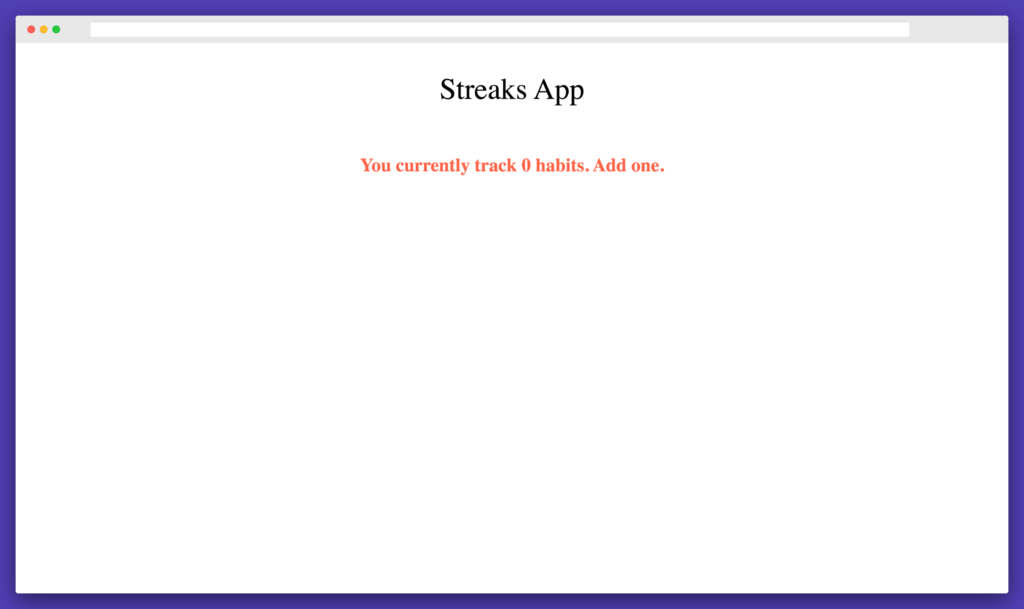
Here, we fetch all habits by calling in urql‘s useQuery function by passing in LIST_ALL_HABITS_QUERY. It gives back fetching, error and data.
When fetching is true, we display the Loading component, which shows Spinner.
When error is true, we display the Error component, which displays an Alert.
Later, we check if there exist any habits, and if there aren’t any habits then we display You currently track 0 habits. Add one.
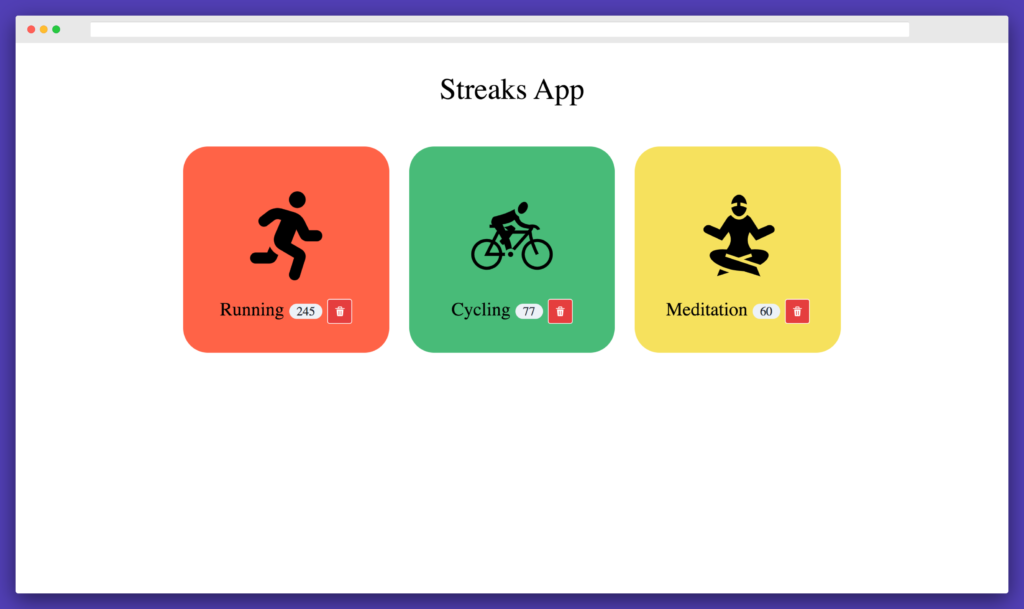
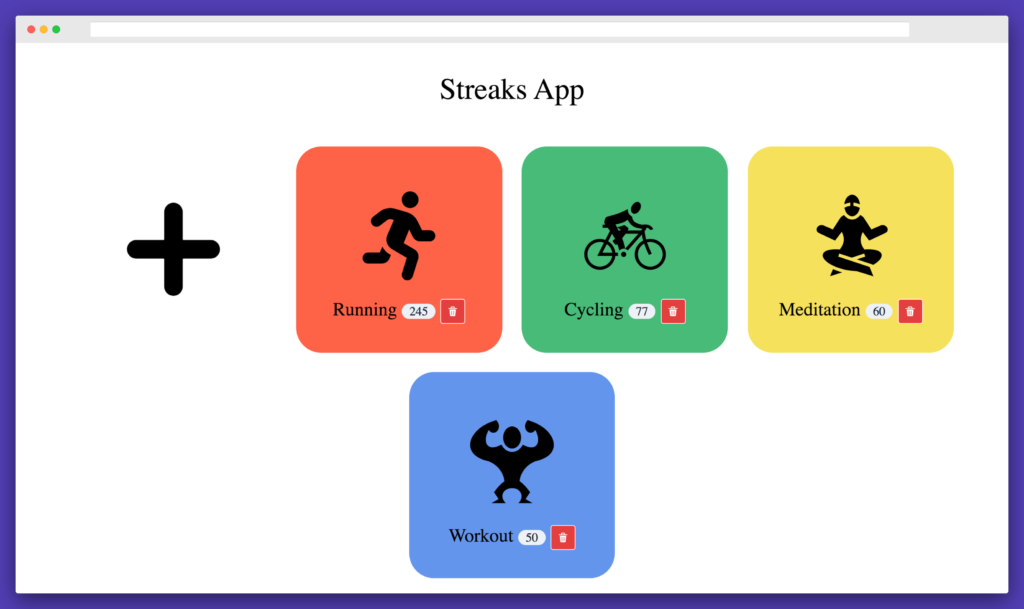
If we have any habits, we display them so it looks like this:
Try clicking on the streak badge to see it increase.
Delete a habit
Now, go ahead and open up DeleteHabit.js and paste the following:
import {
  AlertDialog,
  AlertDialogBody,
  AlertDialogContent,
  AlertDialogFooter,
  AlertDialogHeader,
  AlertDialogOverlay,
  Button,
  IconButton,
} from '@chakra-ui/core'
import React from 'react'
import { useMutation } from 'urql'
import { DELETE_HABIT_MUTATION } from '../graphql/index'

export const DeleteHabit = ({ id, name }) => {
  const [isOpen, setIsOpen] = React.useState()
  const onClose = () => setIsOpen(false)
  const cancelRef = React.useRef()

  const [res, executeMutation] = useMutation(DELETE_HABIT_MUTATION) // eslint-disable-line no-unused-vars

  const deleteHabit = () => {
    executeMutation({ id })
    onClose()
  }
  return (
    <>
      <IconButton
        variantColor='red'
        border='1px solid white'
        aria-label='Delete Habit'
        size='md'
        icon='delete'
        cursor='pointer'
        onClick={() => setIsOpen(true)}
      />
      <AlertDialog
        isOpen={isOpen}
        leastDestructiveRef={cancelRef}
        onClose={onClose}
      >
        <AlertDialogOverlay />
        <AlertDialogContent>
          <AlertDialogHeader fontSize='lg' fontWeight='bold'>
            Delete “{name}” Habit
          </AlertDialogHeader>

          <AlertDialogBody>
            Are you sure? You can't undo this action afterwards.
          </AlertDialogBody>

          <AlertDialogFooter>
            <Button ref={cancelRef} onClick={onClose}>
              Cancel
            </Button>
            <Button variantColor='red' onClick={deleteHabit} ml={3}>
              Delete
            </Button>
          </AlertDialogFooter>
        </AlertDialogContent>
      </AlertDialog>
    </>
  )
}
Most of this code is grabbed from Chakra UI’s AlertDialog. The main objective of this component is to show a trash icon when clicked alerts a modal with two buttons Cancel and Delete. On clicking Cancel, it calls the onClose function, which makes the modal disappear, and on clicking Delete it calls the deleteHabit function.
The deleteHabit function calls the DELETE_HABIT_MUTATION while passing it the id it gets from the parent component and closes the modal by calling onClose.
Now again open up Habit.js and add the following import to the top:
import { DeleteHabit } from './index'
And now just below closing Badge component, add the following code:
<DeleteHabit id={id} name={name} />
The whole Habit.js file should now look like this:
import { Badge, Box, Flex, Text } from '@chakra-ui/core'
import React from 'react'
import { useMutation } from 'urql'
import { INCREMENT_STREAK_MUTATION } from '../graphql/index'
import { getIcon } from '../utils/index'
import { DeleteHabit } from './index'

const colors = [
  'tomato',
  'green.400',
  'yellow.300',
  'cornflowerblue',
  'antiquewhite',
  'aquamarine',
  'lightpink',
  'navajowhite',
  'red.500',
  'lightcoral'
]

export const Habit = ({ index, habit }) => {
  const { id, name, streak } = habit
  const bgColor = colors[index % colors.length]
  const [res, executeMutation] = useMutation(INCREMENT_STREAK_MUTATION) // eslint-disable-line no-unused-vars

  return (
    <Flex
      align='center'
      justify='flex-end'
      direction='column'
      bg={bgColor}
      width='300px'
      height='300px'
      borderRadius='40px'
      margin='16px'
      padding='16px'
    >
      <Box as={getIcon(name)} size='144px' />
      <Text fontWeight='hairline' fontSize='3xl' textAlign='center'>
        {name}
        <Badge
          as='span'
          fontWeight='hairline'
          fontSize='xl'
          rounded='full'
          mx='2'
          px='3'
          textTransform='lowercase'
          cursor='pointer'
          onClick={() => executeMutation({ name })}
        >
          {streak}
        </Badge>
        <DeleteHabit id={id} name={name} />
      </Text>
    </Flex>
  )
}
It should now look like this:

Now try clicking the trash icon on any of the habits. It should open up a modal as follows:
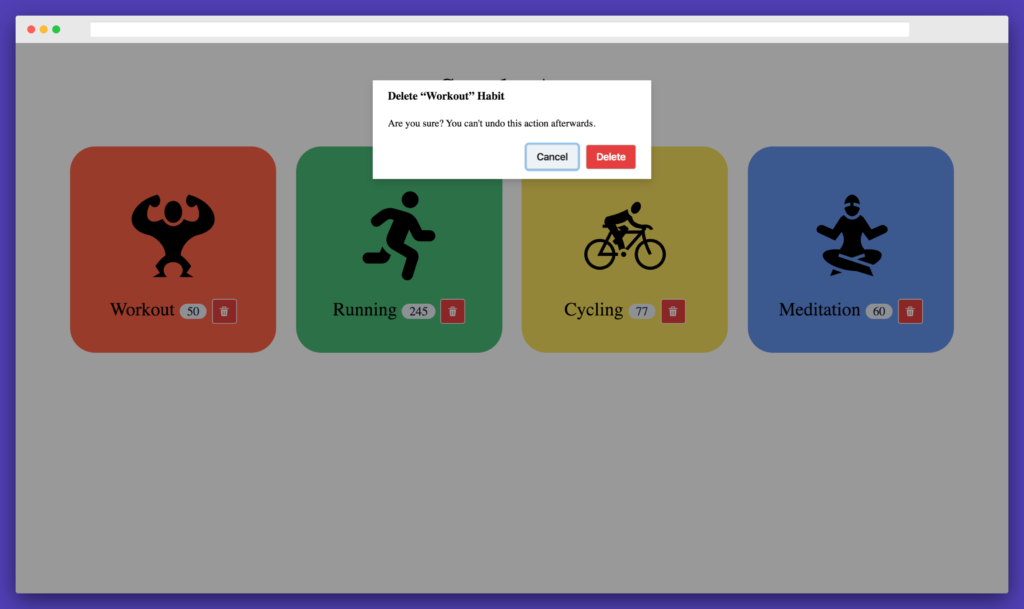
If you click Cancel, it will just close the modal. If you click Delete, the habit will be removed from the UI and the Prisma Database itself as follows:
Create a habit
Now let’s open up CreateHabit.js and paste the following:
import {
  Button,
  Flex,
  FormControl,
  FormLabel,
  Icon,
  Input,
  Modal,
  ModalBody,
  ModalCloseButton,
  ModalContent,
  ModalFooter,
  ModalHeader,
  ModalOverlay,
  useDisclosure,
} from '@chakra-ui/core'
import composeRefs from '@seznam/compose-react-refs'
import React, { useRef } from 'react'
import useForm from 'react-hook-form'
import { useMutation } from 'urql'
import { CREATE_HABIT_MUTATION } from '../graphql/index'

export const CreateHabit = () => {
  const { handleSubmit, register } = useForm()
  const { isOpen, onOpen, onClose } = useDisclosure()
  const [res, executeMutation] = useMutation(CREATE_HABIT_MUTATION) // eslint-disable-line no-unused-vars

  const initialRef = useRef()
  const finalRef = useRef()

  const onSubmit = (values, e) => {
    const { name, streak } = values
    executeMutation({
      name,
      streak: +streak,
    })
    e.target.reset()
    onClose()
  }

  return (
    <Flex
      width='300px'
      height='300px'
      borderRadius='40px'
      margin='16px'
      padding='16px'
      justify='center'
      flexWrap='wrap'
    >
      <Icon
        name='small-add'
        onClick={onOpen}
        fontSize='300px'
        cursor='pointer'
      />
      <Modal
        initialFocusRef={initialRef}
        finalFocusRef={finalRef}
        isOpen={isOpen}
        onClose={onClose}
      >
        <ModalOverlay />
        <ModalContent>
          <ModalHeader>Create Habit</ModalHeader>
          <ModalCloseButton />
          <form onSubmit={handleSubmit(onSubmit)}>
            <ModalBody pb={6}>
              <FormControl>
                <FormLabel htmlFor='name'>Habit name</FormLabel>
                <Input
                  name='name'
                  ref={composeRefs(initialRef, register)}
                  placeholder='Enter your habit'
                  width='90%'
                />
              </FormControl>

              <FormControl mt={4}>
                <FormLabel htmlFor='streak'>Streak</FormLabel>
                <Input
                  name='streak'
                  type='number'
                  placeholder='Enter your streak'
                  width='90%'
                  ref={register}
                />
              </FormControl>
            </ModalBody>

            <ModalFooter>
              <Button
                type='submit'
                rounded='md'
                bg='green.500'
                color='white'
                mr={3}
              >
                Save
              </Button>
              <Button onClick={onClose}>Cancel</Button>
            </ModalFooter>
          </form>
        </ModalContent>
      </Modal>
    </Flex>
  )
}
Again, most of this content is copied from Chakra UI’s FormControl. Here, we show a + icon to the user, which we bring in from Chakra’s own Icon component.
When the + icon is clicked, we open up a modal that uses react-hook-form.
React Hook Form is the easiest way to build forms with Hooks. We just need to pass in register to the refs of the inputs we want to track. We get the register when we call the hook useForm from react-hook-form. We also get handleSubmit, which we need to pass to the form component. We need to pass handleSubmit a function. In our case, we pass onSubmit and the first parameter values of this function are the values we get, which are entered by the user.
One important thing to note here is that we use composeRefs from @seznam/compose-react-refs to compose multiple refs. This is needed because we need to provide the register ref to register our React Hook Form and to keep track of the value. And the second ref initialRef is needed because we need it to focus on the first input as soon as the popup appears. This is necessary for accessibility as well for those who are using screen readers.
Finally, when we call onSubmit we check if it’s not empty and then we call the mutation with two parameters name and streak. +streak means the String is coerced into a Number. Basically, all values returned from React Hook Form are strings, but in our back end, we’re expecting a number.
Lastly, we reset the form to clear all the values and input states. And then we close the modal.
Now go ahead and import CreateHabit into ListAllHabits.js at the top:
import { CreateHabit, Error, Habit, Loading } from './index'
Also, make sure to include it just above where you list all habits using Array.map() as follows:
<CreateHabit />
The ListAllHabits.js file must now look like this:
import { Flex, Text } from '@chakra-ui/core'
import React from 'react'
import { useQuery } from 'urql'
import { LIST_ALL_HABITS_QUERY } from '../graphql/index'
import { CreateHabit, Error, Habit, Loading } from './index'

export const ListAllHabits = () => {
  const [{ fetching, error, data }] = useQuery({ query: LIST_ALL_HABITS_QUERY })

  if (fetching) return <Loading />
  if (error) return <Error />
  const noHabits = !data.habits.length

  return (
    <Flex
      justify='center'
      align='center'
      flexWrap='wrap'
      flexDirection={noHabits ? 'column' : 'row'}
    >
      {noHabits && (
        <Text fontWeight='bold' fontSize='3xl' color='tomato'>
          You currently track 0 habits. Add one.
        </Text>
      )}
      <CreateHabit />
      {data.habits.map((habit, i) => (
        <Habit key={habit.id} index={i} habit={habit} />
      ))}
    </Flex>
  )
}
It should now show the + sign as follows:
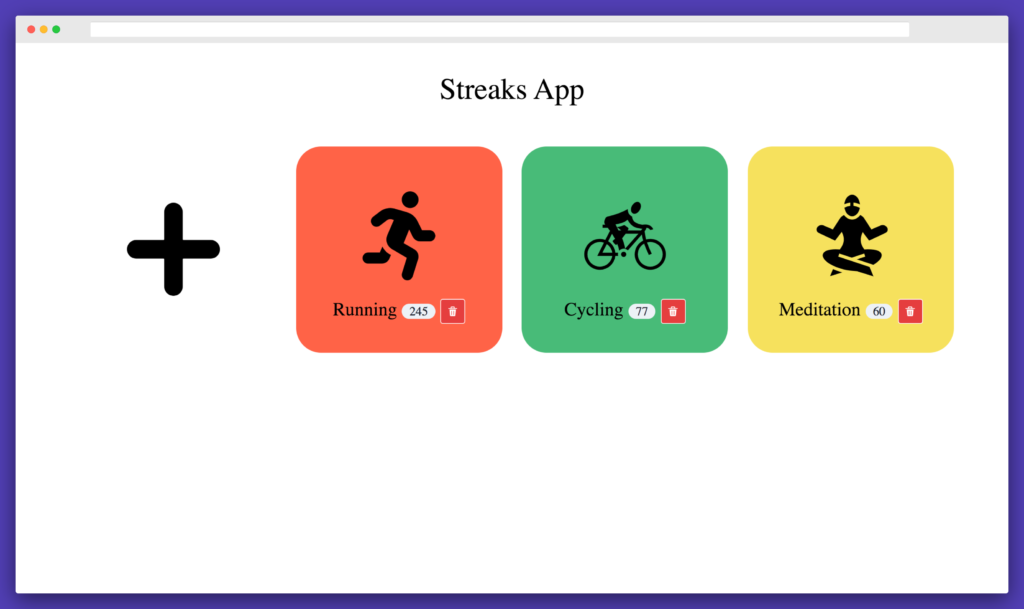
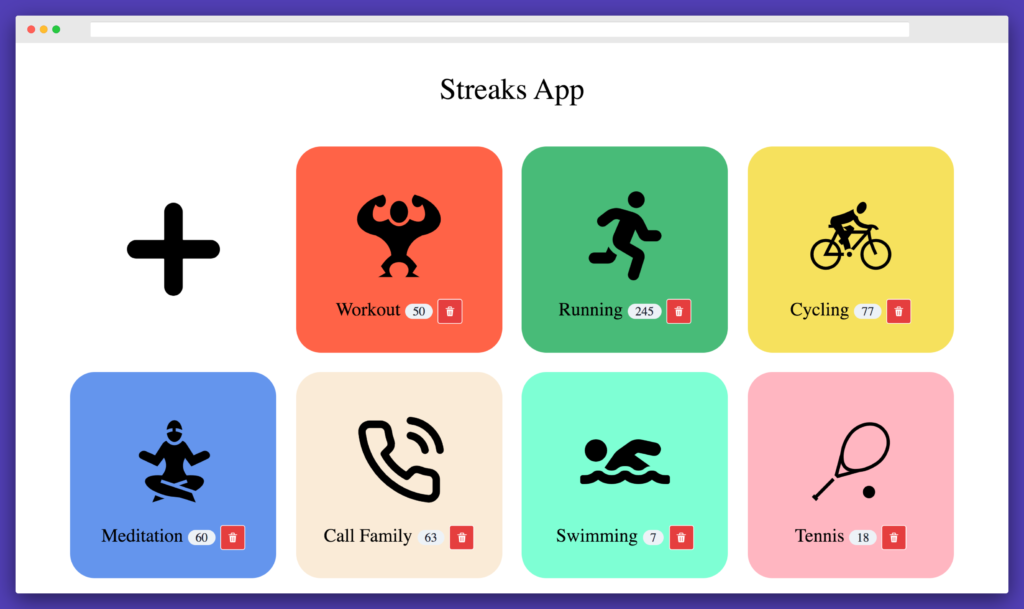
Now click the + sign and add our Workout habit with 50 streaks that we deleted.
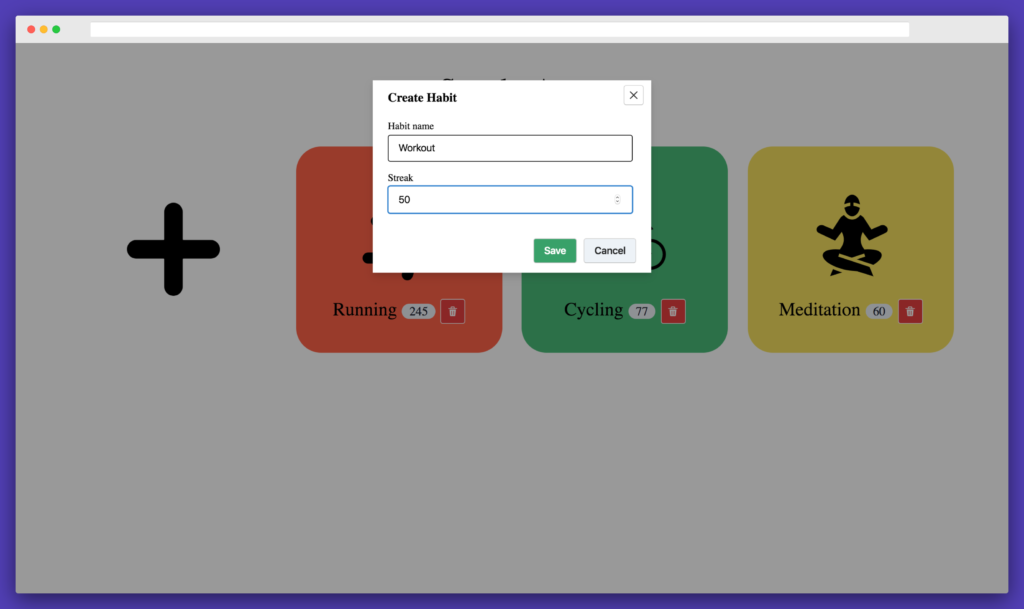
Once you click Save, notice it immediately gets added.
You can add a bunch of other habits that you want to track. After adding a bunch of habits, it now looks like:
Conclusion
In this tutorial, we built a complete habit tracker app “Streaks” from scratch. We used Chakra UI as our React component library to make a beautiful, accessible application with speed. Chakra UI helped us create alerts, modals, and spinners by just adding the built-in building blocks so we could focus on writing the logic rather than writing CSS.
We used React Hooks Form to create simple and easy forms by using React Hooks. It allowed us to keep our forms DRY without writing a lot of code.
In our back end, we used The Prisma Framework. We used Prisma’s own Photon to create data-models declaratively and Lift to perform database migrations. Prisma makes it simple to query the database by using static typing, which allows us to code with confidence. The built-in autocompletion allows us to write applications at a lightning speed.
While The Prisma Framework is in beta, you can have fun with it in your side projects. It will soon be out, so stay tuned.
Now go on and create your own full-stack applications with confidence.
Frequently Asked Questions (FAQs) about Building a Habit Tracker with Prisma 2, Chakra UI, and React
How can I integrate Prisma 2 with Chakra UI in my React application?
Integrating Prisma 2 with Chakra UI in a React application involves a few steps. First, you need to install the necessary dependencies using npm or yarn. These include Prisma, Chakra UI, and other necessary libraries. Once installed, you can set up Prisma by creating a Prisma schema file and generating Prisma Client. For Chakra UI, you need to wrap your application with the ChakraProvider component. This allows you to use Chakra UI components throughout your application. Remember to import the CSSReset component to apply a consistent style baseline throughout your application.
How can I create a database model for my habit tracker application using Prisma 2?
Prisma 2 uses the Prisma Schema Language (PSL) to define your application models. In the case of a habit tracker application, you might have models for User, Habit, and Record. Each model represents a table in your database. You define the fields of your models, their types, and any relations between them. Once your schema is defined, you can generate Prisma Client, which will allow you to interact with your database using auto-completed, type-safe queries.
How can I use Chakra UI to style my React components?
Chakra UI provides a set of reusable, composable, and themeable components that you can use to build your React application. To style your components, you can use the style props provided by Chakra UI. These props allow you to apply styles directly to your components, such as color, font size, margin, and padding. Chakra UI also provides a theme object that you can customize to apply consistent styles across your application.
How can I handle user authentication in my habit tracker application?
Handling user authentication in a habit tracker application can be done using various methods. One common approach is to use JSON Web Tokens (JWT). When a user logs in, you generate a JWT that contains the user’s information and send it back to the client. The client then stores this token and sends it in the header of every subsequent request. On the server side, you verify the token and extract the user’s information from it.
How can I manage state in my React application?
State management in a React application can be handled in various ways. One common approach is to use React’s built-in useState and useContext hooks. useState allows you to add state to your components, while useContext allows you to pass state down the component tree without having to pass props down manually at every level. Another approach is to use a state management library like Redux or MobX, which provide more advanced features like middleware and time-travel debugging.
How can I deploy my habit tracker application?
Deploying a habit tracker application involves several steps. First, you need to build your application for production by running a build command. This will create a build folder with all the static files needed to run your application. Next, you need to choose a hosting platform. There are many options available, including Netlify, Vercel, and Heroku. Once you’ve chosen a platform, you can follow their deployment instructions to deploy your application.
How can I test my habit tracker application?
Testing a habit tracker application can be done using various testing libraries and frameworks. For unit testing, you can use libraries like Jest and React Testing Library. For end-to-end testing, you can use tools like Cypress or Puppeteer. It’s important to write tests for all the critical parts of your application to ensure they work as expected.
How can I add notifications to my habit tracker application?
Adding notifications to a habit tracker application can be done using various methods. One common approach is to use the Notifications API, which allows you to display native system notifications to the user. Another approach is to use a library like react-toastify, which allows you to display toast notifications within your application.
How can I optimize the performance of my habit tracker application?
Optimizing the performance of a habit tracker application involves various techniques. One common approach is to use React’s built-in useMemo and useCallback hooks to prevent unnecessary re-renders. Another approach is to use code splitting to reduce the size of your JavaScript bundle. This can be done using dynamic imports, which allow you to load parts of your application only when they’re needed.
How can I make my habit tracker application accessible?
Making a habit tracker application accessible involves following the Web Content Accessibility Guidelines (WCAG). This includes providing alternative text for images, ensuring sufficient color contrast, and making all functionality available through the keyboard. Chakra UI provides various accessibility features out of the box, such as properly styled focus states and skip links.
 Akshay Kadam
Akshay is a creator, computer artist and micropreneur from Mumbai.