Last week, Kevin O’Hara and I kicked off #Codetober, a month-long series of weekly #CodeLive events. Kevin’s a Javascript / Node development expert and I thought it’d be fun to work with him on building something with Lightning Web Components OSS. Yes, you read that right. If you’ve not heard, Lightning Web Components are open source! You can find out all about them here at lwc.dev or through 👉 this epic trailmix👈 and you can 👉catch the recording of the stream here.👈 Over the course of the hour we accomplished quite a lot, but let’s eat our dessert first, and look at our end-product. You can see the code of what we built at this GitHub repo.
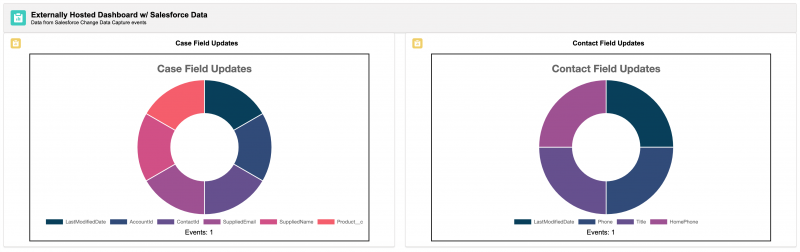
Our app is a dashboard that displays the number, and type of Change Data Capture events that have occurred for that object. For our example, we just recorded the field(s) changed, and the number of CDC events.
Before we started
Kevin and I wanted to focus on building LWC OSS components, not on the underlying plumbing, so before we started our stream we bootstrapped a basic Node app using Express. While we could have spun that up easily enough by hand, LWC OSS comes with a very handy generator tool called create-lwc-app. We started our project with this:
This tool asks us to answer a few questions, before generating a package.json file for us. Out of the box, you can simply cd into your new project directory and use npm run watch to launch the application. However, we went ahead and added a couple of other npm packages we wanted to use. Namely:
- JSForce – JavaScript library for interacting with Salesforce orgs
- Socket.io – JavaScript library for publishing and subscribing to websockets
- Salesforce Lightning Design System – To make our app pretty
- Dotenv – Allows us to keep our Salesforce org credentials in a
.envfile that we can keep out of Git.
How it all fits together
In the beginning was the Salesforce User. They made a change to a contact, and that triggered the Change Data Capture (CDC) event we configured to fire. Our dashboard server app, subscribed to the CDC events, receives a notification indicating what object and fields changed. This event is re-broadcast via websockets to all dashboard clients. The dashboard client displays (as seen above) two instances of a Donut chart. Each chart is listening on the websocket channel for updates. When they receive a message, they adjust the data and re-draw the chart (with pretty animations). Here’s an overview diagram of the dashboard’s architecture:

So, about those LWC OSS components…
Both charts are drawn by the same component, we’ve just put two instances on the page. To make our component reusable, we decorated certain properties with @api. This decorator functions just like it’s on-platform sibling, and allows you to declaratively pass information into the component when it’s put on the page. As you can see in the code below, there are two my-chart components defined, and the sObject variable differs. This is a particularly powerful aspect to component-based development, because it allows developers to reuse logic while declaring in markup the details needed for the component to function in this instance.
Chart.js
This is where the logic of our chart-drawing component lies. But it’s also where things get a bit more complex. With components, it’s crucial to keep their lifecycle in mind as you’re developing. In our case we chose to use the renderedCallback() method. This callback method is unique to LightningWebComponents and is triggered after the component has rendered on the page. Let’s look at the code:
This gives us a good launching point to trigger the setup of our socket’s listeners and our chart. We only want to do this once, however, so we use @track properties as semaphores. Because they’re reactive, the component will rerender when their state changes, and will thus re-execute the renderedCallback() method.
Our dashboard server app is rebroadcasting the CDC events to the clients via websockets. Whenever a message is received by the client’s websocket connection, it executes the onMessage() method, where the bulk of our component logic lives. There’s a lot happening here, but most of it is self-explanatory. So let’s focus on a couple of key bits:
This first line is a bit of EMACSCRIPT 6 (JavaScript 6) magic called destructuring. It allows us to define two constants: changeType and entityName as defined from data.ChangeEventHeader object. Destructuring enables us to access properties and child objects of the data.ChangeEventHeader object without always referencing the full object and key path like this: data.ChangeEventHeader.changeType which makes it easier to read.
This line
makes use of another EMACSRIPT 6 feature called arrow functions. Arrow functions have a concise and simple syntax but their real power (and their gotcha) is that they execute with the calling code’s understanding of this. In our case, we’re establishing a constant, fields defined as the filtered keys of the data object. Specifically, we’re filtering out the ‘ChangeEventHeader’ key, as we’ve already destructured what we need out of it.
The rest of our method simply loops over the fields and either adds that field to the chart’s dataset or increments the count of that field’s changes.
chart.html
The bulk of our chart template is standard Lightning Design System markup. However, Chart.js uses the HTML canvas element for drawing charts. This poses an interesting challenge, since LWC generally wants to be in charge of the dom. In order to cede control of the canvas element to Chart.js, we need to annotate our canvas tag with lwc:dom=”manual”. With that in place, the core of our chart component’s template is simply this:
About the Salesforce Lightning Design System
We’ve used the Lightning Design System throughout our dashboard app to provide a common look and feel. However, the way we included it may not be entirely intuitive. In order to incorporate the SLDS in one location and still allow all of our components to access its resources, we created a new module for our components to extend. Standard Lightning web components extend LightningElement. In our case, we created a class called LightningElementSLDS and defined it like this:
While verbose, this code effectively constructs a stylesheet link and injects it into the template’s dom. Establishing this as a new class allows all our other components to inherit not only the feature set built into LightningElement, but also the Salesforce Lightning Design System. Using our new class has two steps:
- Import the class, providing the path to the file.
- Ensure that the class we’re defining extends
LightningElementWithSLDSinstead ofLightningElement.
With this in place, we can refer to standard SLDS classes, like slds-grid in our HTML markup as usual.
More from #Codetober
So that’s how we built a dashboard with LWC OSS — one that displays updates in near-real-time with CDC events and are styled using SLDS. The day after our stream, Trailhead released a series of three projects on building with Lightning Web Components OSS. They’re absolutely fantastic, and you should head over to this trailmix to learn more!
Remember, #Codetober is a month of weekly #CodeLive streams. This week, we’ll be joined by Cynthia Thomas, code ninja, on building data dependent apps. We’ll be working on building out a use case to rapidly clone records and allow users to edit them en-mass. Register and join us here and see the rest of #Codetober’s events here.