モチベーション
- GANとかに使える顔画像を集めたい
- せっかくだから、自分の好きな声優や芸能人で学習させたい
- ラクしたい
サマリ
- ライブラリ(icrawler)で、画像収集します。
- Google、Bingから画像をガーっと集めます。しかし、関係ない画像(風景や別人)だったり、同じ画像(重複データ)も集まってきます.
- ライブラリ(MTCNN)で、顔画像を抽出します。
- 欲しいのは顔画像なので、集めた画像から顔画像をひと通り抽出します。ただし、別人や重複画像の情報は残っています。
- 顔識別関係の学習済みモデル(Keras VGGFace)を利用し、分類します。
- 学習済みモデルから得られる特徴量から類似度を利用し、上記の顔画像内でクラスタリング、人ごとのクラス形成を試みます。重複情報もここで削除します。
- 最後に、自分の手で微調整(ここだけガンバル)
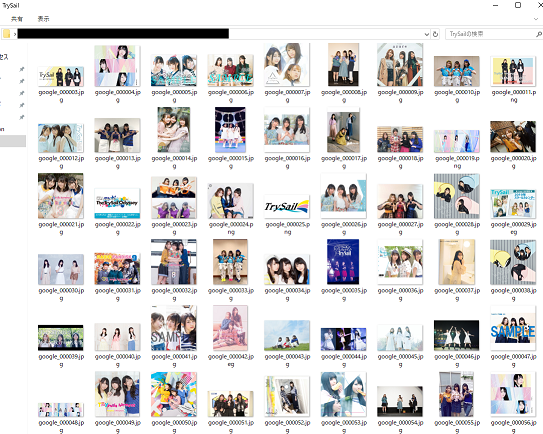
実行結果イメージ
クローリングで、こんな感じに集まってきたデータを、
分類して、まとめていきます。(対象人物でない人や、アニメキャラが分けられます)
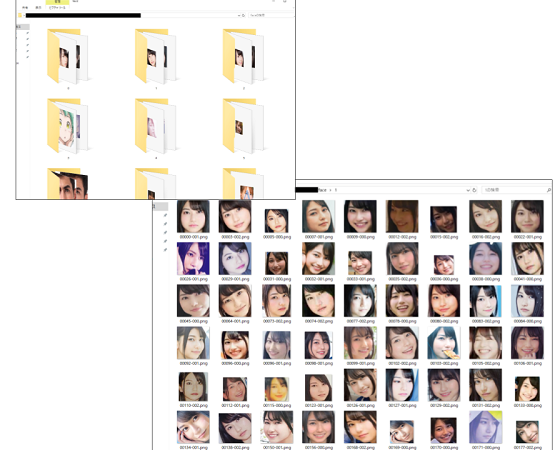
一部、誤分類や重複が残るのでパラメータ調整や、手作業で修正します。
機械学習のために、機械学習(深層学習)の成果物を使うという、鶏と卵になってますが、、自分用だから・・・
今回作成したプログラムは、こちらで公開しています。
以下、簡易使用説明です。Readmeにある内容の転記です。
# GPUを利用しない場合は、tensorflow-gpu -> tensorflow に変更
pip3 install -r requirements.txt
# 第一引数:出力先ディレクトリ
# それ以降:検索クエリ この場合、「TrySail」「麻倉もも」「雨宮天」「夏川椎菜」をそれぞれ検索
# オプション: --flatten 最後に画像をひとつのディレクトリにまとめる
#            --src 検索先 google, bing, baidu が使える
#            --max_num 1クエリごとで、ダウンロードする最大数
python3 crawling.py resource TrySail 麻倉もも 雨宮天 夏川椎菜 --flatten --src google bing --max_num 100
# 第一引数:元データ格納ディレクトリ 直下にあるイメージのみ読込む
# 第二引数:作業用ディレクトリ 途中結果、最終結果の格納先
# オプション: -n プロセス数(最低 2)
#             --min_face 検知する顔画像の最小領域の一辺
python3 clustering.py resource/TrySail resource/work -n 4 --min_face 100
以下、利用ライブラリのサンプルや説明。
クローリング
icrawlerというライブラリを利用します。Build-inでGoogle、Bing、Baidu向けクローラーが完備されており、使いやすいです。
icrawler: https://github.com/hellock/icrawler
Google用クローラーのサンプルを以下に示します。ちなみに、1,000件超のダウンロードになる場合はライブラリ内部で止めているようです。
import pathlib
from datetime import datetime
from icrawler.builtin import GoogleImageCrawler

def example_google():
    keyword = 'TrySail'
    pathlib.Path('output/trysail').mkdir(parents=True, exist_ok=True)

    crawler = GoogleImageCrawler(
        feeder_threads=1, parser_threads=1,
        downloader_threads=2, storage={'root_dir': 'output/trysail'})
    filter_ = {
        'size': 'large',
        'date': ((2015, 5, 13), (datetime.today().year, datetime.today().month, datetime.today().day)),
    }
    crawler.crawl(keyword=keyword, max_num=500, offset=0, file_idx_offset=0,
                  min_size=(250, 250), max_size=None, filters=filter_)
-
keywordが検索クエリになります。 - 個人的に、迷惑をあまりかけないように・・という意味で、
downloader_threadsは低く設定しています。
顔検出
MTCNNというライブラリを利用します。FacenetのMTCNN実装としてTensorFlowで書かれたライブラリです。
MTCNN: https://github.com/ipazc/mtcnn
詳しい使い方は、GitHubにあります。https://github.com/ipazc/mtcnn#usage
import cv2
import mtcnn.mtcnn as mtcnn

img = cv2.cvtColor(cv2.imread('path/to/your-image.png'), cv2.COLOR_BGR2RGB)
model = mtcnn.MTCNN(min_face_size=128)
faces = model.detect_faces(img)
-
min_face_sizeを利用し、128x128以上の領域のみ顔と判定するように指定しています。 - 返り値は、
boxが顔の領域(x, y, 幅, 高さ)、confidenceが顔である確率を示しています。
特徴量抽出
学習済みモデルから対象画像の特徴量を抽出し、コサイン類似度を利用して、イメージの類似度を測ることを試みます。
ライブラリは、Keras VGGFaceを利用します。このライブラリを導入することで、Kerasと同じ使用感で、VGGFaceで学習されたモデルを利用することができます。
Keras VGGFace: https://github.com/rcmalli/keras-vggface
Kerasで学習済みモデルを利用した特徴量抽出の方法は、公式にサンプルがあります。
https://keras.io/ja/applications/
from keras.preprocessing import image
from keras.applications.vgg19 import VGG19
from keras.applications.vgg19 import preprocess_input

def calc_sim_trained_model(path_a: str, path_b: str, size=(224, 224, 3)):
    model = VGG19(weights='imagenet', include_top=False, input_shape=size, pooling='avg')
    inputs = np.array([image.img_to_array(image.load_img(path, target_size=size[:2])) for path in (path_a, path_b)])
    feats = model.predict(preprocess_input(inputs))
    return np.dot(feats[0] / np.linalg.norm(feats[0]), feats[1] / np.linalg.norm(feats[1]))
- モデル生成時に
poolingを指定し、プーリング層を含めるようにしています。
プーリング層によって特徴量をベクトルで抽出できるので、コサイン類似度を行いやすくなります。 -
keras.preprocessingのimage.load_imgを利用すると、リサイズなど簡単に行えて便利です。 -
inputsは、(サンプル数, Width, Height, チャンネル数(色))の形状になる配列です。
多数のイメージを対象にし、バッチで高速に処理したい場合は、inputsにサンプル数を追加ことで対応できます。 - 学習済みモデルを利用するので、
preprocess_inputによる処理後に、predictを利用します。 - numpyにて、$[-1.0, 1.0]$になるように、正規化しつつ、コサイン類似度を計算します。
Keras VGGFaceの場合は、以下を参考に、model, preprocess_inputを入れ替えます。
from keras_vggface.vggface import VGGFace
from keras_vggface.utils import preprocess_input
model = VGGFace(model='senet50', input_shape=(224, 224, 3), include_top=False, pooling='avg')
...
model.predict(preprocess_input(inputs), version=2)
- 利用可能モデル:https://github.com/rcmalli/keras-vggface#example-usage
- 利用モデルによって、
preprocess_inputにversion指定が必要なことに注意。https://github.com/rcmalli/keras-vggface#prediction
おまけ
別途利用できるライブラリのサンプルもついでに。
OpenCV: カスケード型分類器
OpenCVには顔検出に利用できる分類器がデフォルトで用意されています。
import cv2
import pathlib

def face_detect_cascade(path: str, cascade: cv2.CascadeClassifier, **kwargs):
    # https://docs.opencv.org/3.4.1/d7/d8b/tutorial_py_face_detection.html
    img_gs = cv2.imread(path, cv2.IMREAD_GRAYSCALE)
    return cascade.detectMultiScale(img_gs, **kwargs)

# インストール先のdataディレクトリに、デフォルトの分類器が用意されているので、
# 以下のようにパスを指定すればアクセスできます。
cascade = cv2.CascadeClassifier(str(
    pathlib.Path(cv2.__file__).parent / 'data/{}.xml'.format('haarcascade_frontalface_default')
))

face_detect_cascade('path/to/image.png', cascade, scaleFactor=1.1, minNeighbors=10, minSize=(32, 32))
OpenCV: ヒストグラム比較
N階級(下記だと200)のカラーヒストグラムを作成し、その類似度を指定メソッド(HISTCMP_CORRELなど)で計算して求めます。
https://docs.opencv.org/3.4/d6/dc7/group__imgproc__hist.html で利用できるメソッド名が確認できます。
import numpy as np
import cv2

def calc_sim_hist(path_a: str, path_b: str, method='HISTCMP_CORREL'):
    # https://docs.opencv.org/3.4/d6/dc7/group__imgproc__hist.html
    def make_vec(img):
        hists = np.array([cv2.calcHist([img], [ch], None, histSize=[200], ranges=[0, 256]) for ch in range(3)])
        return np.reshape(hists, (hists.shape[0] * hists.shape[1], 1))

    img_a, img_b = cv2.imread(path_a), cv2.imread(path_b)
    hist_a, hist_b = make_vec(img_a), make_vec(img_b)
    return cv2.compareHist(hist_a, hist_b, getattr(cv2, method))
ImageHash
画像の類似度判定に、
ImageHash: https://github.com/JohannesBuchner/imagehash
を利用できます。画像からハッシュ値を算出し、そのハミング距離から類似度を判断します。
import imagehash
from PIL import Image

def calc_sim_imagehash(path_a: str, path_b: str):
    img_a, img_b = Image.open(path_a), Image.open(path_b)
    hash_a, hash_b = imagehash.average_hash(img_a), imagehash.average_hash(img_b)
    return hash_a - hash_b