こういうのができます。

使い方がまっさきに知りたい方は3.使用例を見てください。
お品書き
- 私
- ディレクトリの説明
- 使用例
- おまけ
- 課題
1.私
初めに自己紹介から。
しがないプログラムばっか書いている大学2年生です。
強化学習を用いてあるゲームAIを作ってますが、とても処理時間が重要になることが予想されました。
そこで今回c++で処理時間を計測してグラフにするコードを書きました。
qiitaで記事にするつもりはありませんでしたが、分からないことがあったので多くの人の目に触れてほしいと思い、記事にしました。どうかよろしくおねがいします。(書いてる途中にわかりました)
2.ディレクトリの説明
ソースコードはこちらです。
https://github.com/sirogamiemacs/time_measure
stopWatch, matplotlibの2つのディレクトリから構成されており、stopWatchで時間の計測、matplotlibでグラフ化の処理をしています。
matploblib
https://github.com/lava/matplotlib-cpp
matploblibディレクトリはこちらのコードを元にしたコードで構成されています。(いくつかのメソッドは自分で実装しました。)
https://myenigma.hatenablog.com/entry/2016/01/16/093912
作者さんの解説です。ありがとうございました。
stopWatch
時間計測はこのディレクトリで行っています。
ここのstopWatch.hをincludeして使用します。
3.使用例
@takahiro_itazuriさんのこちらの記事の一部をやってみようと思います。
https://qiita.com/takahiro_itazuri/items/1b7731aad72359d9b43e
2次元配列において
for_each、range_for、counterの3つでアクセス速度を測ります。
下に書くコードは自分のgithubのstopWatch/test.cppをほぼ移したものです。
1.stopWatchControllerクラスをインスタンス化する
stopWatchControllerクラスはすべてのタイマーを管理するクラスです。このクラスにより複数のタイマーを独立させることができます。
#include <memory>
#include <vector>
#include <algorithm>
#include <string>

// インクルードする
#include "stopWatch.h"
int main()
{
 // タイマーを制御するクラスをインスタンス化する。
 // デストラクタでグラフの作成を行うのでスマートポインタが都合が良い。
 shared_ptr<stopWatchController> timer_con;
 timer_con = make_shared<stopWatchController>();
 // 保存するファイルのパスを渡す。
 // この処理を行わなければ、グラフは保存されず表示のみを行います。
 std::string file_name = "./sample.png";
 timer-con->set_file_name(file_name);
2.timerを作成する
timerを作るには次の手順が必要です。
1.timerの名前を決める。(棒グラフの横軸になります)
2.stopWatchController`のインスタンスからnew_timerメソッドを実行する。(名前が引数です。)
なお、new_timerの返り値を用いてそれぞれのtimerを使用します。
 // timerを作成(for_each, range_for, counter)
 std::string title1 = "for_each";
 std::string title2 = "range_for";
 std::string title3 = "counter";

 unsigned const int FOR_EACH  = timer_con->new_timer(title1);
 unsigned const int RANGE_FOR = timer_con->new_timer(title2);
 unsigned const int COUNTER   = timer_con->new_timer(title3);
これでtimerの作成ができました。
2次元配列を作成し、処理時間を計測してみます
 std::vector<std::vector<int>> vecvec(1000,std::vector<int>(1000, 0));
 // times回計測する。
 unsigned const int times = 100;
for_eachだけコードを書きます。
測り方は
timer_con->start(FOR_EACH);
process
timer_con->lap(FOR_EACH);
です。
 for (int k = 0; k < times; k++)
 {
    timer_con->start(FOR_EACH);
    for_each(vecvec.begin(), vecvec.end(), [](vector<int>& vec)
    {
        for_each(vec.begin(), vec.end(), [](int& elem)
        {
            ++elem;
        });
    });
    timer_con->lap(FOR_EACH);
}
デストラクタで表示の処理をするのでこれ以降は必要ありません。
コンパイル方法は次の通りです。(mapのc++17の機能を使用しているのでc++17が必要です。)
g++ -o test test.cpp stopWatch.cpp -stdc++ -lpython2.7 -std=c++17
実行するとsample.pngというファイルが保存されます。
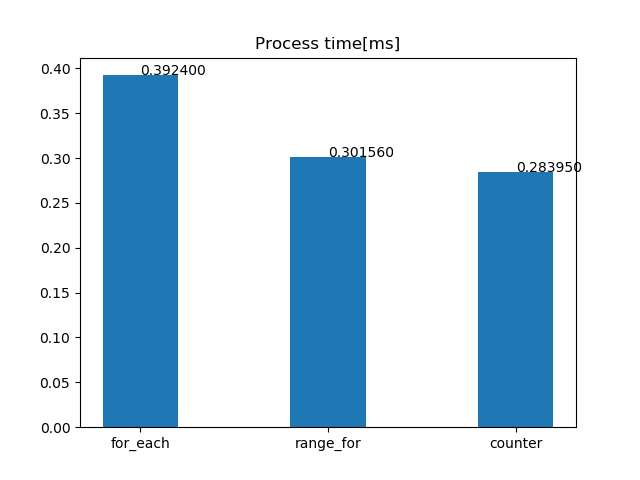
(-03オプションつけてます。)
結果についてはよくわかりません。range_forが一番遅いこともあります。
4.おまけ
waitメソッドが2種類実装されています。
1. stopWatchController::wait(int)
stopWatchController::wait(1000000);
こっちはただ単に指定された時間待つだけです。
usleepメソッドを用いてます。
2. timer_con->wait(int, int);
第一引数でtimerを指定、第二引数で時間を指定します。[ms]
timer_con->start(PROCESS);
// process
timer_con->lap(PROCESS);
timer_con->wait(PROCESS, time);
こっちはprocessをtime時間に一回。
という処理ができます。
他にも細々としたのがいくつかありますが、途中だったり、必要性を感じないものだったりするので省きます。
5.課題
- timerを作るのに少なくても5行以上の宣言が必要になる。少なくしたい。
- seabornにしたい。
記事を終わります。