はじめに
opencvを使って、alphaチャンネルを持った画像をalphaチャンネルを持ってない画像(背景画像)の任意の位置に描画しようと思います。
alphaチャンネルとは
alphaチャンネルは、画像(np.ndarray)の透過率の情報を保持するチャンネルです。
opencvでは、BGR表現モデルの画像であれば各チャンネルが持っている情報は
- img[:, :, 0]がB(Blue)
- img[:, :, 1]がG(Green)
- img[:, :, 2]がR(Red)
になります。これにalphaチャンネルを付け加えると
- img[:, :, 3]が透過率
になります。
alphaチャンネルが持っている値は[0, 255]になりますが、透過率は0の方が高くて255の方が低くなる見たいです。
つまり、画像の一番左上のピクセルの値img[0, 0, :3]が(127, 127, 127)だったとすると、本来このピクセルの色はグレーになりますが、img[0, 0, 4]が0だったとすると、このピクセルの色情報は完全に無効になり、重ね合わせた背景のピクセルのみが表示されるようになります。
背景のピクセルの色情報をb, 透過付き画像の色情報をi, 透過率をa, 重ね合わせたあとのピクセルの色情報をpとすると、計算式は以下のようになります。
$p = b * (1-a/255) + i * (a / 255)$
方法
自前import
import cv2
import numpy
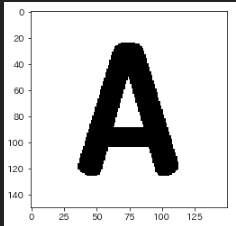
alphaチャンネル付き画像を読み込む
# -1がなかったらhogera.pngが透過付き画像でもBGR表現モデルになる
img = cv2.imread("hoge/geho/hogera.png", -1)
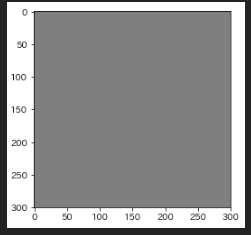
背景画像作成
wall = np.full((500, 500, 3), 127)
任意の座標(x, y)に重ね合わせる処理
- alphaチャンネル非対応
- はみ出し非対応
img_h, img_w = img.shape[:2]
wall[y:y+img_h, x:x+img_w, :] = img[:, :, :3]
任意の座標(x, y)に重ね合わせる処理(はみ出し考慮バージョン)
- alphaチャンネル非対応
wall_h, wall_w = wall.shape[:2]
img_h, img_w = img.shape[:2]

if x < 0:
    img_w += x
    img = img[:, -x:, :]
    x = 0
elif x + img_w > wall_w:
    img_w = x + img_w - wall_w
    img = img[:, :img_w, :]

if y < 0:
    img_h += y
    img = img[-y:, :, :]
    y = 0
elif y + img_h > wall_h:
    img_y = y + img_h - wall_h
    img = img[img_h:, :, :]

if img.size == 0:
    wall[y:y+img_h, x:x+img_w, :] = img[:, :, :3]
任意の座標(x, y)に重ね合わせる処理(alphaチャンネル対応バージョン)
- はみ出し非対応
img_h, img_w = img.shape[:2]

alpha = img[:, :, 3] / 255  # [0, 1]に正規化
alpha = alpha.reshape(*alpha.shape, 1)  # broadcastのためにreshape
wall[y:y+img_h, x:x+img_w, :] = img[:, :, :3] * alpha + wall[y:y+img_h, x:x+img_w, :] * (1-alpha)
関数化
def plot_alpha_img(wall, img, loc):
    x, y = loc

    wall = wall.copy()
    wall_h, wall_w = wall.shape[:2]
    img_h, img_w = img.shape[:2]

    if x < 0:
        img_w += x
        img = img[:, -x:, :]
        x = 0
    elif x + img_w > wall_w:
        img_w = x + img_w - wall_w
        img = img[:, :img_w, :]

    if y < 0:
        img_h += y
        img = img[-y:, :, :]
        y = 0
    elif y + img_h > wall_h:
        img_h = y + img_h - wall_h
        img = img[img_h:, :, :]

    if img.size == 0:
        return wall

    alpha = img[:, :, 3] / 255
    alpha = alpha.reshape(*alpha.shape, 1)
    wall[y:y+img_h, x:x+img_w, :] = img[:, :, :3] * alpha + wall[y:y+img_h, x:x+img_w, :] * (1-alpha)

    return wall
使用例
plt.imshow(img)
plt.imshow(wall)
wall = plot_alpha_img(wall, img, (100, 100))
wall = plot_alpha_img(wall, img, (70, 70))
plt.imshow(wall)
