概要
こんにちは。パンダマスターと申します。
この記事では自前のアプリケーションで公開しているWebページにインラインでAuth0のログインダイアログを組み込む方法について記述していきます。
免責事項
この記事の内容がAuth0側で想定した正しい運用であるという確証はありません。当記事のサンプルコードの使用に際しては自己責任にてお願いします。
また、当記事に記載されている内容、サンプルコードを使用することによって被った、いかなる損害に対しても筆者は一切責任を負いません。
上記に同意していただける方のみ、続きをお読みください。続きを読むことによって、上記の免責事項に同意したことになります。
前提
まずAuth0のホームページでアカウントを登録し、テストで使用するユーザとCallback, Origin等々のURLについて設定します。
Applicationsメニューから新しいアプリケーションを作成し、アプリケーションのページからQuick StartタブのSpring Securityを選択すると、コードサンプルを見ることができます。この記事に書いてあるJavaコードのほとんどは、そのサンプルを元にしたものです。Auth0公式の完全なコードサンプルはGitHubのauth0-samples/auth0-spring-security-mvc-sampleを参照してください。
また、クライアントサイドのJavaScriptコードはLock v11 for Webのコードサンプルを元にしています。
次に、Spring InitializrでSpring Web Starter, Spring Securityを含めたGradleプロジェクトをダウンロードします。ダウンロードしたプロジェクトをお好みのIDEやエディタで開いて実装を開始しましょう。
実装
早速、実装していきましょう。
build.gradle
依存ライブラリをbuild.gradleに追加します。
Auth0、CSRF対策用のnonce生成、そしてThymeleafに関するライブラリです。
plugins {
    id 'org.springframework.boot' version '2.1.7.RELEASE'
    id 'java'
}

apply plugin: 'io.spring.dependency-management'

group = 'net.panda-master.sample'
version = '0.0.1-SNAPSHOT'
sourceCompatibility = '1.8'

repositories {
    mavenCentral()
}

dependencies {
    implementation 'org.springframework.boot:spring-boot-starter-security'
    implementation 'org.springframework.boot:spring-boot-starter-web'
    testImplementation 'org.springframework.boot:spring-boot-starter-test'
    testImplementation 'org.springframework.security:spring-security-test'
    compile 'com.auth0:mvc-auth-commons:1.+'
    compile group: 'org.apache.commons', name: 'commons-lang3', version: '3.9'
    compile group: 'org.thymeleaf', name: 'thymeleaf-spring5', version: '3.0.11.RELEASE'
    compile group: 'nz.net.ultraq.thymeleaf', name: 'thymeleaf-layout-dialect', version: '2.4.1'
}
WebConfig.java
Thymeleaf関連の設定が主。他のテンプレートエンジン使う時は差し替えてください。
package net.pandamaster.sample.auth0;

import org.springframework.beans.factory.annotation.Autowired;
import org.springframework.context.ApplicationContext;
import org.springframework.context.annotation.Bean;
import org.springframework.context.annotation.Configuration;
import org.springframework.web.servlet.config.annotation.ViewResolverRegistry;
import org.springframework.web.servlet.config.annotation.WebMvcConfigurer;
import org.thymeleaf.spring5.SpringTemplateEngine;
import org.thymeleaf.spring5.templateresolver.SpringResourceTemplateResolver;
import org.thymeleaf.spring5.view.ThymeleafViewResolver;

import nz.net.ultraq.thymeleaf.LayoutDialect;

@Configuration
public class WebConfig implements WebMvcConfigurer {

    @Autowired
    private ApplicationContext applicationContext;

    @Bean
    public SpringResourceTemplateResolver templateResolver() {
        SpringResourceTemplateResolver templateResolver = new SpringResourceTemplateResolver();
        templateResolver.setApplicationContext(applicationContext);
        templateResolver.setPrefix("classpath:/templates/");
        templateResolver.setSuffix(".html");
        templateResolver.setTemplateMode("HTML");
        templateResolver.setCacheable(false);
        templateResolver.setOrder(1);
        return templateResolver;
    }

    @Bean
    public SpringTemplateEngine templateEngine() {
        SpringTemplateEngine templateEngine = new SpringTemplateEngine();
        templateEngine.setTemplateResolver(templateResolver());
        templateEngine.addDialect(new LayoutDialect());
        return templateEngine;
    }

    @Override
    public void configureViewResolvers(ViewResolverRegistry registry) {
        ThymeleafViewResolver resolver = new ThymeleafViewResolver();
        resolver.setTemplateEngine(templateEngine());
        registry.viewResolver(resolver);
    }
}
WebSecurityCofig.java
Webセキュリティ設定。
このクラスではauth0に関する3つの値、ドメイン、クライアントID、シークレットを定義したauth0.propertiesファイル(事前に用意しておきます)から値を取り出せるようにします。
また、"/"(ログインページ)及び"/callback"(コールバック)の各URLについては認証無しで、その他のURLについては認証後にアクセスできるよう設定します。
その他、authenticationController()、logoutSuccessHandler()の各Beanについて記述しています。認証時及びログアウト成功時にこれらが呼び出されます。
package net.pandamaster.sample.auth0;

import java.io.UnsupportedEncodingException;

import com.auth0.AuthenticationController;

import org.springframework.beans.factory.annotation.Value;
import org.springframework.context.annotation.Bean;
import org.springframework.context.annotation.Configuration;
import org.springframework.security.config.annotation.web.builders.HttpSecurity;
import org.springframework.security.config.annotation.web.configuration.EnableWebSecurity;
import org.springframework.security.config.annotation.web.configuration.WebSecurityConfigurerAdapter;
import org.springframework.security.web.authentication.logout.LogoutSuccessHandler;

@Configuration
@EnableWebSecurity
public class WebSecurityConfig extends WebSecurityConfigurerAdapter {

    @Value(value = "${com.auth0.domain}")
    private String domain;

    @Value(value = "${com.auth0.clientId}")
    private String clientId;

    @Value(value = "${com.auth0.clientSecret}")
    private String clientSecret;
    @Override
    protected void configure(HttpSecurity http) throws Exception {
        http.csrf().disable();
        http.requiresChannel().anyRequest().requiresInsecure().and().headers().frameOptions().deny().and()
                .authorizeRequests()
                .antMatchers("/", "/callback")
                .permitAll().anyRequest().authenticated()
                .and().logout().logoutSuccessHandler(logoutSuccessHandler()).permitAll();
    }

    @Bean
    public AuthenticationController authenticationController() throws UnsupportedEncodingException {
        return AuthenticationController.newBuilder(domain, clientId, clientSecret)
            .build();
    }

    @Bean
    public LogoutSuccessHandler logoutSuccessHandler() {
        return new LogoutController();
    }

    public String getDomain() {
        return domain;
    }

    public String getClientId() {
        return clientId;
    }

    public String getClientSecret() {
        return clientSecret;
    }
}
login.html
さて、本題となるログインページのHTMLです。
Thymeleafを使っているので<html>タグはこのようになります。
注目してほしいのは2つ目の<script>タグで、こちらにログインダイアログを生成するコードが記述されています。
new Auth0Lockの第3引数でオプションを指定していますが、そのオブジェクトのcontainerプロパティにダイアログを組み込みたい<div>タグのidを書いてあげるとポップアップではなくインラインで表示してくれます。
CSSの上書きは推奨されていませんが、テーマも少しいじれるようなのでボタンの色だけ変えています。
また、<meta>タグでclientIdとdomainをHTMLに記述することになります。Auth0アカウントのクライアントIDを晒すようですが、いずれにせよauthorize(このAuth0認証サービスを使用していいかどうかの認可)の際、URLパラメータにclientIdが乗るので、見えることに変わりはないでしょう(と思う)。
当たり前ですが、シークレットは絶対に他の人に見せたり見える状況にしてはいけません。これだけは守りましょう。
stateはCSRFトークンです。サーバ側でAuth0のライブラリがセッション変数に格納したトークンと一致するかどうか確認してくれます。
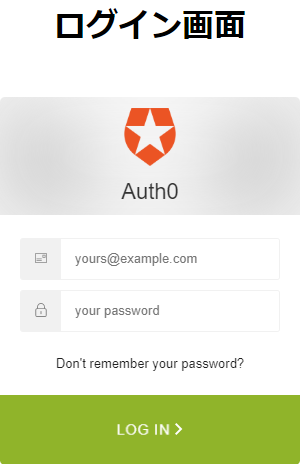
<!DOCTYPE html>

<html lang="ja" xmlns="http://www.w3.org/1999/xhtml"
xmlns:th="http://www.thymeleaf.org"
    xmlns:layout="http://www.ultraq.net.nz/thymeleaf/layout">
    <head>
        <meta charset="utf-8" />
        <meta th:content="${clientid}" name="clientid" />
        <meta th:content="${domain}" name="domain" />
        <meta th:content="${state}" name="state" />
        <title>Login with Auth0</title>
    </head>
    <body id="app">
        <div style="text-align: center;">
            <h1>ログイン画面</h1>
        </div>
        <br>
        <div id="login-div"></div>
    </body>
    <script src="https://cdn.auth0.com/js/lock/11.14/lock.min.js"></script>
    <script>
        window.onload = function() {
            var lock = new Auth0Lock(document.getElementsByName("clientid").item(0).content,
                document.getElementsByName("domain").item(0).content, {
                container: 'login-div',
                auth: {
                    redirectUrl: 'https://<YOUR_DOMAIN>/callback',
                    responseType: 'code',
                    params: {
                        state: document.getElementsByName("state").item(0).content,
                        scope: "openid email",
                    }
                },
                theme: {
                    primaryColor: 'rgb(144, 180, 42)'
                }
            });
            lock.show();
        }
    </script>
</html>
LoginController.java
上記のlogin.htmlへのリクエストを処理します。
ここで、設定ファイルに記述したAuth0のclientIdとdomain及び、CSRFトークンとして使用するnonceをstateに設定します。nonceについてはセッション変数にも格納して、ログイン時に検証します。
ただし、"com.auth0.state"というセッション変数についてはライブラリのソースを読んで得た結果で、こうするという記述を公式サイトから見つけることはできませんでした。なのでちょっと怪しいです。
package net.pandamaster.sample.auth0;

import javax.servlet.http.HttpServletRequest;

import org.apache.commons.lang3.RandomStringUtils;
import org.springframework.beans.factory.annotation.Autowired;
import org.springframework.stereotype.Controller;
import org.springframework.web.bind.annotation.RequestMapping;
import org.springframework.web.bind.annotation.RequestMethod;
import org.springframework.web.servlet.ModelAndView;

@Controller
public class LoginController {

    @Autowired
    private WebSecurityConfig appConfig;

    @RequestMapping(value = "/", method = RequestMethod.GET)
    ModelAndView getLogin(HttpServletRequest request) {
        ModelAndView mav = new ModelAndView("login");
        String state;
        mav.addObject("clientid", appConfig.getClientId());
        mav.addObject("domain", appConfig.getDomain());
        state = RandomStringUtils.randomAlphanumeric(32);
        mav.addObject("state", state);
        request.getSession().setAttribute("com.auth0.state", state);
        return mav;
    }
}
CallbackController.java
ログインに際し、callbackにリダイレクトされますが、そのリクエストを処理します。
JWTで受け取った認証結果をデコードして、ログインできたならSecurityContextHolderに認証トークンを設定し、ログインに失敗してExceptionが発生した場合はSecurityContextHolderをクリアしてログインページにリダイレクトします。
package net.pandamaster.sample.auth0;

import java.io.IOException;

import javax.servlet.ServletException;
import javax.servlet.http.HttpServletRequest;
import javax.servlet.http.HttpServletResponse;

import com.auth0.AuthenticationController;
import com.auth0.IdentityVerificationException;
import com.auth0.Tokens;
import com.auth0.jwt.JWT;

import org.springframework.beans.factory.annotation.Autowired;
import org.springframework.security.core.AuthenticationException;
import org.springframework.security.core.context.SecurityContextHolder;
import org.springframework.stereotype.Controller;
import org.springframework.web.bind.annotation.RequestMapping;
import org.springframework.web.bind.annotation.RequestMethod;

@Controller
public class CallbackController {

    @Autowired
    private AuthenticationController controller;

    private final String redirectOnFail = "/";

    private final String redirectOnSuccess = "/mypage";

    public CallbackController() {
    }

    @RequestMapping(value = "/callback", method = RequestMethod.GET)
    protected void getCallback(final HttpServletRequest req, final HttpServletResponse res) throws ServletException, IOException {
        handle(req, res);
    }

    private void handle(HttpServletRequest req, HttpServletResponse res) throws IOException {
        try {
            Tokens tokens = controller.handle(req);
            TokenAuthentication tokenAuth = new TokenAuthentication(JWT.decode(tokens.getIdToken()));
            SecurityContextHolder.getContext().setAuthentication(tokenAuth);
            res.sendRedirect(redirectOnSuccess);
        } catch (AuthenticationException | IdentityVerificationException e) {
            e.printStackTrace();
            SecurityContextHolder.clearContext();
            if (req.getSession() != null) {
                req.getSession().invalidate();
            }
            res.sendRedirect(redirectOnFail);
        }
    }
}
TokenAuthentication.java
GitHubのコードサンプルそのままです。JWTの認証トークンをデコードして結果を判定するクラスです。
package net.pandamaster.sample.auth0;

import java.util.ArrayList;
import java.util.Collection;
import java.util.Collections;
import java.util.Date;
import java.util.List;

import com.auth0.jwt.interfaces.Claim;
import com.auth0.jwt.interfaces.DecodedJWT;

import org.springframework.security.authentication.AbstractAuthenticationToken;
import org.springframework.security.core.GrantedAuthority;
import org.springframework.security.core.authority.SimpleGrantedAuthority;

public class TokenAuthentication extends AbstractAuthenticationToken {
    private static final long serialVersionUID = 1L;

    private final DecodedJWT jwt;
    private boolean invalidated;

    public TokenAuthentication(DecodedJWT jwt) {
        super(readAuthorities(jwt));
        this.jwt = jwt;
    }

    private boolean hasExpired() {
        return jwt.getExpiresAt().before(new Date());
    }

    private static Collection<? extends GrantedAuthority> readAuthorities(DecodedJWT jwt) {
        Claim rolesClaim = jwt.getClaim("https://access.control/roles");
        if (rolesClaim.isNull()) {
            return Collections.emptyList();
        }
        List<GrantedAuthority> authorities = new ArrayList<>();
        String[] scopes = rolesClaim.asArray(String.class);
        for (String s : scopes) {
            SimpleGrantedAuthority a = new SimpleGrantedAuthority(s);
            if (!authorities.contains(a)) {
                authorities.add(a);
            }
        }
        return authorities;
    }

    @Override
    public String getCredentials() {
        return jwt.getToken();
    }

    @Override
    public Object getPrincipal() {
        return jwt.getSubject();
    }

    @Override
    public void setAuthenticated(boolean authenticated) {
        if (authenticated) {
            throw new IllegalArgumentException("Create a new Authentication object to authenticate");
        }
        invalidated = true;
    }

    @Override
    public boolean isAuthenticated() {
        return !invalidated && !hasExpired();
    }
}
LogoutController.java
WebSecurityConfigから呼び出され、セッションの破棄とAuth0アカウントのログアウトを処理します。
package net.pandamaster.sample.auth0;

import java.io.IOException;

import javax.servlet.http.HttpServletRequest;
import javax.servlet.http.HttpServletResponse;

import org.springframework.beans.factory.annotation.Autowired;
import org.springframework.security.core.Authentication;
import org.springframework.security.web.authentication.logout.LogoutSuccessHandler;
import org.springframework.stereotype.Controller;

@Controller
public class LogoutController implements LogoutSuccessHandler {

    @Autowired
    private WebSecurityConfig appConfig;

    @Override
    public void onLogoutSuccess(HttpServletRequest req, HttpServletResponse res, Authentication authentication) {
        invalidateSession(req);

        String returnTo = req.getScheme() + "://" + req.getServerName();
        if ((req.getScheme().equals("http") && req.getServerPort() != 80) || (req.getScheme().equals("https") && req.getServerPort() != 443)) {
            returnTo += ":" + req.getServerPort();
        }
        returnTo += "/";

        String logoutUrl = String.format(
                "https://%s/v2/logout?client_id=%s&returnTo=%s",
                appConfig.getDomain(),
                appConfig.getClientId(),
                returnTo);
        try {
            res.sendRedirect(logoutUrl);
        } catch(IOException e){
            e.printStackTrace();
        }
    }

    private void invalidateSession(HttpServletRequest request) {
        if (request.getSession() != null) {
            request.getSession().invalidate();
        }
    }
}
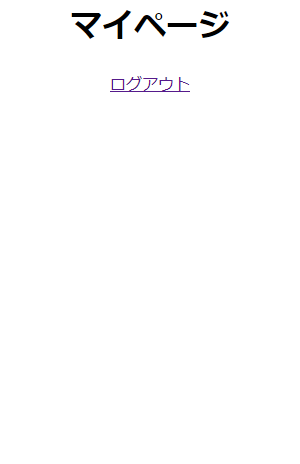
mypage.html
ログイン後に表示されるページ。認証なしでアクセスすると403が返ってきます。
<!DOCTYPE html>

<html lang="ja" xmlns="http://www.w3.org/1999/xhtml"
xmlns:th="http://www.thymeleaf.org"
    xmlns:layout="http://www.ultraq.net.nz/thymeleaf/layout">
    <head>
        <meta charset="utf-8" />
        <title>Login with Auth0</title>
    </head>
    <body id="app">
        <div style="text-align: center;">
            <h1>マイページ</h1>
            <a href="/logout">ログアウト</a>
        </div>
    </body>
</html>
MyPageController.java
ただmypage.htmlを返すだけのコントローラ。
package net.pandamaster.sample.auth0;

import javax.servlet.http.HttpServletRequest;

import org.springframework.stereotype.Controller;
import org.springframework.web.bind.annotation.RequestMapping;
import org.springframework.web.bind.annotation.RequestMethod;
import org.springframework.web.servlet.ModelAndView;

@Controller
public class MyPageController {
    @RequestMapping(value = "/mypage", method = RequestMethod.GET)
    ModelAndView getMyPage(HttpServletRequest request) {
        ModelAndView mav = new ModelAndView("mypage");
        return mav;
    }
}
実行結果
実際動かしてみましょう。画面はこんな感じです。
懸念事項
下記について解決できないままです。
1.ユーザID・パスワードの未入力時に表示される吹き出しが見切れる
2.ログイン時にgravatar.comへのリクエストが発生し404になる
愚痴
この投稿のような「こうやってみたらこうなったよー」という経験則だけが書いてあるのってよくないとは思いつつ、実際自分で書くとなると理論のりの字も出て来やしませんね。OAuth2やOIDCについてきちんと学ぶべきなのですが、ついつい動かすことに終始してしまいます。
冒頭でも書きましたが、正直 Lock for Webをこういう使い方していいのか迷っているところもあります。
実際どうなんですかね?教えて偉い人!