前 → Vue + AWS Amplifyでシンプルな画像共有アプリを作成する (概要) #1
〜この記事でやること〜
- VueProjectの作成
- Amplifyの導入
- Auth ( Cognito )
- Storage ( S3 )
- 作成したprojectをAmplifyConsoleからBuild & Deploy
VueProjectの作成
まずはProjectを作成します。
■ 前提条件
- Node.js
- npm
がインストールされていること
■ 参考
Node.js / npm をインストール (Mac環境)
Node.js / npmをインストールする(for Windows)
とりあえず Ubuntu で新しい Node.js, npm をインストール
VueCLIのinstall
$ npm install -g @vue/cli
VueProjectの作成
今回は全部盛りにしていますが各自好きなように選択してください。
※この記事はclass-styleではなくobject-styleで書きます
$ vue create <your-project-name>

Vue CLI v3.9.2
? Please pick a preset: Manually select features
? Check the features needed for your project: Babel, TS, PWA, Router, Vuex, CSS Pr
e-processors, Linter, Unit, E2E
? Use class-style component syntax? No
? Use Babel alongside TypeScript (required for modern mode, auto-detected polyfill
s, transpiling JSX)? Yes
? Use history mode for router? (Requires proper server setup for index fallback in
 production) Yes
? Pick a CSS pre-processor (PostCSS, Autoprefixer and CSS Modules are supported by
 default): Sass/SCSS (with node-sass)
? Pick a linter / formatter config: Standard
? Pick additional lint features: Lint on save, Lint and fix on commit
? Pick a unit testing solution: Jest
? Pick a E2E testing solution: Cypress
? Where do you prefer placing config for Babel, PostCSS, ESLint, etc.? In package.
json
? Save this as a preset for future projects? No
起動してみる
$ yarn serve
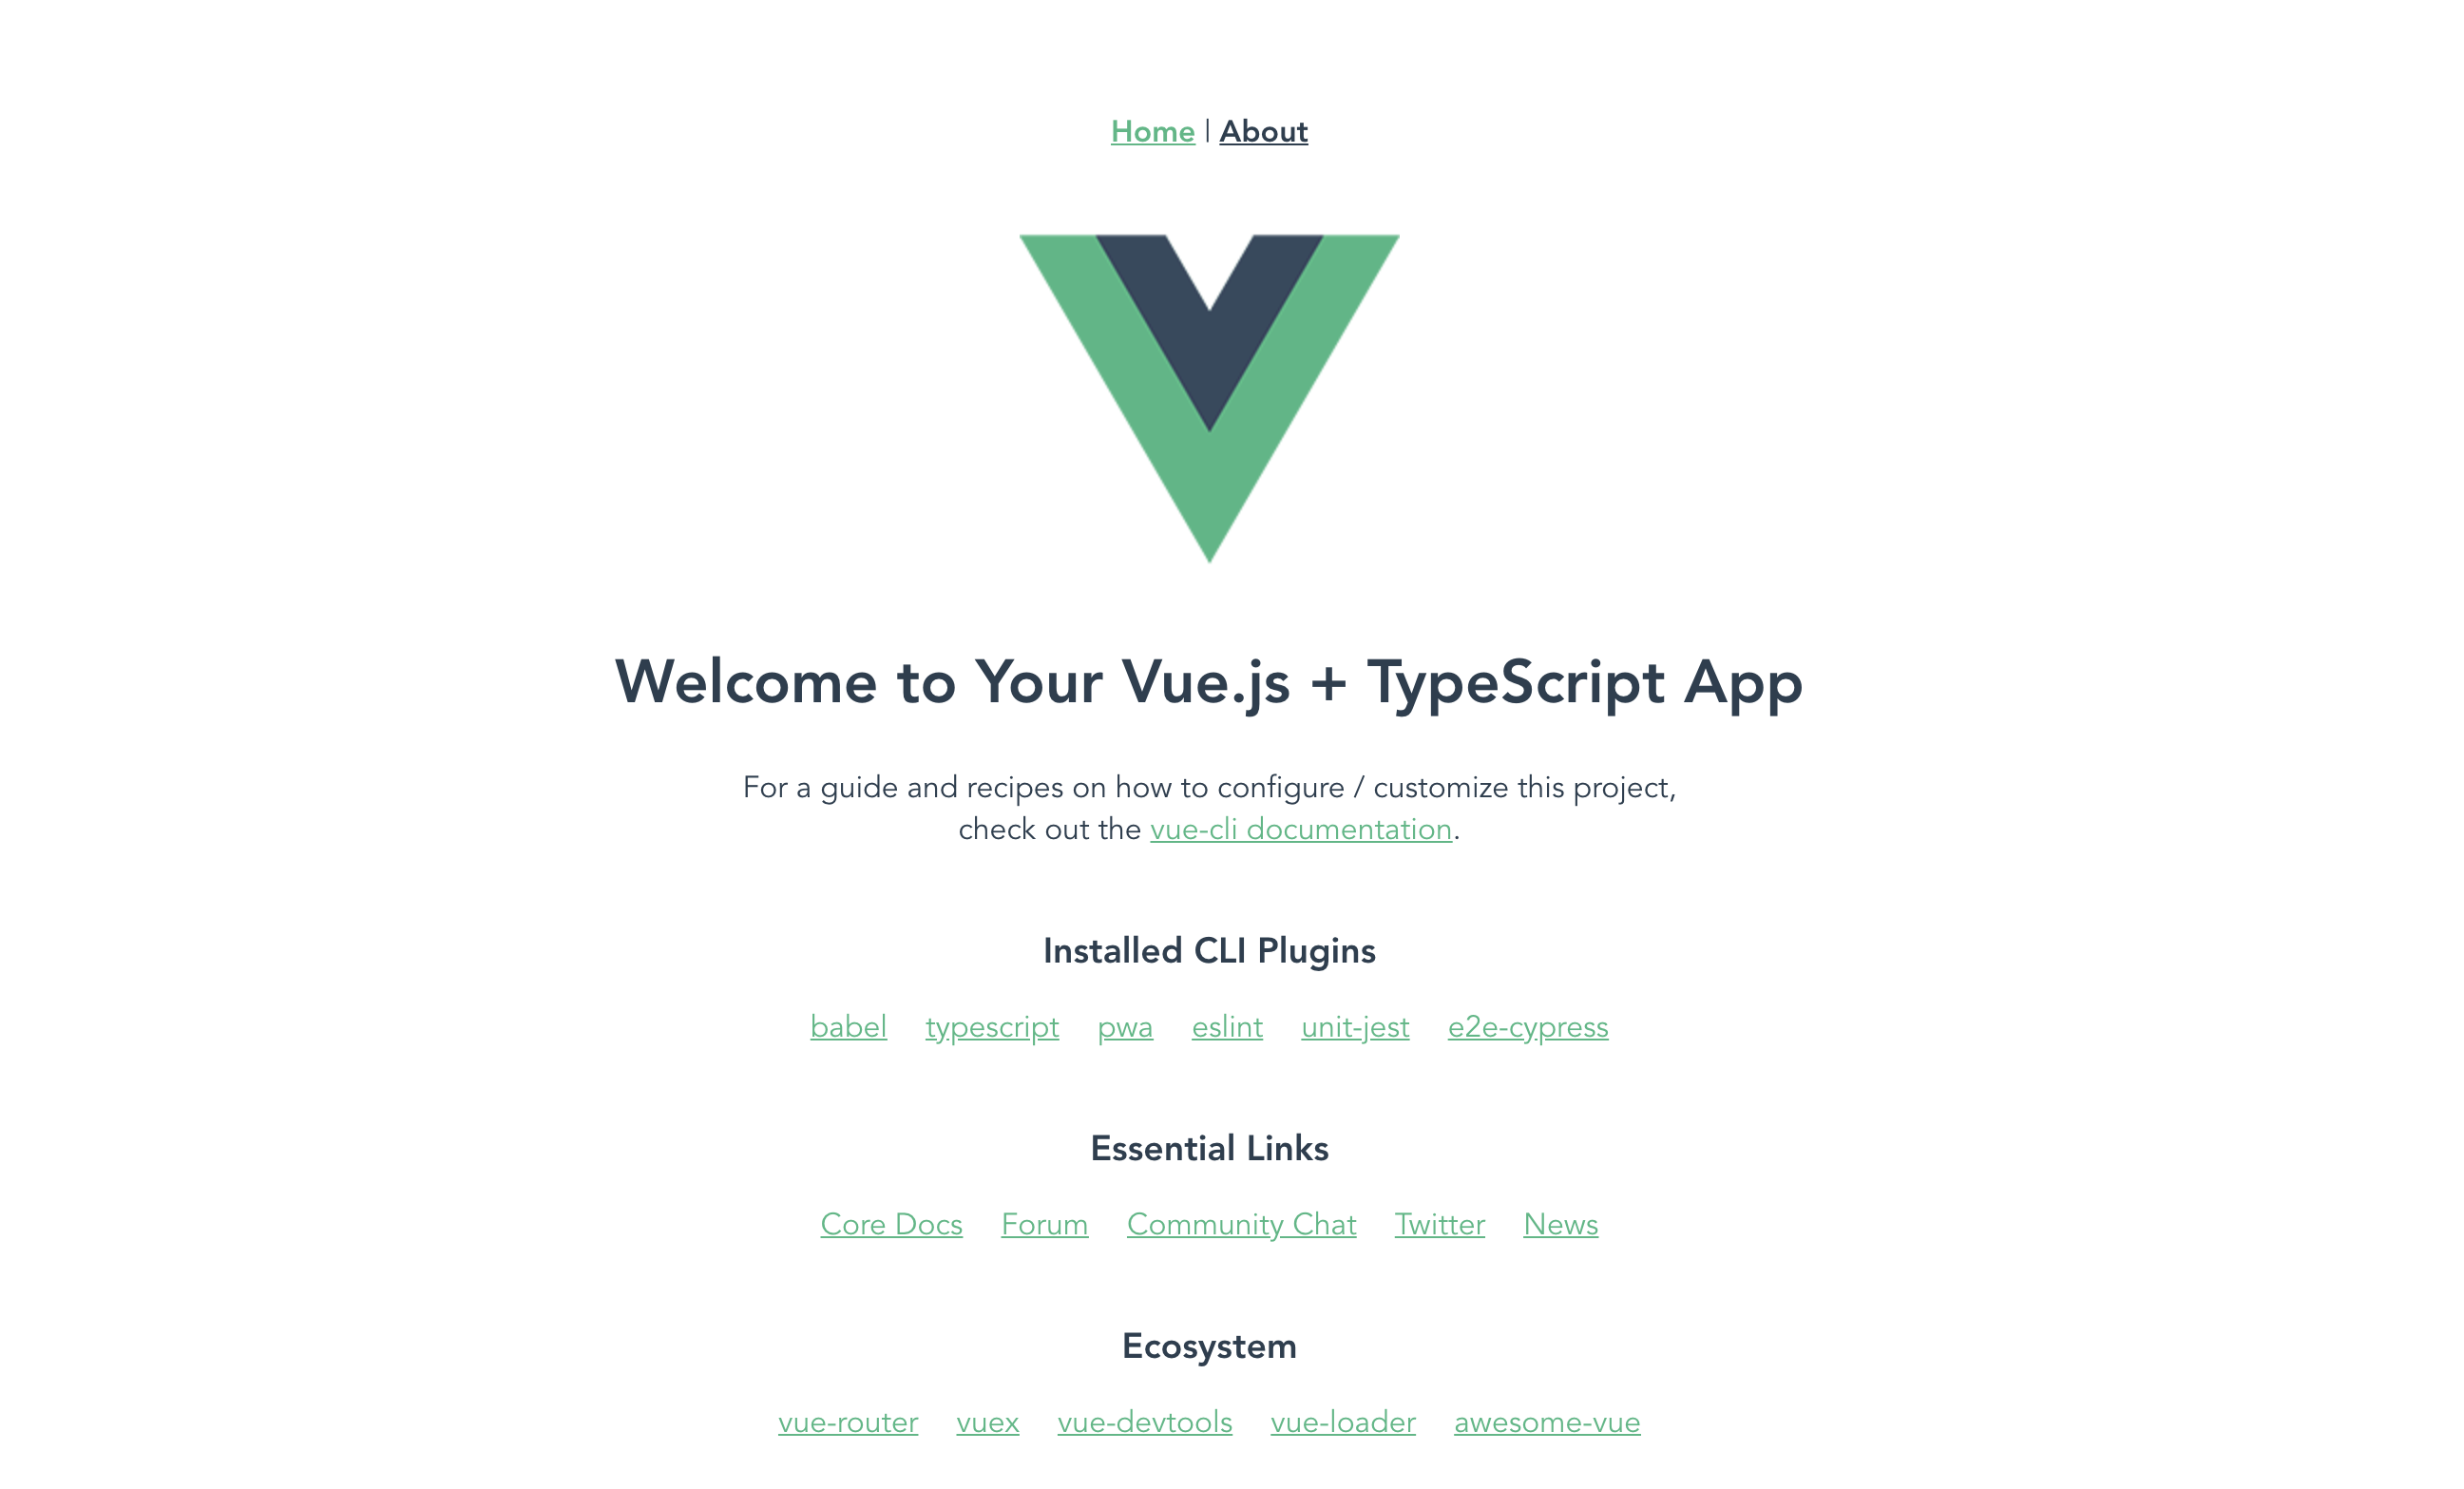
このように表示されればOK
GitHubへpush
Remoteリポジトリの追加
$ git remote add origin <your-remote-repository>
Push
$ git add .
$ git commit -m "first commit"
$ git push origin master
Amplifyの導入
Amplifyを導入するにあたってdevelopブランチを作成しておきます。
developブランチの作成
$ git checkout -b develop
Amplify-CLIのinstall
$ npm install -g @aws-amplify/cli
$ amplify -v

1.8.1
次に、AWSアカウントを紐付けます。以下のコマンドを打つとAmplifyで使用するユーザーを新規作成することが出来ます。
詳しくはAWS Amplify クイックスタートを参考にしてください。
$ amplify configure
もし既にAWSのユーザーがあり、そちらを使う場合はこの作業は必要ありません。
AWS Backendの設定
Amplify-CLIのプロジェクトの設定を選択することが出来ます。
amplifyの環境名はdevにしています。
$ amplify init

? Enter a name for the project <project name>
? Enter a name for the environment dev
? Choose your default editor: Visual Studio Code
? Choose the type of app that you're building typescript
Please tell us about your project
? What javascript framework are you using vue
? Source Directory Path:  src
? Distribution Directory Path: dist
? Build Command:  yarn build
? Start Command: yarn serve
設定が終わるとしばらく動いた後にS3にbucketが作成されます。
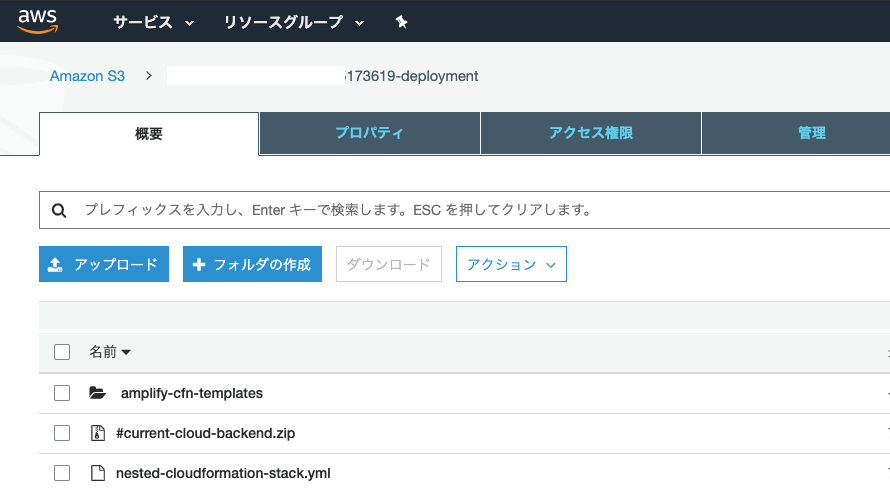
これはDeploy用のCloudFormationTemplateを配置するbucketになります。
Amazon Cognitoの追加
ユーザー管理・認証をしたいのでAmazonCognitoを使えるようにします。
commandで簡単に作成出来ます。
$ amplify auth add

// Manualを選択
Do you want to use the default authentication and security configuration? Manual

configuration

// IAM controlをするかどうか
 Select the authentication/authorization services that you want to use:
User Sign-Up, Sign-In, connected with AWS IAM controls (Enables per-user Storage features fo
r images or other content, Analytics, and more)

 Please provide a friendly name for your resource that will be used to label this
category in the project: <label-name>
 Please enter a name for your identity pool. <identity-pool-name>
 Allow unauthenticated logins? (Provides scoped down permissions that you can cont
rol via AWS IAM)
No
// GoogleアカウントやTwitterアカウントでのサインアップ(今回はなし)
 Do you want to enable 3rd party authentication providers in your identity pool?
No


 Please provide a name for your user pool: <user-pool-name>

// サインイン時に使える属性(今回はユーザー名)
 Warning: you will not be able to edit these selections.
 How do you want users to be able to sign in? Username

// 多要素認証
 Multifactor authentication (MFA) user login options: OFF

// Emailを使って登録変更する
 Email based user registration/forgot password: Enabled (Requires per-user email e
ntry at registration)

// アカウント認証コード送付用の文面
 Please specify an email verification subject: Your verification code
 Please specify an email verification message: Your verification code is {####}

// パスワードポリシー(デフォルト使用)
 Do you want to override the default password policy for this User Pool? No

// 登録時に必要な属性の選択(今回はEmailのみ)
 Warning: you will not be able to edit these selections.
 What attributes are required for signing up? (Press <space> to select, <a> to tog
gle all, <i> to invert selection)Email

 Specify the app's refresh token expiration period (in days): 30
 Do you want to specify the user attributes this app can read and write? No

// OAuth(今回はなし)
 Do you want to enable any of the following capabilities? (Press <space> to select
, <a> to toggle all, <i> to invert selection)
 Do you want to use an OAuth flow? No

// Lambdaトリガー(今回はなし)
? Do you want to configure Lambda Triggers for Cognito? No


Successfully added resource <project-name> locally
これでOKです。
S3 Storageの追加
今回は画像共有アプリなので画像を保存するbucketを用意します。
$ amplify storage add

// Imageが含まれている方を選択
? Please select from one of the below mentioned services Content (Images, audio, v
ideo, etc.)

? Please provide a friendly name for your resource that will be used to label this
 category in the project: <label-name>
? Please provide bucket name: <bucket-name>

// 認証済みユーザーのみがアクセスできる
? Who should have access: Auth users only

// どこまでの権限を与えるか
? What kind of access do you want for Authenticated users? create/update, read, de
lete

// Lambdaトリガー(今回はなし)
? Do you want to add a Lambda Trigger for your S3 Bucket? No
Successfully added resource <label-name> locally
リソースの作成
amplifyの状態を確認します。
$ amplify status

Current Environment: dev

| Category | Resource name | Operation | Provider plugin   |
| -------- | ------------- | --------- | ----------------- |
| Auth     | resourcename  | Create    | awscloudformation |
| Storage  | resourcename  | Create    | awscloudformation |
AuthとStorageがCreateの状態になっていますが、あくまでLocalの設定が追加されただけでリソースは作成されません。
実際にリソースを作成するには
$ amplify push
を実行します。色々走った後に、
✔️ All resources are updated in the cloud
となればOKです。
Cloud上にS3 bucketとCognitoのUserpoolが作成されているのが確認できます。
変更をGitHubにpush
$ git add .
$ git commit -m "Add amplify ~"
$ git push origin develop
Amplify Consoleを使ってDeploy
いよいよdeployです。
まずはAmazon Amplify Consoleを開きましょう。
アプリの作成をクリックするとGitプロバイダーを選択する項目があるのでGitHubを選択してcontinueをクリック

対象のリポジトリとブランチを選択して次へをクリック

バックエンドの設定の画面が表示されます。
Amplifyの環境名を選択し、AmplifyConsole用のロールを選択します。無い場合はCreate new roleを選択
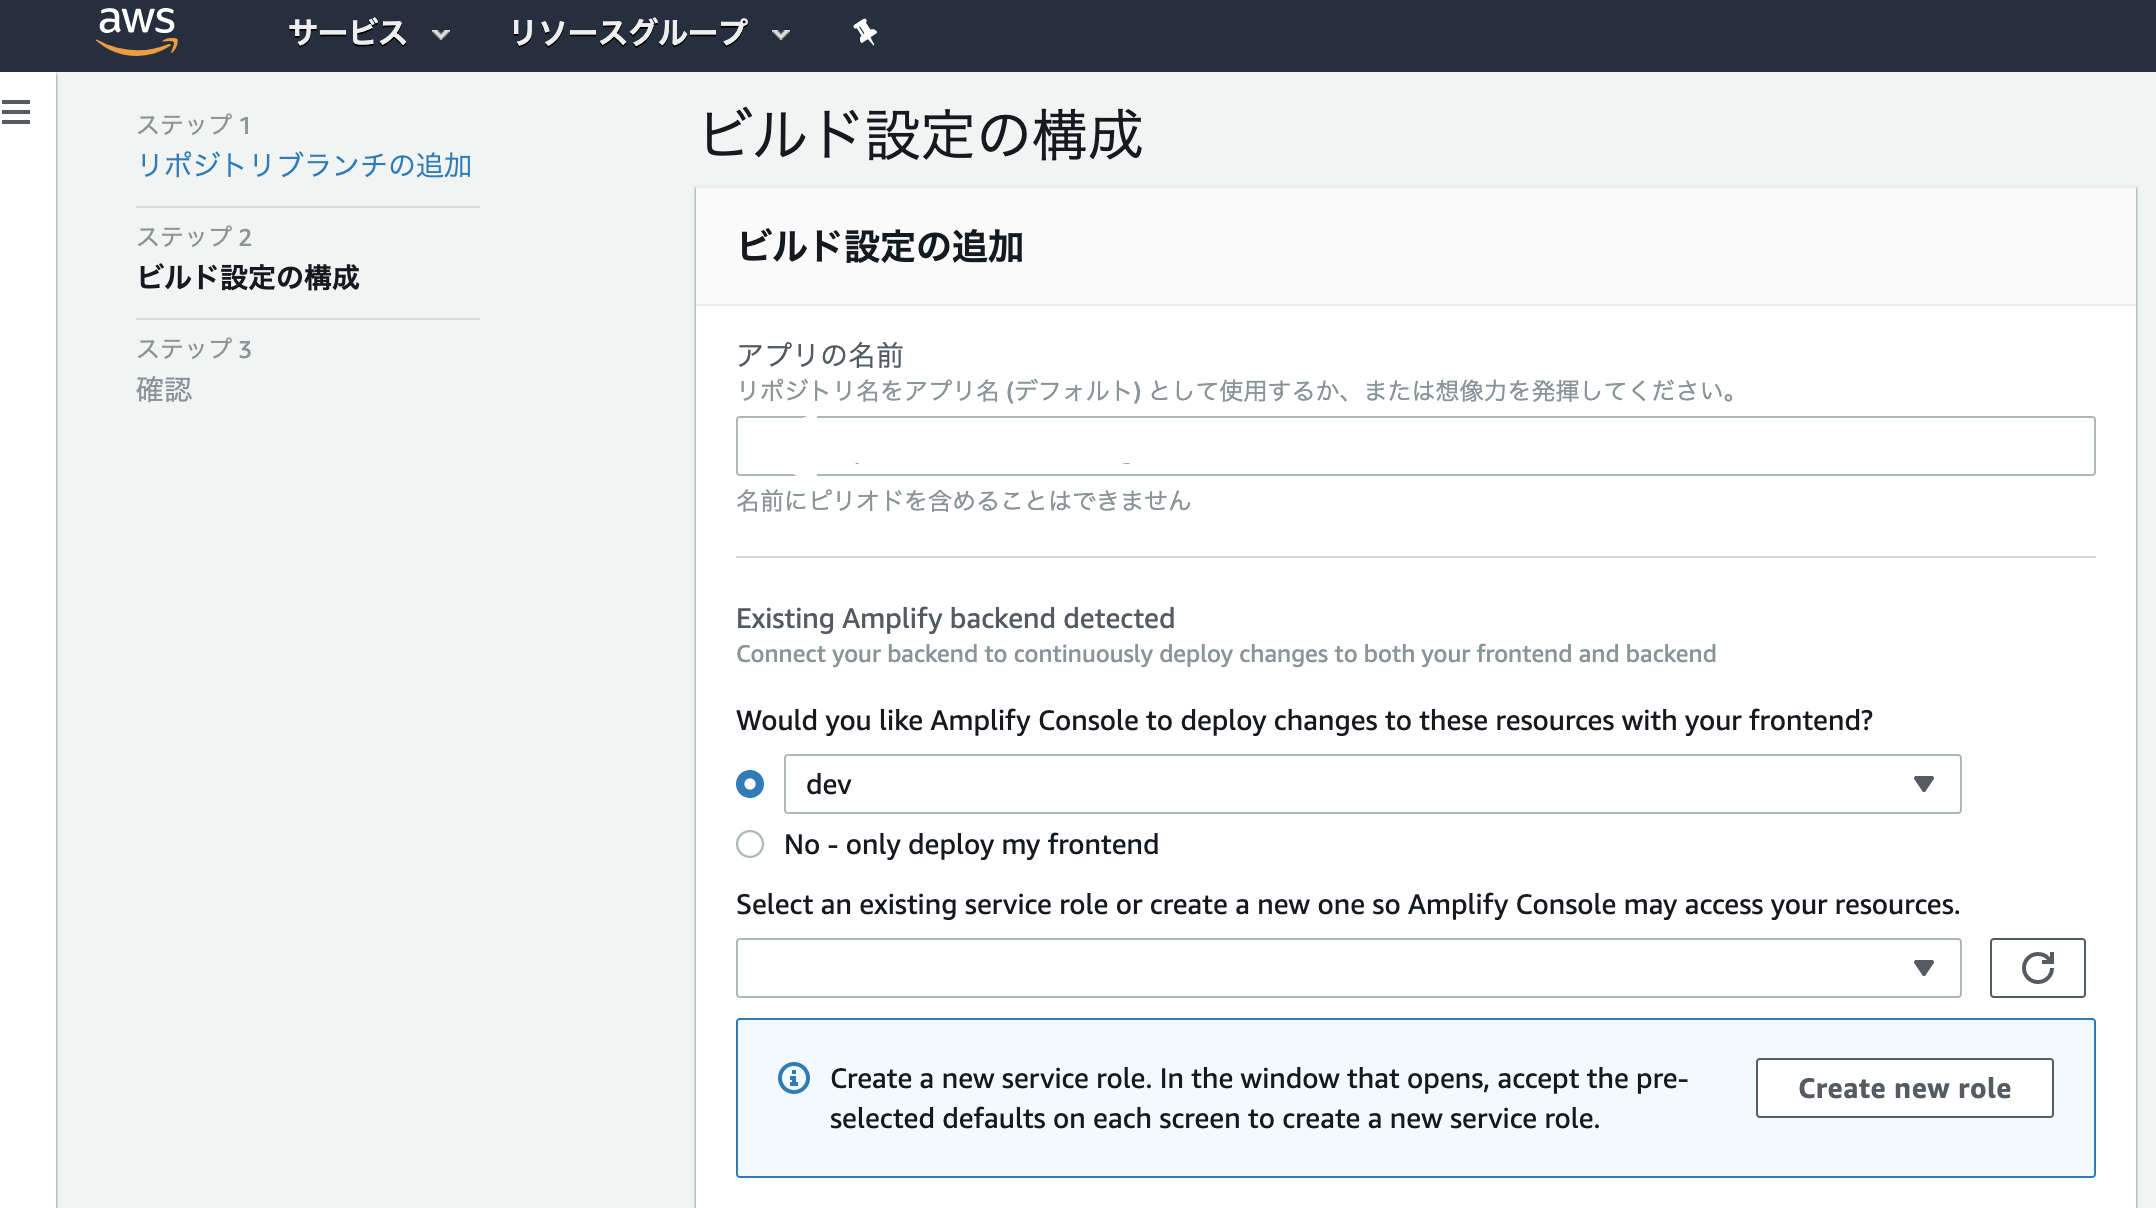
「アプリの作成」を押すと早速ビルドが始まります。

ビルドが終わり、プロビジョンから検証までオールグリーンであればDeploy成功です!
ドメインのところに書かれているURLを開いて以下のように表示されればOK!

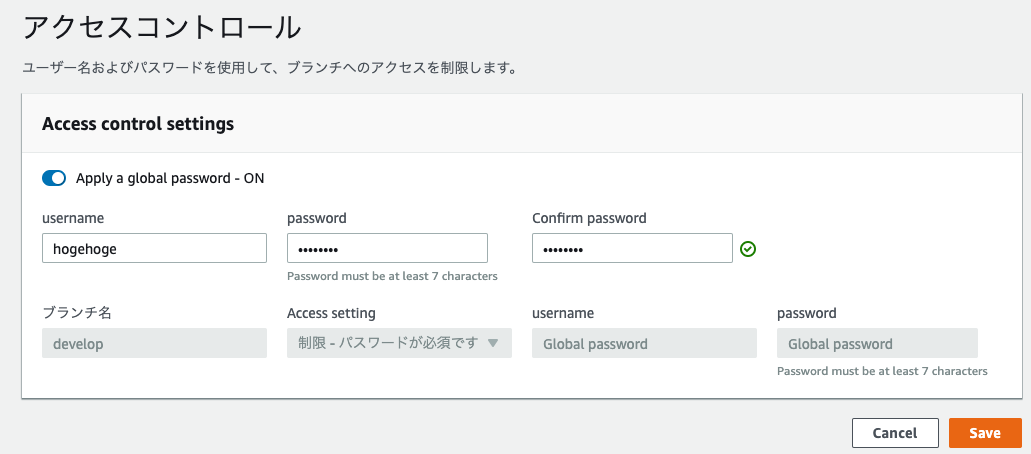
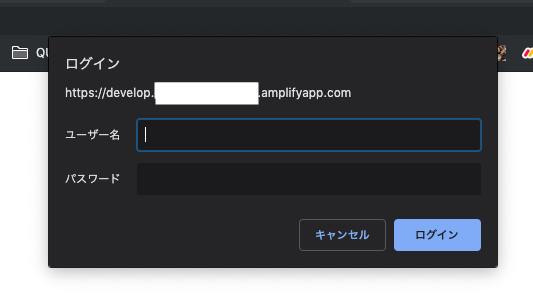
Basic認証を追加
このままだと誰でもアクセス出来てしまうので簡単な認証を追加することでそれを防ぎます。
Amplify Console左メニュの「アクセスコントロール」をクリック

「アクセスの管理」をクリック
Apply a global password を ON にして username と password を設定してSaveをクリック
キャッシュをクリアしてからURLを開いて以下のように表示されればOKです!
終わりに
VueProjectの作成からリソースの生成、ビルド&デプロイまで行いました。
次回はUIデザインを詰めていこうと思います。
ありがとうございました!
前 → Vue + AWS Amplifyでシンプルな画像共有アプリを作成する (概要) #1
次 → Vue + AWS Amplifyでシンプルな画像共有アプリを作成する (UIデザイン) #3