GSD
What is JAMstack?
Posted by Paweł Dąbrowski on October 11, 2023
Table of contents
What is JAMstack? How does it work?
In an era where a new JavaScript framework is created every day you might think that I’d want to introduce yet another one to you. And you’d be right and wrong at the same time. Although the term JAMstack is related to JavaScript and modern web development architecture, it is an ecosystem, a set of tools on their own.
Remember the time when most of the websites on the internet were static? They were fast, simple, cheap and the deployment process was easy. How about going back to those days? Instead of sending files via FTP we would publish the new version of the website by executing one command from the terminal - sounds good? Then let’s take a closer look at what JAMstack is and how it works.
Foundations of JAMstack
JAMstack is a set of tools that can be used to build an ecosystem. There are three foundations that are more like conventions rather than a set of specific tools that you have to use to fit in the definition of the term JAMstack.
 JavaScript
JS is the first foundation of the whole stack. You can love it or you can hate it but you have to admit that JavaScript is one of the most popular programming languages these days with an incredibly vibrant community. The request and response cycles are based on client side thanks to this technology. You can use either pure JavaScript or use any other framework or library available on the market such as React or Vue.
 API
API
Though I did mention the static websites, the next foundation of the JAMstack are APIs. Thanks to it you can use backend functionality without having a database or the backend engine on your own server. You still have backend, yes, but deploy only a static website. You can use any API you want, public or private. There are many third-part sites you can choose from. You can also connect to the other backend app that you have created.
 Markup
The presentation layer of your website. With the JAMstack ecosystem usually, it’s a static site generator where templated markup is prebuilt at the build time. You can write your own HTML and CSS code or use a framework such as Hugo, Jekyll or Gatsby, which will greatly improve the time of template development.

Why JAMstack? What are the advantages?
You’re probably wondering why you may need static websites in the era of modern and interactive websites with many cool features. The answer is obvious: static websites are great if you just need a website that is not a complex internet application. Before we dive into the list of advantages of using JAMstack, we will go through the history of this ecosystem so you will get a better understanding of the idea behind this whole new approach.
History of JAMstack
It all started with the LAMP stack where LAMP stands for Linux Apache MySQL and PHP. The term refers to the tech stack where a website is running on a Linux server with the MySQL database and PHP programming language. You might hear about WAMP or MAMP which is the same but refers to Windows and Mac OS.
This movement started in the late ’90s. Back then most of the websites on the Internet were running on MySQL and PHP. Before PHP there was just static HTML which allows building static websites. Since LAMP was coined, static websites were not cool for a long time. In 2016 a small group of developers established the term JAMstack and started to slowly promote it among other developers and the whole dev community.
A year later, in 2017, the JAMstack community has grown and static websites became something more than just information pages where the content was changed only by editing page files and uploading them on the server. It was possible to build dynamic websites and apps. The new stack has hit the mainstream and it became very popular in a relatively short time.
JAMstack vs the traditional way of building websites
JAMstack is using well-known technologies, but the way you can build websites with it follows a non-traditional approach, slightly different from what we have known for years.
Differences in workflows
With the JAMstack you focus on the presentation layer first and then just fill the website with data. You don’t have to build backend because you are using 3rd party APIs and the creation of the frontend is faster because you generate things instead of building them from the ground.
Benefits for the developer
The biggest benefit for the developers using JAMstack is the saved time on every step of the development process. JAMstack provides a great developer experience since generating code is way faster than writing it from scratch. Also, the deployment process is easier because you don’t have to think about the database and other backend stuff, you just deploy a static website where most of the content is usually already present. Let’s have a look at how to build a website with JAMstack.
How Do I Use JAMstack to Build My Site? Understanding the Architecture
It’s time to put our hands on the keyboard and build something awesome that will be working well from day one. What’s more, our website will be online in seconds without any cost.
Collecting the pieces
As mentioned before, JAMstack ecosystem is built on the top of three foundations: JavaScript, API, and Markup. Before we dive into the development process, it is good to choose our favorite tools because it will speed up the whole process and make it even more pleasant.
J - Javascript
Do you have your favorite JavaScript framework or library? These days there are some strong and well-known players available to use: React, Vue, Angular, jQuery and many more. Choose your favorite one. If you prefer using vanilla JavaScript then it’s even easier to start. In our tutorial, we will use plain JS and methods provided by the markup library so no extra configuration is required.
A - API
We won’t build backend on our side so this is the right moment to choose which external API we want to use. There are many options available out there and ButterCMS, a headless CMS, is a perfect pair for the JAMstack. The authorization mechanism is simple yet safe and powerful. We just have to send a token along with the request URL so it will be easy to integrate external data with our website.
M - Markup
The last thing is markup which is responsible for the presentation layer and templates. In this tutorial, we will use Hugo, the world fastest framework for building websites. Hugo provides plenty of free templates that are perfect to start so don’t worry about anything and prepare for the fun.
Workflow
In contrast to the traditional workflow, we will start with generating templates and layout with the Hugo framework. The next step is to fill our website with data using external API provided by ButterCMS. Once our website is ready to be shown to the world, we will use Netlify to deploy it for free in seconds.
Summary
In the previous paragraphs, we went through some practical information about the development process with the JAMStack ecosystem, decided on which tools we will use and what workflow we will follow. We are ready to write some code and see the first results. Sounds good? Then let’s go!
An Example: Let's See the Code
Hands on the keyboard! We will create our first website now.
Markup with Hugo
Installation
To be able to generate a JAMstack website we have to install Hugo first. If you are using MacOS system then you can do this with homebrew:
brew install hugoand to verify that everything went well, check the tool version:
hugo versionIf you are using other systems then check https://gohugo.io/getting-started/installing website for the guidance.
Generation
Our tool is already installed in our system so we can generate the layout and other files for our website. In order to do this, we have to call the new site command from Hugo framework:
hugo new site awesomesiteThis command will generate awesomesite directory with the website content inside.
Theme installation
Before we run the server for the first time, we have to install a template. You can look for available themes on https://themes.gohugo.io but for now, we will use the Ananke theme for a quicker start:
git init
git submodule add https://github.com/budparr/gohugo-theme-ananke.git themes/ananke
Our theme is installed and the last thing is to update the config to tell Hugo which template we would like to use:
echo 'theme = "ananke"' >> config.tomlWe can now start our server:
hugo serverYou should see the default welcome message:
Total in 20 ms
Watching for changes in awesomesite/{content,data,layouts,static,themes}
Watching for config changes in config.toml
Environment: "development"
Serving pages from memory
Running in Fast Render Mode. For full rebuilds on change: hugo server --disableFastRender
Web Server is available at http://localhost:1313/ (bind address 127.0.0.1)
Press Ctrl+C to stop
Page generation
Now it’s time to add some pages. We will add an “about” and a “contact” page that are usually present on a typical website:
hugo new contact.md
hugo new about.md
Our pages are generated but we can access them only by typing the address into the browser. It’s time to add a menu. Open the config.toml file and add our menu times:
[menu]

  [[menu.main]]
    identifier = "about"
    name = "About"
    url = "/about/"
    weight = -110

  [[menu.main]]
    identifier = "contact"
    name = "Contact"
    url = "/contact/"
    weight = -110
You can change the page contents with the markdown syntax to play with it a little bit. Remember that you have to update the draft attribute for each page and set it to true in order to see the page on the website. Each time when you generate a new page, it’s not visible by default because of the draft attribute:
---
title: "Contact"
date: 2019-05-09T17:33:44+02:00
draft: true
---
You have to change its value to false if you want to make your page available on the production version of the website otherwise it’s hidden from the world.
API with ButterCMS
At this stage, we end up with a simple website, two pages, and a responsive layout. We will introduce API now to be able to edit pages easily via the web interface. Start by creating a new account on ButterCMS website. (Did you know you can try out ButterCMS for free?)
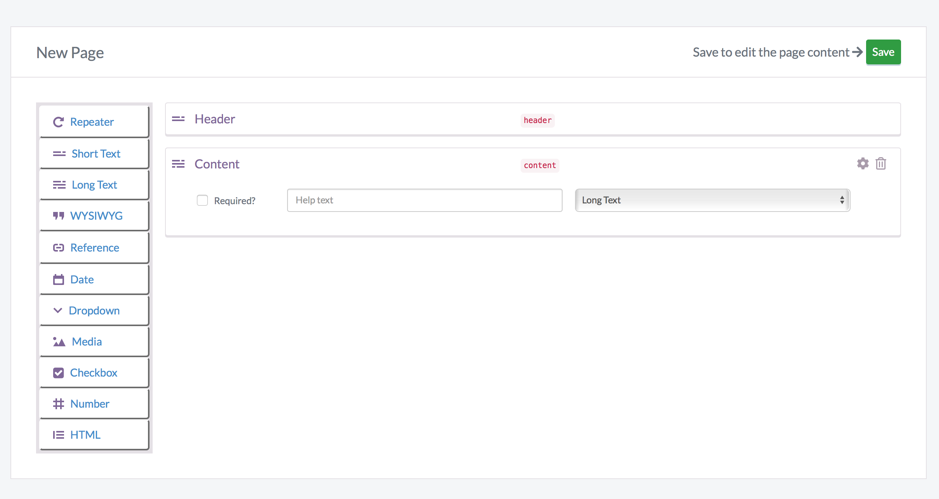
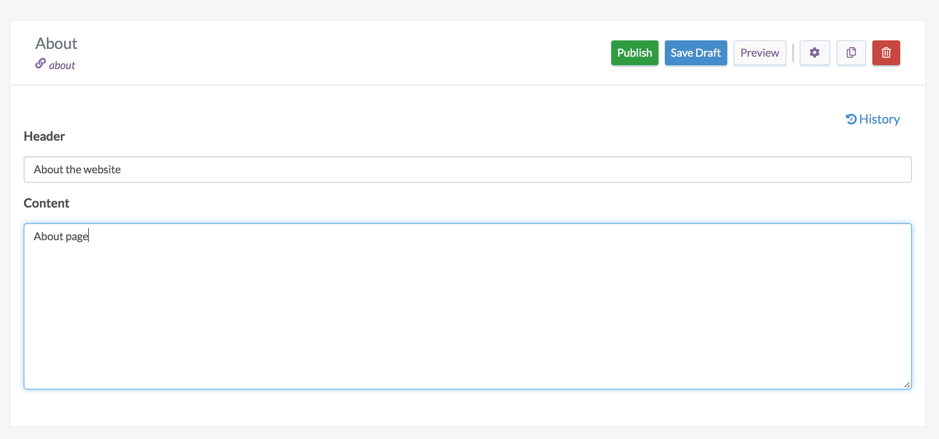
Now, move on to the pages section and click the “New Page” button. Each page in the ButterCMS system consists of multiple fields and in our tutorial, we will need to create two fields: header and content. We need multiple fields because we will fetch the page from API and usually we will need more data than just content.
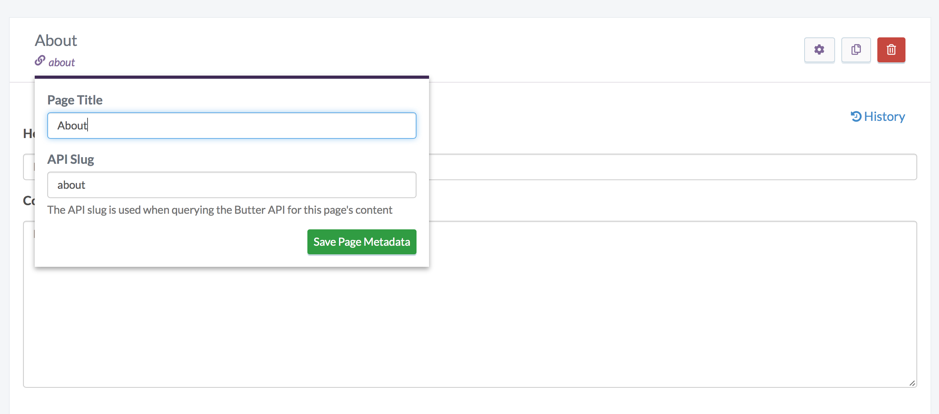
In the next step, we have to save the page title and page slug. Slug is a unique name for your page. Thanks to it you can easily fetch page content using the API.
The last step is to add test content into the fields we created in the previous step.
Now, we are ready to pull our page from the API. You can test it in your browser. In order to do this, replace “api_key” placeholder with your own API key in the following URL and open it in the browser:
https://api.buttercms.com/v2/pages/*/about/?auth_token=api_key
You should see the response in JSON format - it means that everything is working fine and we can pull our pages.
Hugo + API
Let’s get back to our website. We have some static data already saved there but now, we want to pull the about page data from our ButterCMS account.
Markdown is a simple format so in order to pull data from the API, we have to use Hugo’s shortcodes feature. A shortcode is a code snippet that allows us to render raw HTML inside the template without losing the simplicity provided by the Markdown syntax for content management.
We will create one shortcode that will pull the given page from the ButterCMS API and render it on our website. Create a new directory in the layouts folder called “shortcodes” and then create a file named api_page.html with the following content:
{{ $slug := .Get "slug" }}
{{ $resource := printf "%s%s%s" "https://api.buttercms.com/v2/pages/*/" $slug "/?auth_token=api_key"}}
{{ $data := getJSON $resource }}

<h1>{{ $data.data.fields.header }}</h1>
<p>{{ $data.data.fields.content }}</p>
Before we move forward, I will explain what exactly happened in our code:
- In the first line we used
.Getmethod provided by the Hugo framework to fetch the value of the slug argument name passed when calling our code - In the next line, we prepared the API URL that we need to use in order to pull the page content from our ButterCMS account
- We pulled data from said API in JSON format using another built-in method -
getJSON - Finally, we rendered our data
Our code is ready, we can now use it on our pages. Open the contents/about.md page and put the following code:
---
date: 2019-05-09T17:33:48+02:00
draft: false
---

{{< api_page slug="about" >}}
Now, each time you want to display page data you have to call the above method with the proper value passed along with the slug key. You should now be able to see content from the API on the about page.
Deployment
It’s time to make our site live. We have to set up a new account on https://app.netlify.com. Remember your password and login as we will need them when deploying our website from the command line.
After creating a new account we can install the CLI tool for Netlify. Run the following command in your terminal:
npm install netlify-cli -gVerify your installation by running netlify command. You should see the list of available commands. Now move to the directory where your website is located and authorize yourself by running the following command:
netlify loginWhen you are signed in, the last step is to deploy our website. Run the following command:
netlify deploy --prodYou should be asked about the directory that you want to deploy into. Write “public” (because that’s where static files are placed in web projects) and hit the enter key. Enter the unique slug for the website and in seconds you should be able to access your live website:
yourslug.netlify.comNext steps
Our website is now live and available for everyone. You can now modify the layout, add more pages or set up your own domain. There are a lot of modification options available out there as well as custom themes that you can use for free.
If you are looking for inspiration you can check the list of example websites available on the official JAMStack page - https://jamstack.org/examples/ - there are many websites listed with the tech stack explained.
How to Use Jamstack Going Forward
Building your first website with JAMStack is just the beginning of an incredible journey. There are several ways that you can continue including contributions to the open source and making JAMStack more popular in the business world.
Business clients and JAMstack
JAMStack is not only a great choice for small personal projects but also for larger commercial websites or applications. A static site means a faster site which leads to a better ranking at Google and more traffic. More traffic usually means more income and this should attract your potential clients. A static site is a lot simpler than dynamic one so it's safer by default. These days it is hard to argue with this, secure website is one of the most important things right now.
Your contribution
You can also become part of the JAMStack movement by contributing in several ways. The easiest way is to build your own website and tell other people that you have used JAMStack to create it. If sharing knowledge is your thing then you can write an article, tutorial or share articles from other industry players that create amazing things. You can also build your own library that will be part of the JAMStack ecosystem, it's up to you!
What we've learned
So far we learned what JAMStack is and what its foundations are. We quickly went through its history and briefly compared it to the traditional way of building websites. During the practical part of the article, we have learned how to build our first website using ButterCMS API as the backend and Hugo framework as the tool for website templates.
Now you are able to be part of the JAMStack community and build your next, more advanced website.
Make sure to check out our Jamstack guide with Gatsby on the front-end and hosted by Netlify.
ButterCMS is the #1 rated Headless CMS


Related articles
Don’t miss a single post
Get our latest articles, stay updated!
Paweł is a self-made writer of the digital era, IT samurai and problem solver who loves Ruby. He writes for human beings and computers at pdabrowski.com and focuses on soft skills in the software creation process.