はじめに
どうも、2回目のらいうです。
今回も全開に引き続きこちらのアプリを作っていきます。
※問題リストが表示されるまで時間がかかる現象の解決法を見つけました!
part1:サーバも含めたiOSアプリ開発を1から10まで説明(1/2)
part2: サーバも含めたiOSアプリ開発を1から10まで説明(2/2) *コーディングだけでUIもつくるよ ⬅️イマココ
アプデ1:swiftで画面の表示が遅い時の対処法(iosのUIを更新する処理はメインスレッドで行う)
アプデ2:オフラインでもアプリが動くようにとSNSシェア機能の追加アプデ
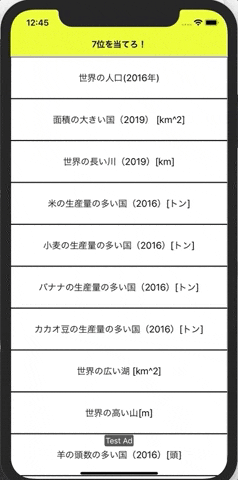
7位当て:App Store
まだ、前回のサーバサイド構築編を読んでない方はこちら
サーバも含めたiOSアプリ開発を1から10まで説明(1/2)
それと、細かい説明はいらんからソースだけ見せろという方にはgithubのリンク貼っておきます
https://github.com/Raiu1210/hit_7th
Android版は完成したらpart3という形でこのシリーズに追加しようと思います。
現在(2019年6月17日)ではios側しかできていないので、ご容赦ください。
クライアント側(ios)
全体像としては、こんな感じ
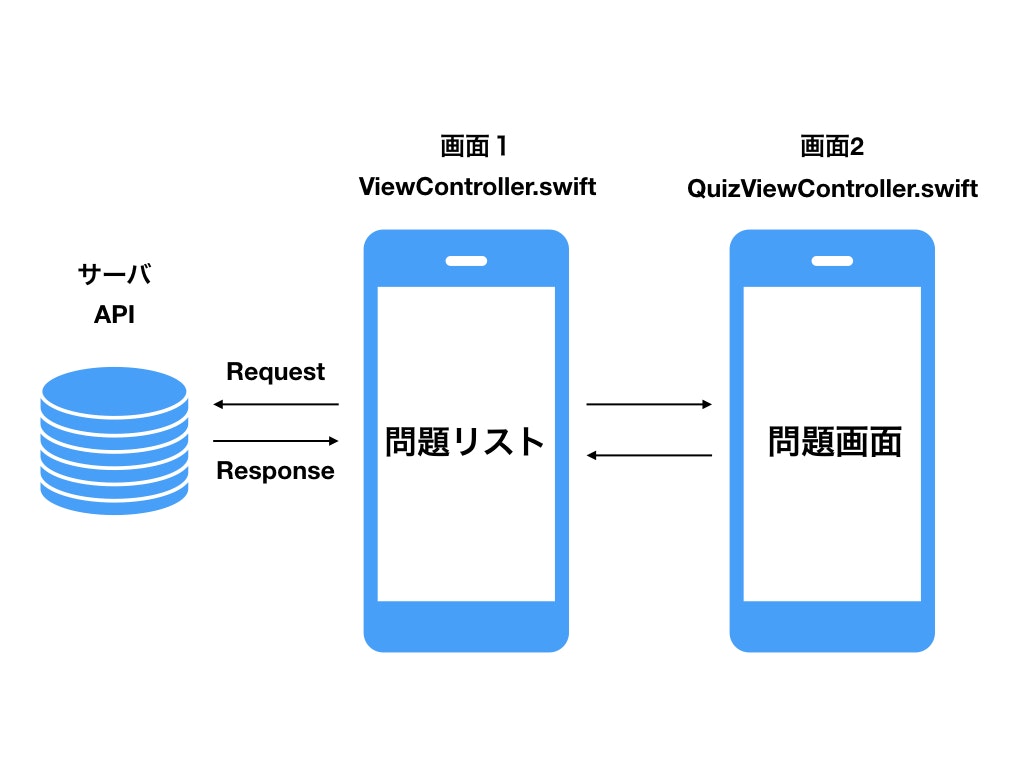
- 2画面構成
- 問題リスト(ViewController.swift)
- 問題画面 (QuizViewController.swift)
前回作ったサーバ側でjsonを返すphpファイルを設置しておいたので、そこにリクエストを送って、クライアントで処理をします。
ちなみに、僕はstoryboardとかは使わずに、コーディングだけでUIも作りたい派です。
Xcode
Xcodeは今更解説する必要もないほど、情報があふれたものだと思うので初めての方は色々ググってみてください。MacであればApp storeからインストールできます。
https://apps.apple.com/jp/app/xcode/id497799835?l=en&mt=12
これで、新規プロジェクトを作りましょう
僕はSingle View Applicationで作りました
あと、レンタルサーバによってはhttpsが対応していなかったりすると思うのですが、デフォルトではiosはhttps通信しか許してくれないので、http通信をする際はinfo.plistを編集して許可しなければいけません。
https://fukatsu.tech/permit-http-ios
CocoaPodsを使ってライブラリを用意
CocoaPodsについては、インストール方法や使い方はたくさん記事になっているので、お好みのものを読みながら準備してください。
ググって一番上に出てきたのはこれ
iOSライブラリ管理ツール「CocoaPods」の使用方法
おそらくですが、この記事の最後の部分はちょっと間違っていて
updateだけではすでに入れたライブラリのアップデートがされるだけで、インストールはできなかったはず。
新しいライブラリを使うときは
pod install --repo-update
した方が良さそう。
んで、今回使っているのはこんな感じ
platform :ios, '12.0'
use_frameworks!

target 'hit_7th' do
  pod 'SwiftyJSON', '~> 4.0'
  pod 'Firebase/Core'
  pod 'Firebase/AdMob'
end
デフォルトの機能だけではswiftでjsonを扱うのが少し面倒なので、コーディングがシンプルにできるようにSwiftyJSONを使います。
Firebase周りは、アナリティクスを入れたり、広告をつけたりしたい時用なので、今回は必ずしも必要なわけではありません。
細かい実装に関しては、googleの出している公式documentを読みながら実装してください。チュートリアルもわかりやすいので問題なくできると思います。
ファイル構造
- hit_7th
  |- Podfile
  |- Podfile.lock
  |- hit_7th.xcodeproj
  |- hit_7th.xcworkspace
  |- Pods
    |- インストールしたライブラリ達
  |- hit_7th
    |- ViewController.swift
    |- QuizViewController.swift
    |- (その他もろもろ)
こんな感じにしたいので、とりあえずQuizViewController.swiftを作りましょう。
command + n でファイルを追加
swiftファイルを選んでQuizViewControllerと名前をつける
Firebaseとかを使いたければ、https://firebase.google.com/docs/ios/setup?hl=ja
これをみながらGoogleService-Info.plistをダウンロードして、File->Add files to "project name"に追加しましょう。
ドラッグ&ドロップではダメっぽいです。
AppDelegate.swift
import UIKit
import Firebase
import GoogleMobileAds

@UIApplicationMain
class AppDelegate: UIResponder, UIApplicationDelegate {

    var window: UIWindow?
    var myNavigationController: UINavigationController?
    var json_string:String?
    var selected_id:Int?

    func application(_ application: UIApplication, didFinishLaunchingWithOptions launchOptions: [UIApplication.LaunchOptionsKey: Any]?) -> Bool {
        // Override point for customization after application launch.

        FirebaseApp.configure()
        GADMobileAds.sharedInstance().start(completionHandler: nil)

        let first: ViewController = ViewController()
        myNavigationController = UINavigationController(rootViewController: first)
        let n_bar_rgba = UIColor(red: 240/255, green: 240/255, blue: 10/255, alpha: 1)
        UINavigationBar.appearance().barTintColor = n_bar_rgba
        self.window = UIWindow(frame: UIScreen.main.bounds)
        self.window?.rootViewController = myNavigationController
        self.window?.makeKeyAndVisible()

        return true
    }

    func applicationWillResignActive(_ application: UIApplication) {
        // Sent when the application is about to move from active to inactive state. This can occur for certain types of temporary interruptions (such as an incoming phone call or SMS message) or when the user quits the application and it begins the transition to the background state.
        // Use this method to pause ongoing tasks, disable timers, and invalidate graphics rendering callbacks. Games should use this method to pause the game.
    }

    func applicationDidEnterBackground(_ application: UIApplication) {
        // Use this method to release shared resources, save user data, invalidate timers, and store enough application state information to restore your application to its current state in case it is terminated later.
        // If your application supports background execution, this method is called instead of applicationWillTerminate: when the user quits.
    }

    func applicationWillEnterForeground(_ application: UIApplication) {
        // Called as part of the transition from the background to the active state; here you can undo many of the changes made on entering the background.
    }

    func applicationDidBecomeActive(_ application: UIApplication) {
        // Restart any tasks that were paused (or not yet started) while the application was inactive. If the application was previously in the background, optionally refresh the user interface.
    }

    func applicationWillTerminate(_ application: UIApplication) {
        // Called when the application is about to terminate. Save data if appropriate. See also applicationDidEnterBackground:.
    }


}
デフォルトの形と変えているのはごく一部で
広告とアナリティクス用の
import Firebase
import GoogleMobileAds
クラス変数として
画面遷移用に myNavigationController: UINavigationController?
jsonの退避場所 json_string:String?
ボタンIDの退避場所 selected_id:Int?
FirebaseApp.configure() GADMobileAds.sharedInstance().start(completionHandler: nil)
この2つの関数は広告とアナリティクス用
let first: ViewController = ViewController()
myNavigationController = UINavigationController(rootViewController: first)
let n_bar_rgba = UIColor(red: 240/255, green: 240/255, blue: 10/255, alpha: 1)
UINavigationBar.appearance().barTintColor = n_bar_rgba
self.window = UIWindow(frame: UIScreen.main.bounds)
self.window?.rootViewController = myNavigationController
self.window?.makeKeyAndVisible()
画面遷移用に、クラスの指定と
ナビゲーションバーの色の指定
あとは画面遷移用のおまじない
ViewController.swift
//
//  ViewController.swift
//  hit_7th
//
//  Created by Ryu Ishibashi on 2019/06/06.
//  Copyright © 2019 Ryu Ishibashi. All rights reserved.
//

import UIKit
import SwiftyJSON
import GoogleMobileAds

class ViewController: UIViewController, GADBannerViewDelegate {
    self.title = "7位を当てろ!"
    var viewWidth:CGFloat = 0.0
    var viewHeight:CGFloat = 0.0
    var bannerView: GADBannerView!
    let data_server = "http://zihankimap.work/hit_7th/datalist"
    let scrollView = UIScrollView()
    let appDelegate = UIApplication.shared.delegate as! AppDelegate

    override func viewDidLoad() {
        super.viewDidLoad()
        // Do any additional setup after loading the view.

        viewWidth = self.view.frame.width
        viewHeight = self.view.frame.height
        self.view.backgroundColor = UIColor.white
        get_data_from_server(url: data_server)
        show_banner_ad()
    }

    private func show_banner_ad() {
        bannerView = GADBannerView(adSize: kGADAdSizeBanner)
        bannerView.adUnitID = "ca-app-pub-9410270200655875/4326461587"
        bannerView.rootViewController = self
        bannerView.load(GADRequest())
        addBannerViewToView(bannerView)
    }

    func addBannerViewToView(_ bannerView: GADBannerView) {
        bannerView.translatesAutoresizingMaskIntoConstraints = false
        view.addSubview(bannerView)
        view.addConstraints(
            [NSLayoutConstraint(item: bannerView,
                                attribute: .bottom,
                                relatedBy: .equal,
                                toItem: bottomLayoutGuide,
                                attribute: .top,
                                multiplier: 1,
                                constant: 0),
             NSLayoutConstraint(item: bannerView,
                                attribute: .centerX,
                                relatedBy: .equal,
                                toItem: view,
                                attribute: .centerX,
                                multiplier: 1,
                                constant: 0)
            ])
    }

    private func get_data_from_server(url:String){
        let url = URL(string: url)!
        print("URL : \(url)")
        let request = URLRequest(url: url)
        let session = URLSession.shared
        session.dataTask(with: request) { (data, response, error) in if error == nil, let data = data, let response = response as? HTTPURLResponse {
            let jsonString = String(data: data, encoding: String.Encoding.utf8) ?? ""
            let json_Data: Data =  jsonString.data(using: String.Encoding.utf8)!
            self.appDelegate.json_string = jsonString
//            print(json_Data)

            do {
                let parsed_data = try JSON(data: json_Data)
                let num_of_Q = parsed_data.count
                self.create_view(num_of_Q: num_of_Q)
                print(num_of_Q)
                for i in 0 ..< parsed_data.count
                {
                    let id = parsed_data[i]["id"].stringValue
                    let title = parsed_data[i]["title"].stringValue
                    self.create_button(index:i, id: Int(id)!, title: title)
                }
            } catch { print(error) }
            }
            }.resume()
    }

    private func create_view(num_of_Q:Int) {
        scrollView.frame = CGRect(x: 0, y: 90, width: viewWidth, height: viewHeight-90)
        scrollView.contentSize = CGSize(width: Int(viewWidth), height: 80*(num_of_Q+1))

        self.view.addSubview(scrollView)
    }

    private func create_button(index:Int, id:Int, title:String) {
        navigationItem.backBarButtonItem = UIBarButtonItem(title: "", style: .plain, target: nil, action: nil)
        let Q_Button = UIButton()
        Q_Button.frame = CGRect(x:0, y:80*index, width:Int(viewWidth), height:80)
        Q_Button.titleLabel?.numberOfLines = 0
        Q_Button.setTitle(title, for: .normal)
        Q_Button.layer.borderWidth = 1.0
        Q_Button.layer.borderColor = UIColor.black.cgColor
        Q_Button.setTitleColor(UIColor.black, for: .normal)
        Q_Button.tag = id
        Q_Button.addTarget(self, action: #selector(ViewController.goQuiz(_:)), for: .touchUpInside)
        self.scrollView.addSubview(Q_Button)
    }

    @objc func goQuiz(_ sender: UIButton) {
        self.appDelegate.selected_id = sender.tag
        let quizVC = QuizViewController()
        self.navigationController?.pushViewController(quizVC, animated: true)
    }
}
import
import UIKit
import SwiftyJSON
import GoogleMobileAds
UIKitはデフォであるはず
SwiftyJSONは今回使います。
GoogleMobileAdsは広告入れたい人用(Podでfirebase/AdMobが必要)
Class
class ViewController: UIViewController, GADBannerViewDelegate {
    ...
}
広告入れたい人は、GADBannerViewDelegateも継承しておきましょう。
そうでない人はいじる必要ないです
クラス内変数
self.title = "7位を当てろ!"
var viewWidth:CGFloat = 0.0
var viewHeight:CGFloat = 0.0
var bannerView: GADBannerView!
let data_server = "http://zihankimap.work/hit_7th/datalist"
let scrollView = UIScrollView()
let appDelegate = UIApplication.shared.delegate as! AppDelegate
self.title = "7位を当てろ!"
でnavigationControllerのタイトルを書きます
viewWidthとviewHeightは
画面サイズを使いたいのでグローバル変数として用意しておきます
bannerViewは広告用
data_serverはjsonAPIのURL
scrollViewは問題リストに
appDelegateは画面遷移時にデータを渡す時のバッファとして利用します
(本来ここを使うのはあまり良くないかもしれませんが、小さいデータならDelegateを使った方が少ないコードでシンプルに実装できそうだったので、今回はこれを利用しました)
viewDidLoad()
override func viewDidLoad() {
        super.viewDidLoad()
        // Do any additional setup after loading the view.

        viewWidth = self.view.frame.width
        viewHeight = self.view.frame.height
        self.view.backgroundColor = UIColor.white
        get_data_from_server(url: data_server)
        show_banner_ad()
    }
インスタンス化された直後に呼び出される関数。
ここに、主な処理を書いていきます。
viewWidth = self.view.frame.width
viewHeight = self.view.frame.height
self.view.backgroundColor = UIColor.white
クラス変数で作った横幅、縦幅に画面サイズを格納していきます。
3行目はいらないかも。デフォで白色だけど何かの手違いでそれ以外の色になったら嫌なので(心配性w)一応書いておきましたw
get_data_from_server(url: data_server)
show_banner_ad()
この2つの関数は自分で定義します。
1つ目の関数は、サーバにリクエストを送ってjsonレスポンスをもらいます。
2つ目の関数は、広告を表示します。
private func get_data_from_server(url:String){
        let url = URL(string: url)!
        print("URL : \(url)")
        let request = URLRequest(url: url)
        let session = URLSession.shared
        session.dataTask(with: request) { (data, response, error) in if error == nil, let data = data, let response = response as? HTTPURLResponse {
            let jsonString = String(data: data, encoding: String.Encoding.utf8) ?? ""
            let json_Data: Data =  jsonString.data(using: String.Encoding.utf8)!
            self.appDelegate.json_string = jsonString
//            print(json_Data)

            do {
                let parsed_data = try JSON(data: json_Data)
                let num_of_Q = parsed_data.count
                self.create_view(num_of_Q: num_of_Q)
                print(num_of_Q)
                for i in 0 ..< parsed_data.count
                {
                    let id = parsed_data[i]["id"].stringValue
                    let title = parsed_data[i]["title"].stringValue
                    self.create_button(index:i, id: Int(id)!, title: title)
                }
            } catch { print(error) }
            }
            }.resume()
    }
まず
let url = URL(string: url)!
でさっき定義したURL文字列をURLデータにします。
let request = URLRequest(url: url)
でリクエストを作成して
let session内で処理をしていきます。
最初の方は、おまじないに近くてそういう変数達でデータを格納していくんだーという感じで処理はHTTPURLResponse{}内で作ります。
まず
let jsonString = String(data: data, encoding: String.Encoding.utf8) ?? ""
で受け取ったjson文字列のデータを格納します。
let json_Data: Data = jsonString.data(using: String.Encoding.utf8)!
で文字列のデータからjsonデータにします。
また、遷移先の画面でもこのjsonデータは使いたいので
self.appDelegate.json_string = jsonString
でjsonStringをDelegate側にも入れておきます。
Data型のデータを保存できれば速そうなんですが、最初に定義しておく方法がわからなかったのでデフォルト機能でできるStringデータを格納しました。
次にdo関数内でscrollViewを完成させます
let parsed_data = try JSON(data: json_Data)
let num_of_Q = parsed_data.count self.create_view(num_of_Q: num_of_Q)
まずjsonDataをパースしてswiftyJSONで使えるようにします。
次にデータ数のカウントをします。これはつまり連想配列がいくつあるか=問題数となります。これをcreate_view関数の引数に入れて実行します。
create_view関数
private func create_view(num_of_Q:Int) {
        scrollView.frame = CGRect(x: 0, y: 90, width: viewWidth, height: viewHeight-90)
        scrollView.contentSize = CGSize(width: Int(viewWidth), height: 80*(num_of_Q+1))

        self.view.addSubview(scrollView)
    }
frameで設置場所
contentSizeで後ろのviewのサイズを指定します。この時、さっきの問題数を引数としてViewを作っているので、DB側にデータを追加すれば画面が勝手に対応してくれます。
このような工夫をすることで問題追加アップデートが楽になります。
この機能のおかけで、僕がDBに問題を追加するだけで問題追加のアップデートになります。
そしてこのscrollViewをself.view.addSubview(scrollView)でviewに配置します。
scrollViewについては、イメージがわかないと使い方がわかりずらいと思いますので
https://hajihaji-lemon.com/smartphone/swift/uiscrollview/
こちらを参考にしてください
さて、少し戻って
for i in 0 ..< parsed_data.count
{
let id = parsed_data[i]["id"].stringValue
let title = parsed_data[i]["title"].stringValue
self.create_button(index:i, id: Int(id)!, title: title)
}
ここでjsonデータに格納していた
idをid変数に
titleをtitle変数に
そして、これらとfor文のiを引数としてcreate_button関数に入れます。
create_button関数
private func create_button(index:Int, id:Int, title:String) {
        navigationItem.backBarButtonItem = UIBarButtonItem(title: "", style: .plain, target: nil, action: nil)
        let Q_Button = UIButton()
        Q_Button.frame = CGRect(x:0, y:80*index, width:Int(viewWidth), height:80)
        Q_Button.titleLabel?.numberOfLines = 0
        Q_Button.setTitle(title, for: .normal)
        Q_Button.layer.borderWidth = 1.0
        Q_Button.layer.borderColor = UIColor.black.cgColor
        Q_Button.setTitleColor(UIColor.black, for: .normal)
        Q_Button.tag = id
        Q_Button.addTarget(self, action: #selector(ViewController.goQuiz(_:)), for: .touchUpInside)
        self.scrollView.addSubview(Q_Button)
    }
遷移先のnavigationItemに関するプロパティを設定します。
ボタンのプロパティについてはたくさん記事があると思うのでそちらを参照していただくとして、注目すべきはindexを使って次々ボタンを作成することです。さっきの問題追加のアップデートを容易にするための機能と関わりがあります。
self.scrollView.addSubview(Q_Button)
それと、このボタンは viewにaddするのではなくscrollviewにaddする点に注意です。
Q_Button.addTarget(self, action: #selector(ViewController.goQuiz(_:)), for: .touchUpInside)で
ボタンを押された時の関数はgoQuiz()と指定しています。
ボタンを押された時の関数(goQuiz())
@objc func goQuiz(_ sender: UIButton) {
        self.appDelegate.selected_id = sender.tag
        let quizVC = QuizViewController()
        self.navigationController?.pushViewController(quizVC, animated: true)
    }
まずdelegate側にボタンのtagすなわちidを保存しておきます。
そしてQuizViewControllerに移動します。
QuizViewController.swift
import UIKit
import SwiftyJSON
import GoogleMobileAds

class QuizViewController: UIViewController {
    let appDelegate = UIApplication.shared.delegate as! AppDelegate
    var num = [5, 6, 7, 8].shuffled()
    var data:[String:String] = [:]
    var index = 0
    var message = ""
    var bannerView: GADBannerView!

    override func viewDidLoad() {
        super.viewDidLoad()

        prepare_quiz()
        show_banner_ad()
    }

    private func show_banner_ad() {
        bannerView = GADBannerView(adSize: kGADAdSizeBanner)
        bannerView.adUnitID = "ca-app-pub-9410270200655875/1210000198"
        bannerView.rootViewController = self
        bannerView.load(GADRequest())
        addBannerViewToView(bannerView)
    }

    func addBannerViewToView(_ bannerView: GADBannerView) {
        bannerView.translatesAutoresizingMaskIntoConstraints = false
        view.addSubview(bannerView)
        view.addConstraints(
            [NSLayoutConstraint(item: bannerView,
                                attribute: .bottom,
                                relatedBy: .equal,
                                toItem: bottomLayoutGuide,
                                attribute: .top,
                                multiplier: 1,
                                constant: 0),
             NSLayoutConstraint(item: bannerView,
                                attribute: .centerX,
                                relatedBy: .equal,
                                toItem: view,
                                attribute: .centerX,
                                multiplier: 1,
                                constant: 0)
            ])
    }

    private func prepare_quiz(){
        let selected_id = appDelegate.selected_id?.description
        let jsonString = appDelegate.json_string!
        let json_Data: Data =  jsonString.data(using: String.Encoding.utf8)!
        let parsed_data = try! JSON(data: json_Data)

        while parsed_data[index]["id"].stringValue != selected_id {
            index += 1
        }

        data.updateValue(parsed_data[index]["title"].stringValue, forKey: "title")
        data.updateValue(parsed_data[index]["1st"].stringValue, forKey: "1st")
        data.updateValue(parsed_data[index]["2nd"].stringValue, forKey: "2nd")
        data.updateValue(parsed_data[index]["3rd"].stringValue, forKey: "3rd")
        data.updateValue(parsed_data[index]["4th"].stringValue, forKey: "4th")
        data.updateValue(parsed_data[index]["5th"].stringValue, forKey: "5th")
        data.updateValue(parsed_data[index]["6th"].stringValue, forKey: "6th")
        data.updateValue(parsed_data[index]["7th"].stringValue, forKey: "7th")
        data.updateValue(parsed_data[index]["8th"].stringValue, forKey: "8th")
        data.updateValue(parsed_data[index]["9th"].stringValue, forKey: "9th")
        data.updateValue(parsed_data[index]["10th"].stringValue, forKey: "10th")
        data.updateValue(parsed_data[index]["data1"].stringValue, forKey: "data1")
        data.updateValue(parsed_data[index]["data2"].stringValue, forKey: "data2")
        data.updateValue(parsed_data[index]["data3"].stringValue, forKey: "data3")
        data.updateValue(parsed_data[index]["data4"].stringValue, forKey: "data4")
        data.updateValue(parsed_data[index]["data5"].stringValue, forKey: "data5")
        data.updateValue(parsed_data[index]["data6"].stringValue, forKey: "data6")
        data.updateValue(parsed_data[index]["data7"].stringValue, forKey: "data7")
        data.updateValue(parsed_data[index]["data8"].stringValue, forKey: "data8")
        data.updateValue(parsed_data[index]["data9"].stringValue, forKey: "data9")
        data.updateValue(parsed_data[index]["data10"].stringValue, forKey: "data10")
        data.updateValue(parsed_data[index]["memo"].stringValue, forKey: "memo")


        create_answer_message()
        create_quiz_view()

    }


    private func create_answer_message() {
        message += "\n\(data["title"]!)\n"
        message += "1位 : \(data["1st"]!) (\(data["data1"]!))\n"
        message += "2位 : \(data["2nd"]!) (\(data["data2"]!))\n"
        message += "3位 : \(data["3rd"]!) (\(data["data3"]!))\n"
        message += "4位 : \(data["4th"]!) (\(data["data4"]!))\n"
        message += "5位 : \(data["5th"]!) (\(data["data5"]!))\n"
        message += "6位 : \(data["6th"]!) (\(data["data6"]!))\n"
        message += "7位 : \(data["7th"]!) (\(data["data7"]!))\n"
        message += "8位 : \(data["8th"]!) (\(data["data8"]!))\n"
        message += "9位 : \(data["9th"]!) (\(data["data9"]!))\n"
        message += "10位 : \(data["10th"]!) (\(data["data10"]!))\n"
        message += "\n\(data["memo"]!)"
        print(message)
    }

    private func create_quiz_view(){
        self.view.backgroundColor = UIColor.white
        let quiz_label = UILabel()
        quiz_label.frame = CGRect(x:50,y:100,width: self.view.frame.width*0.8, height:150)
        quiz_label.center.x = self.view.center.x
        quiz_label.numberOfLines = 0
        quiz_label.text = data["title"]! + "\n第7位は?"
        quiz_label.textAlignment = .center
        quiz_label.font = UIFont.boldSystemFont(ofSize: 24.0)
        quiz_label.layer.borderWidth = 3.0
        quiz_label.layer.borderColor = UIColor.black.cgColor

        self.view.addSubview(quiz_label)
        for i in 0...3 {
            create_quiz_button(counter: i)
        }
    }

    private func create_quiz_button(counter:Int) {
        let choice_Button = UIButton()
        let height:CGFloat = CGFloat(300 + 80 * counter)
        choice_Button.frame = CGRect(x:50, y:height, width: self.view.frame.width*0.7, height:50)
        choice_Button.center.x = self.view.center.x
        choice_Button.layer.borderWidth = 1.0
        choice_Button.layer.cornerRadius = 10.0
        choice_Button.setTitleColor(UIColor.black, for: .normal)

        if(num[counter] == 7) {
            choice_Button.setTitle(data["7th"]!, for: .normal)
            choice_Button.addTarget(self, action: #selector(chose_correct_answer(_:)), for: .touchUpInside)
        } else if(num[counter] == 5){
            choice_Button.setTitle(data["5th"]!, for: .normal)
            choice_Button.addTarget(self, action: #selector(chose_wrong_answer(_:)), for: .touchUpInside)
        } else if(num[counter] == 6){
            choice_Button.setTitle(data["6th"]!, for: .normal)
            choice_Button.addTarget(self, action: #selector(chose_wrong_answer(_:)), for: .touchUpInside)
        } else if(num[counter] == 8){
            choice_Button.setTitle(data["8th"]!, for: .normal)
            choice_Button.addTarget(self, action: #selector(chose_wrong_answer(_:)), for: .touchUpInside)
        }

        self.view.addSubview(choice_Button)
    }

    @objc func chose_correct_answer(_ sender: UIButton) {
        let Alert1_correct: UIAlertController = UIAlertController(title: "正解! ⭕️", message: message,  preferredStyle: .alert)
        let myOkAction = UIAlertAction(title: "ほえ〜", style: .default) { action in
            print("Action OK!!")
        }
        Alert1_correct.addAction(myOkAction)
        present(Alert1_correct, animated: true, completion: nil)
    }

    @objc func chose_wrong_answer(_ sender: UIButton) {
                let Alert1_correct: UIAlertController = UIAlertController(title: "残念! ❌", message: message,  preferredStyle: .alert)
                let myOkAction = UIAlertAction(title: "ほえ〜", style: .default) { action in
                    print("Action OK!!")
                }
                Alert1_correct.addAction(myOkAction)
                present(Alert1_correct, animated: true, completion: nil)
    }


    override func didReceiveMemoryWarning() {
        super.didReceiveMemoryWarning()
    }


}
基本的な実装方法は、ViewController.swiftと同じなので、こっちは細かいところまでは解説しません。
prepare_quiz()関数では
まずjsonStringとボタンIDを取得してきます。
jsonをパースした後ボタンIDと一致する、idのカラムを探します。
その時のカラムの順番をindexとします(だいたいはid=indexdで一致しますが、必ずしも一致するわけではないのでこのような実装にしています。DB側の管理がめんどくさくなりますが、id=indexとしちゃう方法もゴリゴリやればできなくもないです)。
次はdataに辞書型データとしてkey:valueをそれぞれ追加していきます。
その後data配列をもとにanswer_messageを作ります。
create_quiz_view()では
まずはlabelを作り問題画面を作成します。
その後for文で回している
create_quiz_button(counter: i)関数で回答ボタンを作成します。
ファイルの最初の方に
var num = [5, 6, 7, 8].shuffled()
とあります。これで配列の順番がランダムにシャッフルされます。
つまりnumは
num = [6,5,7,8] かもしれないし
num = [8,7,5,6] かもしれない
といった感じです。
この時の7があるindexが答えになります。
ここは、頭の体操だと思ってアルゴリズムを読み解いてみてくださいw
private func create_quiz_button(counter:Int) {
        let choice_Button = UIButton()
        let height:CGFloat = CGFloat(300 + 80 * counter)
        choice_Button.frame = CGRect(x:50, y:height, width: self.view.frame.width*0.7, height:50)
        choice_Button.center.x = self.view.center.x
        choice_Button.layer.borderWidth = 1.0
        choice_Button.layer.cornerRadius = 10.0
        choice_Button.setTitleColor(UIColor.black, for: .normal)

        if(num[counter] == 7) {
            choice_Button.setTitle(data["7th"]!, for: .normal)
            choice_Button.addTarget(self, action: #selector(chose_correct_answer(_:)), for: .touchUpInside)
        } else if(num[counter] == 5){
            choice_Button.setTitle(data["5th"]!, for: .normal)
            choice_Button.addTarget(self, action: #selector(chose_wrong_answer(_:)), for: .touchUpInside)
        } else if(num[counter] == 6){
            choice_Button.setTitle(data["6th"]!, for: .normal)
            choice_Button.addTarget(self, action: #selector(chose_wrong_answer(_:)), for: .touchUpInside)
        } else if(num[counter] == 8){
            choice_Button.setTitle(data["8th"]!, for: .normal)
            choice_Button.addTarget(self, action: #selector(chose_wrong_answer(_:)), for: .touchUpInside)
        }

        self.view.addSubview(choice_Button)
    }
最後に
正解のボタンを押した時の関数と
不正解のボタンを押した時の関数を実装して終わりです。
課題
起動時に、ボタンもスクロールビューも読み込まれていて、配置はされている(タップしたら反応はする)けど、表示に時間がかかる。
これはおそらく、僕がアプリのライフサイクルレベルをしっかり理解したコーディングができていないからだと考察しています。
ちょっと色々漁ってはいるのですが、これといった解決方法はまだ見つけられていません。(知っている方いたらコメントください!)
※問題リストが表示されるまで時間がかかる現象の解決法を見つけました!
swiftで画面の表示が遅い時の対処法(iosのUIを更新する処理はメインスレッドで行う)
Recruit
part1でも書きましたがw
現在大学4年性で、大学院進学を考えていますが、どこかのタイミングでエンジニアとしてのインターンをしたいと考えています。実際に現場で経験を積むことでスキルアップができると思っているからです(僕のフォローしている優秀な同年代のエンジニアもだいたいインターンをして技術を磨いていた)。
しかし、私は地方の大学生なので空きコマにインターン等ができなかったので、少し遅れを取ってしまっている(個人開発しかできなかった)と思っています。いいインターン先が見つかれば半年から1年の休学をするつもりです。
これを読んでいる方で、オススメのインターン先を知っている方いたら、コメントなりSNSなりで教えていただけると幸いです。
お疲れ様でした
ふえー、結構たくさん書いた気がするなー
まあ、こんな感じで作ったものです。
web側の実装とios側の実装を一通りやるわけなので、swiftの参考書を読み終わってサンプルプロジェクトを卒業して中級者になりたい方には、ちょうどいいテーマだったんじゃないでしょうか?