追記:home.htmlの記述とスクショの画像が間違っていたため修正しました。
前提・環境
Spring Securityを使ってログイン・ログアウト機能を作りたかったのですが色々とハマって2日ほど詰んでしまい、
最終的にSpring公式のガイドに従って作っていくことにしました。
→https://spring.io/guides/gs/securing-web/
全文英語なのでちまちま意味を調べながら、書きながら…で何とか理解できたので、初心者の方向けに共有します。
環境:
- Windows 10
- Eclipse
- Spring Boot 2.1.4
- Java 8
- Mavenでビルド
- テンプレートエンジンはThymeleaf
Spring Bootでプロジェクト作成
新規作成→Spring スターター・プロジェクト
を選択し、以下の項目で作成します。
- Java 8
- 型:Maven
- 依存関係はThymeleaf,Webのみ選択
これが絶対!って訳ではありませんが、環境によって動きが変わってきちゃうと思うので、とりあえずコピペしたい人は合わせた方が良いと思います。
SpringSecurityの導入
では、作成したプロジェクトに手を加えていきます。
まずは、pom.xmlに「SpringSecurity使うよ!」という記述を追加します。
(Spring公式ではHello Worldアプリケーション作成後に行っていますが、今回は最初にやってしまいます)
pom.xmlって何?って場合は、ぜひググってみてください。
ざっくり言うと、pom.xmlはMavenの設定ファイル的なものです。(間違ってたらごめんなさい)
<?xml version="1.0" encoding="UTF-8"?>
<project xmlns="http://maven.apache.org/POM/4.0.0" xmlns:xsi="http://www.w3.org/2001/XMLSchema-instance"
    xsi:schemaLocation="http://maven.apache.org/POM/4.0.0 http://maven.apache.org/xsd/maven-4.0.0.xsd">
    <modelVersion>4.0.0</modelVersion>
    <parent>
        <groupId>org.springframework.boot</groupId>
        <artifactId>spring-boot-starter-parent</artifactId>
        <version>2.1.4.RELEASE</version>
        <relativePath/> <!-- lookup parent from repository -->
    </parent>
    <groupId>com.example</groupId>
    <artifactId>login-Training-SpringBoot</artifactId>
    <version>0.0.1-SNAPSHOT</version>
    <name>login-Training-SpringBoot</name>
    <description>Demo project for Spring Boot</description>

    <properties>
        <java.version>1.8</java.version>
    </properties>

    <dependencies>
        //ここに追加!
        <dependency>
            <groupId>org.springframework.boot</groupId>
            <artifactId>spring-boot-starter-security</artifactId>
        </dependency>

        <dependency>
            <groupId>org.springframework.boot</groupId>
            <artifactId>spring-boot-starter-thymeleaf</artifactId>
        </dependency>
        <dependency>
            <groupId>org.springframework.boot</groupId>
            <artifactId>spring-boot-starter-web</artifactId>
        </dependency>

        <dependency>
            <groupId>org.springframework.boot</groupId>
            <artifactId>spring-boot-starter-test</artifactId>
            <scope>test</scope>
        </dependency>
    </dependencies>

    <build>
        <plugins>
            <plugin>
                <groupId>org.springframework.boot</groupId>
                <artifactId>spring-boot-maven-plugin</artifactId>
            </plugin>
        </plugins>
    </build>

</project>
<dependencies></dependencies>の間に
<dependency>
     <groupId>org.springframework.boot</groupId>
     <artifactId>spring-boot-starter-security</artifactId>
</dependency>
を追加します。
これで、「Spring Security使うよ!」という設定ができました。
最初に、セキュリティがかかっていないアプリケーションを作成する
まずはセキュリティのない状態でHello Worldするアプリケーションを作っていきます。
home.htmlの作成
Thymeleafテンプレートを使うので、
src/main/resources/templates/home.html
のようにtemplatesフォルダ配下にHTMLファイルを作成します。
※4/25 修正しました
<!DOCTYPE html>
<html xmlns="http://www.w3.org/1999/xhtml" xmlns:th="http://www.thymeleaf.org" xmlns:sec="http://www.thymeleaf.org/thymeleaf-extras-springsecurity3">
    <head>
        <meta charset="UTF-8">
        <title>Hello,SpringSecurity!</title>
    </head>
    <body>
        <h1>WELCOME!</h1>
        <br>
        <p>ログインは<a th:href="@{/hello}">こちら</a></p>
     <p><a th:href="@{/}">新規ユーザー登録</a></p>
    </body>
</html>
- htmlタグ内の記述:Thymeleaf使う宣言、Security使う宣言、XHTMLのネームスペース
- "/hello"へのリンク
まずネームスペースについて。
ネームスペースとは、マークアップ言語を自由に設計できるXML上で、複数の語彙を組み合わせてもコンピュータが識別できるように、と作られた「名前空間」のことを指します。(文字通り)
あまりにも概念過ぎて理解しづらいですが、
名前空間についてはこの記事が分かりやすいです。
XML名前空間の簡単な説明
今回使う"xmlns"は「XML名前空間」と言い、語彙のタイプとURIを組み合わせることでコンピュータが識別できるようになっている、らしいです。
また、
多くの場合、名前空間を示すURIにhttp:スキームが使われているため、何かを取り出せるという印象があるのですが、これは第一義的にはその名のとおり「ID」の役割を果たすものと理解してください
とのことで、まぁここではタグ識別IDと思っていて間違いないでしょう。
ここではデフォルトの名前空間をxmlns= ""で設定し、
xmlns:th= ""でth:の設定、
xmlns:sec= ""でsec:の設定をしています。
次に、"/hello"へのリンクですが、
ここではThymeleaf記法でリンクを貼っています。
th:href属性の@{...}の部分がリンク先。
この場合、「localhost:8080/hello」にリンクされているということになります。
(新規ユーザー登録のリンクも記述していますが、表示しているだけで未実装なので、今回は使いません)
Thymeleafの書き方参考:必要最小限のサンプルでThymeleafを完全マスター
[hello.html]
では、先程リンクを記述したhello.htmlを作成します
<!DOCTYPE html>
<html xmlns:th="http://www.thymeleaf.org" xmlns:sec="http://www.thymeleaf.org/thymeleaf-extras-springsecurity3">
    <head>
        <meta charset="UTF-8">
        <title>Hello,SpringSecurity!</title>
    </head>
    <body>
        <h3>ようこそ!</h3>
    </body>
</html>
ここでは一旦、単純にようこそ!を表示するだけにしておきます。
MvcConfigクラスの作成
続いてはMVCの設定をするクラスを作成。
src/main/java/hello/MvcConfig.java
に置きます。
package hello;

import org.springframework.context.annotation.Configuration;
import org.springframework.web.servlet.config.annotation.ViewControllerRegistry;
import org.springframework.web.servlet.config.annotation.WebMvcConfigurer;

@Configuration
public class MvcConfig implements WebMvcConfigurer {
    public void addViewControllers(ViewControllerRegistry registry) {
        registry.addViewController("/home").setViewName("home");
        registry.addViewController("/").setViewName("home");
        registry.addViewController("/hello").setViewName("hello");
        registry.addViewController("/login").setViewName("login");
    }
}
- @Configurationアノテーションをつける
- WebMvcConfigurerをimplements
implementsについて:
インターフェースを実装!Javaでimplementsを使う方法【初心者向け】
ざっくり説明すると、
interface(仕様)→implementsしたクラス(仕様に実際の定義を入れ込む)→そのメソッドを使う
といったイメージですね。
アプリケーションにセキュリティをかけていく
セキュリティ設定クラス(WebSecurityConfig.java)を作成
WebSecurityConfigurerAdapterクラスを継承した設定のクラスを作成します。
src/main/java/hello/WebSecurityConfig.java
このように配置。
package hello;

import org.springframework.context.annotation.Bean;
import org.springframework.context.annotation.Configuration;
import org.springframework.security.config.annotation.web.builders.HttpSecurity;
import org.springframework.security.config.annotation.web.configuration.EnableWebSecurity;
import org.springframework.security.config.annotation.web.configuration.WebSecurityConfigurerAdapter;
import org.springframework.security.core.userdetails.User;
import org.springframework.security.core.userdetails.UserDetails;
import org.springframework.security.core.userdetails.UserDetailsService;
import org.springframework.security.provisioning.InMemoryUserDetailsManager;

@Configuration
@EnableWebSecurity
public class WebSecurityConfig extends WebSecurityConfigurerAdapter {
    @Override
    protected void configure(HttpSecurity http) throws Exception{
        http
            .authorizeRequests()
                // "/" と /home は全ユーザーがアクセス可能
                .antMatchers("/","/home").permitAll()
                //上記以外へのアクセスは認証が必要
                .anyRequest().authenticated()
                .and()
            //ログイン、ログアウトのURL指定と全ユーザーへのアクセス許可
            .formLogin()
                .loginPage("/login")
                .permitAll()
                .and()
            .logout()
                .permitAll();
    }

    @Bean
    @Override
    public UserDetailsService userDetailsService() {
        UserDetails user =
                User.withDefaultPasswordEncoder()
                    .username("user")
                    .password("pass")
                    .roles("USER")
                    .build();
        return new  InMemoryUserDetailsManager(user);
    }
}
- WebSecurityConfigurerAdapterを継承
- @EnableWebSecurityアノテーションを記述
- URLパスとアクセス権限を定義
- userDetailsService()では@Beanアノテーションを使い、ユーザー名とパスワードを設定する
まず、継承は、クラス作るときに継承すればいいです。
で、@EnableWebSecurityですが、これを記述することでWebSecurity機能を使うことができるみたいです。まぁ、Webでのセキュリティ機能だよー!という記述ってことです。正確な定義はGoogle先生に譲ります。。
URLのパスとアクセス権限については、コメントに書いている通り。
permitAll()で全ユーザーにアクセスを許可し、
authenticated()で認証を必要とする
って感じです。
最後にuserDetailsService()の部分ですが、
まず@BeanはJavaBeansと一緒で、
@Beanアノテーションを使うことでユーザーのBean(具体的な中身)を生成できます。
また、UserDetailsServiceクラスをオーバーライドし、ここでユーザーネームやパスワードを指定します。
ここでは、usernameはusername,passwordはpass,role(役割)はUSERとします。
login.htmlを作成
<!DOCTYPE html>
<html xmlns:th="http://www.thymeleaf.org" xmlns:sec="http://www.thymeleaf.org/thymeleaf-extras-springsecurity3">
    <head>
        <meta charset="UTF-8">
        <title>LoginPage</title>
    </head>
    <body>
        <div th:if="${param.error}">
            ユーザー名かパスワードが違います
        </div>
        <div th:if="${param.logout}">
            ログアウト済みです
        </div>
        <form th:action="@{/login}" method="post">
            <div><label>ユーザー名:<input type="text" name="username" /></label></div>
            <div><label>パスワード:<input type="password" name="password" /></label></div>
            <div><input type="submit" value="ログイン" /></div>
        </form>
    </body>
</html>
src/main/resources/templates/login.html
に作成。
${param}は「暗黙オブジェクト」とかいうよくわからない物体。
ざっくり噛み砕いて説明すると、.(ドット)の後のパラメータを取得してくれるものです。(「${param} EL式」とかで検索すると出てくる)
なので、${param.error}で、errorのパラメータを取得することができます。
この場合はerrorがtrueならエラーメッセージを、logoutがtrueならその旨のメッセージを表示するように記述しています。
また、Spring公式によると、ログイン失敗すると"/login?error"にリダイレクトするようになっているようです。
If the user fails to authenticate, the page is redirected to "/login?error" and our page displays the appropriate error message.
ちなみに、XMLの書き方だとinputタグの最後に/をつける必要があるようです。
Spring Boot2でinputタグのしめに「/>」とスラッシュをつけないとエラーになる理由
最後に、hello.htmlにユーザー名とログアウトリンクを表示
<!DOCTYPE html>
<html xmlns:th="http://www.thymeleaf.org" xmlns:sec="http://www.thymeleaf.org/thymeleaf-extras-springsecurity3">
    <head>
        <meta charset="UTF-8">
        <title>Hello,SpringSecurity!</title>
    </head>
    <body>
        <h2>Hello!</h2>
        <h1 th:inline="text">Hello[[${#httpServletRequest.remoteUser}]]!</h1>
        <form th:action="@{/logout}" method="post">
            <input type="submit" value="ログアウト" />
        </form>
        <p></p>
    </body>
</html>
bodyの表示部分を書き換えました。
-
[[${#httpServletRequest.remoteUser}]]でユーザー名表示 - ログアウトボタンを作成
[[${#httpServletRequest.remoteUser}]]の部分でユーザー名を取得して画面表示します。
We display the username by using Spring Security’s integration with HttpServletRequest#getRemoteUser().
(公式ガイドより)
ここでは、 HttpServletRequestのgetRemoteUser()メソッドを使ってusernameを取得するよ!と書かれてあります。
この考え方を使って、
httpServletRequestでremoteUserのデータを取得する
といったイメージですね。
二重括弧 [ [ ] ] は、調べた限りだとデータ変換用のようです。
取得する→出力用にフォーマットする の2段階踏むからかな。多分。
アプリケーションの実行用クラスを作成する
やっとここまできました!
あとはプロジェクトを実行できるよう設定するだけです。
公式ではhelloパッケージに新たに実行用クラスApplication.javaを作成していますが、すでにデフォルトでcom.example.demoパッケージにあるんだよなぁ…と思いつつ、
読んだら「helloパッケージにあることでどうたらこうたら」みたいなこと書いてあったので念のため作成。
(ちゃんと訳してないので意味ないかもw)
@ComponentScan tells Spring to look for other components, configurations, and services in the hello package, allowing it to find the controllers.
src/main/java/hello/Application.java
に作ります。
<!DOCTYPE html>
<html xmlns:th="http://www.thymeleaf.org" xmlns:sec="http://www.thymeleaf.org/thymeleaf-extras-springsecurity3">
    <head>
        <meta charset="UTF-8">
        <title>Hello,SpringSecurity!</title>
    </head>
    <body>
        <h2>Hello!</h2>
        <h1 th:inline="text">Hello[[${#httpServletRequest.remoteUser}]]!</h1>
        <form th:action="@{/logout}" method="post">
            <input type="submit" value="ログアウト" />
        </form>
        <p></p>
    </body>
</html>
デフォの実行用クラスは消してしまってもいいと思います。
私はなんか怖いので全文コメントアウトしましたw
実行!
やっと完成しました!
これで実行してみましょう。
プロジェクトを右クリック→実行→Spring Bootアプリケーション をクリックで起動できます。
その後、ブラウザのURL入力欄にhttp://localhost:8080を打ち込んでアクセスしてみてください。
※4/25 修正しました
home.html
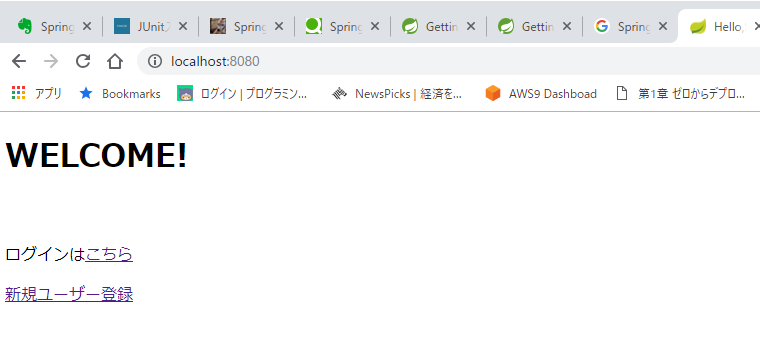
最初にhome画面が出力されました。
ログインページへのリンクが表示されていますね。
ここではまだ使いませんが、新規ユーザー登録も表示されています。
ログアウトを押します。
login.html
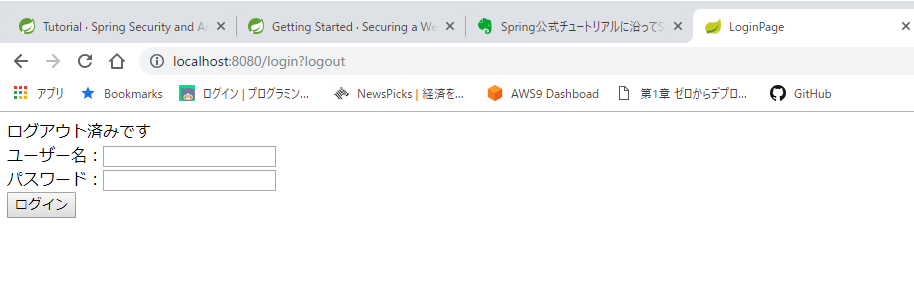
login画面に遷移しました。
ユーザー情報は「ログアウト済み」になっているので、「ログアウト済みです」と表示されています。
次は、自分で指定したユーザー名(user)とパスワード(pass)を入力してログインしてみましょう。
hello.html
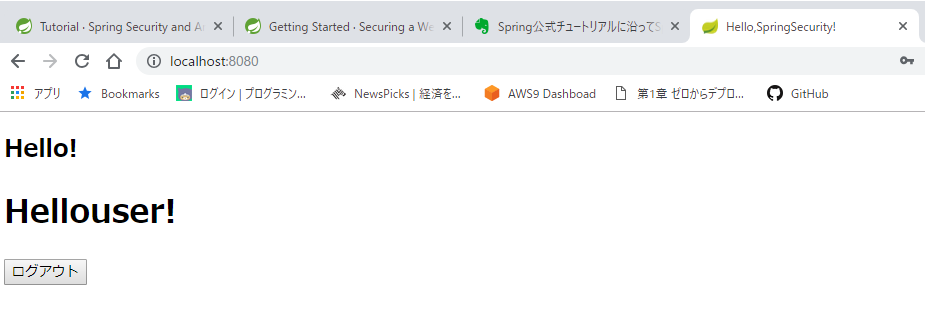
ログインできました!
ユーザー名は「user」となっているので、ちょっとわかりにくいですが「Hello+user+!」の形になっています。
では、間違ったユーザー名orパスワードを入力してみましょう。
login.html
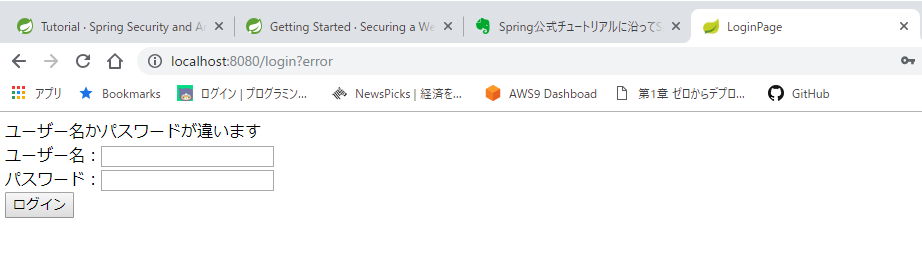
ちゃんとエラーが表示されていますね。
はーーここまで長かった。
仕組みが分かった上でこれができれば、応用も効きそうです。
お疲れさまでした!