はじめに
「標的型攻撃に対するJPCERT/CCのおすすめログ設定をElasticsearchで構築してみる」の「準備編」に続いて、実際にプロキシサーバのコンフィグレーションを行います。プロキシサーバとして(Squid)を利用します。
本記事の続編は以下の通りです。
* 「メールサーバ編」
* 「エンドポイントログ編(その1- 概要/Sysmon)」
* 「エンドポイントログ編(その2- Winlogbeat/Elasticsearch)」
※本記事で作成するFilebeatモジュールやSquidの設定例はこちらへ仮置きしておきます(今後、もう少しわかりやすい配置にする予定です)。
※Ubuntu18.04上で構築(FilebeatはDEBパッケージでインストール)しますので他のディストリビューションやFilebeatインストール方法の場合にはファイルの配置場所などを読みかえてください。
※実際の環境で運用するには、ネットワーク設定、個々のソフトウェアのインストール/初期設定や認証/通信の暗号、冗長構成や負荷分散などで相応の設定が必要となります。それぞれ個別のドキュメントをご参照ください。本記事ではログ設定に関係する基本的なコンフィグレーションにフォーカスして記載します。
利用するソフトウェア
- OS: Ubuntu 18.04
- プロキシサーバ: Squid (3.5.27)
- DNSサーバ: Dnsmasq (2.79)
- Elasticsearch (6.6.0)
- Kibana (6.6.0)
- Filebeat (6.6.0)
- VMware Workstation Player等のVMソフトウェア
- Windows 10 (クライアントPC)
ネットワーク構成例
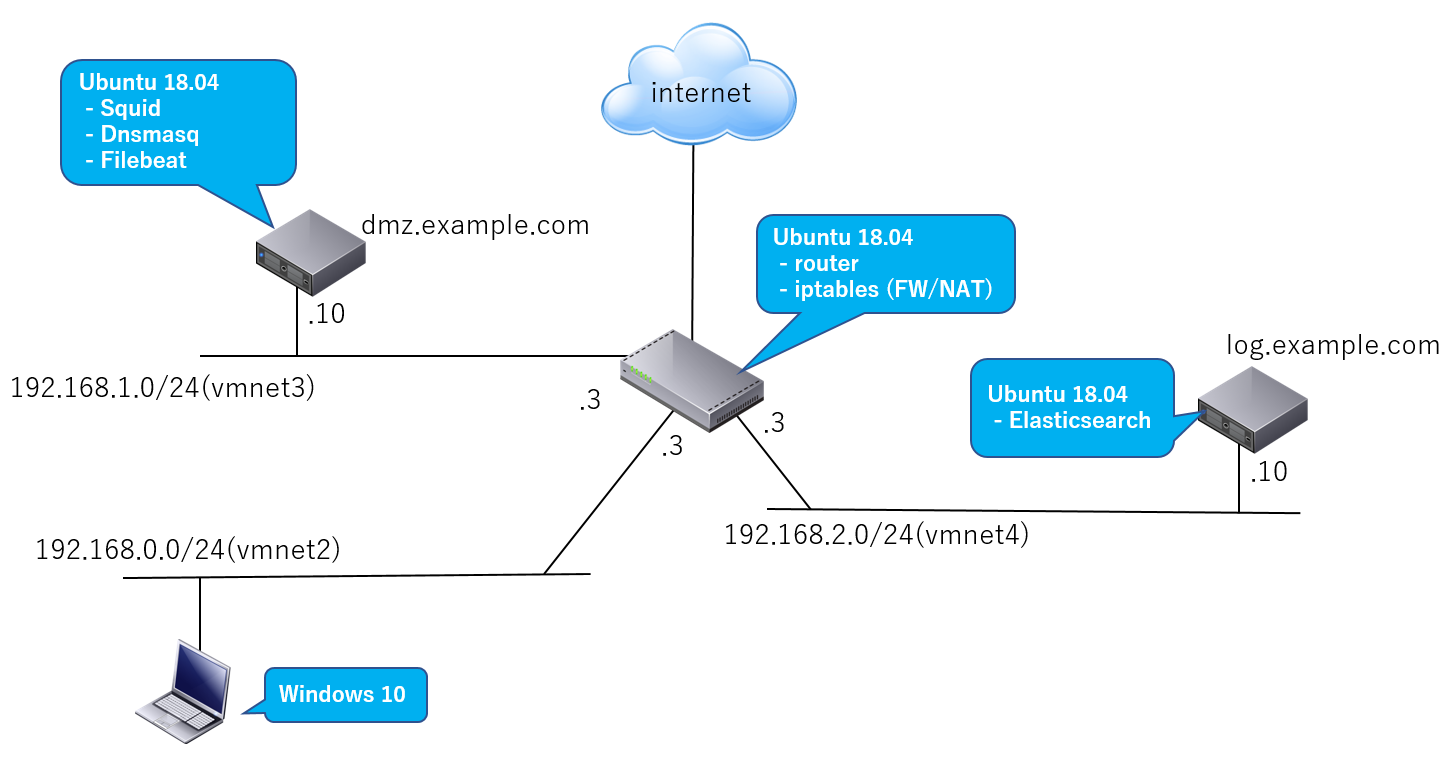
ここでは「準備編」で説明した以下のようなシンプルなネットワーク構成を想定。
| 説明 | |
|---|---|
| Webアクセス | Win10クライアントPC上のWebブラウザはインターネットへdmz.example.comで動作するプロキシサーバ(Squid)経由でアクセス |
| ログ | dmz.example.com上で動作するプロキシサーバのログをFilebeatがElasticsearch(log.example.com)へ転送 |
作業内容
- ネットワーク構築および各ソフトウェアのインストールと設定
- Squidログ設定およびフォーマット追加
- Squid用のFilebeatモジュール作成
- Squid用のFilebeatモジュールをdmz.example.comに配置し設定
- Kibanaで確認
JPCERT/CCのおすすめログ設定
「高度サイバー攻撃への対処におけるログの活用と分析方法」をもとに以下の情報を出力するように設定します。
- URL
- HTTPリクエストメソッド
- タイムスタンプ
- 送信先サーバのFQDN
- 送信先サーバのIPアドレス
- 送信先サーバのポート番号
- 送信元クライアントのIPアドレス
- ユーザエージェント
- リファラ
- 送受信量
また、エンドポイントのログと関連付けて分析しやすいように以下も追加しておきます。
- 送信元クライアントのポート番号
これらのログを記録することで以下のような攻撃検出を行える可能性があります。
- マルウエアに感染したPC がC&Cサーバやマルウエア設置サイトへの通信を試みる
- CONNECTメソッドを使用して、組織外との通信を試みる
- ボットに感染したPC はC&Cサーバへの通信を定期的に行い、情報の取得やコントロールの受信を試みる
- マルウエアに感染したPCは、変則的な時間帯にも、C&Cサーバ等へ通信を試みる
- マルウエアに感染したPCがC&Cサーバやアップロードサイトへの通信を試みる
(JPCERT/CCの同資料より抜粋)
これらのログを利用した分析手法の詳細についても同資料に説明されていますのでぜひご参照ください。
また、分析時には通常(ノーマル)とは違う動作を見つけることも重要となります。そのためHTTPメッセージで通常想定される情報と異なるまたは欠けている、定期的に通信エラーが発生するなども分析観点となります。例えば以下のような状況での検出です。
- マルウェアがサンドボックス検出のために存在しない送信先へ接続を試みる
- 攻撃者の探索等の活動時間だけC&Cサーバが接続可能になる
最近?ではWannaCryの以下のキルスイッチ接続先が話題になりました。
- www[.]iuqerfsodp9ifjaposdfjhgosurijfaewrwergwea[.]com
このような既知の疑わしいURLはvirustotalなどで無償でチェックできます。
プロキシサーバ(Squid)のログ設定とフォーマット追加
Squidのデフォルトログの形式(squid形式)ではなくcombined形式を雛形にフォーマットを変更します。ただし他のログ分析ツールを利用している場合にはそれらがログメッセージのパーシングに失敗する場合がありますのでご注意ください。
Squidの設定ファイル/etc/squid/squid.confに以下の設定を追加します。Squidログフォーマットの詳細仕様についてはこちらを参照。
logformat combined   %>a:%>p %[ui %[un "%rm %ru HTTP/%rv" %>Hs %>st %<st "%{Referer}>h" "%{User-Agent}>h" %Ss:%Sh [%ts%03tu] %<a:%<p %<A
access_log daemon:/var/log/squid/access.log combined
ログフォーマットの説明
| 説明 | |
|---|---|
| %>a | 送信元クライアントIP |
| %>p | 送信元クライアントポート番号 |
| %[ui %[un | Proxy認証情報 |
| %rm %ru HTTP/%rv | HTTPリクエストメソッド、URL、HTTPバージョン |
| %>Hs | HTTPステータス |
| %>st | 送信元クライアントからの受信量(リクエスト)(チャンクエンコーディングを除く) |
| %<st | クライアントへの送信量(リプライ) |
| %{Referer}>h | リファラ |
| %{User-Agent}>h | ユーザエージェント |
| %Ss | Squidリクエストステータス |
| %Sh | Squid階層ステータス |
| %ts%03tu | タイムスタンプ(UNIX_TIME milliseconds) |
| %<a | 送信先サーバまたは上位プロキシサーバIP |
| %<p | 送信先サーバまたは上位プロキシサーバポート番号 |
| %<A | 送信先サーバまたは上位プロキシサーバのFQDN |
SquidログメッセージのJSON変換
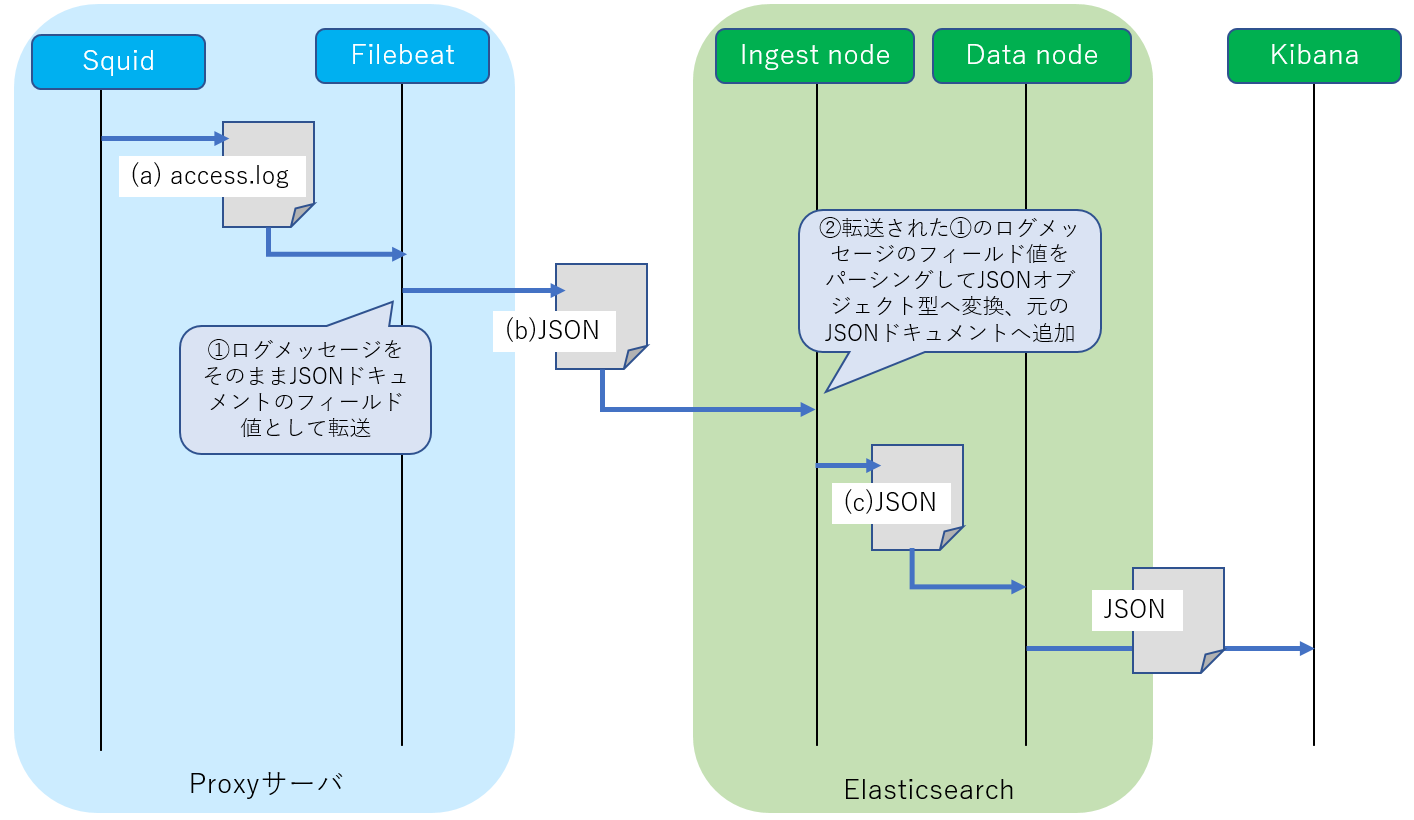
Squidのログ/var/log/squid/access.logへ一行ずつ記録された各ログ内容は、FilebeatによりそれぞれJSON形式ドキュメントへ変換されてElasticsearch(IngestノードおよびDataノード)へ転送されます。
192.168.xx.xxx:50435 - - \"GET http://xxx.example.com HTTP/1.1\" 200 2991 918 \"http://xxx.example.com/xxx.js\" \"Mozilla/5.0 (Windows NT 10.0; Win64; x64) AppleWebKit/537.36 (KHTML, like Gecko) Chrome/73.0.3683.86 Safari/537.36\" TCP_MISS:HIER_DIRECT [xxxxxxxx35237] 10.xx.xx.xx:80 xxx.example.com
{
  "_index" : "filebeat-6.6.0-2019.xx.xx",
  "_type" : "doc",
  "_id" : "SKMrAmoB5yTtiEEfLG6k",
  "_score" : 1.0,
  "_source" : {
    "offset" : 831750,
    "log" : {
      "file" : {
        "path" : "/var/log/squid/access.log"
      }
    },
    "prospector" : {
      "type" : "log"
    },
    "source" : "/var/log/squid/access.log",
    "fileset" : {
      "module" : "squid",
      "name" : "access"
    },
    "message" : "192.168.xx.xxx:50435 - - \"GET http://xxx.example.com HTTP/1.1\" 200 2991 918 \"http://xxx.example.com/xxx.js\" \"Mozilla/5.0 (Windows NT 10.0; Win64; x64) AppleWebKit/537.36 (KHTML, like Gecko) Chrome/73.0.3683.86 Safari/537.36\" TCP_MISS:HIER_DIRECT [xxxxxxxx35237] 10.xx.xx.xx:80 xxx.example.com",
    "input" : {
      "type" : "log"
    },
    "@timestamp" : "2019-xx-xxT12:55:43.875Z",
    "beat" : {
      "hostname" : "dmz_server",
      "name" : "dmz_server",
      "version" : "6.6.0"
    },
    "host" : {
      "os" : {
        "codename" : "bionic",
        "name" : "Ubuntu",
        "family" : "debian",
        "version" : "18.04.1 LTS (Bionic Beaver)",
        "platform" : "ubuntu"
      },
      "containerized" : false,
      "name" : "dmz_server",
     "id" : "39xx7a23335243cb9x4740a1axx0ae3d",
      "architecture" : "x86_64"
    },
    "event" : {
      "dataset" : "squid.access"
    }
  }
}
この(b)JSONを見るとFilebeatから転送される段階ではSquidから出力されたログメッセージがそのままJSONドキュメントの_source.messageフィールドへ設定されています。
{
  "_index" : "filebeat-6.6.0-2019.xx.xx",
  "_type" : "doc",
  "_id" : "SKMrAmoB5yTtiEEfLG6k",
  "_score" : 1.0,
  "_source" : {
    "offset" : 831750,
    "log" : {
      "file" : {
        "path" : "/var/log/squid/access.log"
      }
    },
    "prospector" : {
      "type" : "log"
    },
    "source" : "/var/log/squid/access.log",
    "fileset" : {
      "module" : "squid",
      "name" : "access"
    },
    "input" : {
      "type" : "log"
    },
    "@timestamp" : "2019-xx-xxT12:55:43.875Z",
    "beat" : {
      "hostname" : "dmz_server",
      "name" : "dmz_server",
      "version" : "6.6.0"
    },
    "host" : {
      "os" : {
        "codename" : "bionic",
        "name" : "Ubuntu",
        "family" : "debian",
        "version" : "18.04.1 LTS (Bionic Beaver)",
        "platform" : "ubuntu"
      },
      "containerized" : false,
      "name" : "dmz_server",
     "id" : "39xx7a23335243cb9x4740a1axx0ae3d",
      "architecture" : "x86_64"
    },
    "squid" : {
      "access" : {
        "received_bytes" : "918",
        "squid_hier" : "HIER_DIRECT",
        "response_code" : "200",
        "user_ident" : "-",
        "geoip" : {
          "continent_name" : "Asia",
          "country_iso_code" : "JP",
          "location" : {
            "lon" : 1xx.xx,
            "lat" : xx.xx
          }
        },
        "method" : "GET",
        "user_name" : "-",
        "unix_time" : "xxxxxxxx35237",
        "http_version" : "1.1",
        "squid_status" : "TCP_MISS",
        "url" : "http://xxx.example.com/",
        "sent_bytes" : "2991",
        "client_port" : "50435",
        "referrer" : "http://xxx.example.com/xxx.js",
        "server_fqdn" : "image2.pubmatic.com",
        "server_ip" : "10.xx.xx.xx",
        "server_port" : "80",
        "client_ip" : "192.168.0.xx",
        "time" : "2019-xx-xxT12:55:35.123Z",
        "user_agent" : {
          "patch" : "3683",
          "original" : "Mozilla/5.0 (Windows NT 10.0; Win64; x64) AppleWebKit/537.36 (KHTML, like Gecko) Chrome/73.0.3683.86 Safari/537.36",
          "major" : "73",
          "minor" : "0",
          "os" : "Windows 10",
          "name" : "Chrome",
          "os_name" : "Windows 10",
          "device" : "Other"
        }
      }
    },
    "event" : {
      "dataset" : "squid.access"
    }
  }
}
それを受け取ったIngestノードではパイプラインによる加工処理によってこのmessageフィールドのテキスト値をパーシングし(C)JSONへ変換した後でDataノードへ渡されます(詳細はFilebeatモジュールの「IngestノードのPipelineプロセッサの設定」にて後述)。
Squid用Filebeatモジュールの作成
(現状)FilebeatのパッケージにはSquid用モジュールが含まれていないようです。そのため上述したログフォーマット用のモジュールを作成します。こうすることでKibanaで各情報単位で検索や集計したり、自作ツール等で扱いやすくなります。
※本記事で作成したFilebeatモジュールへ置きました。
Filebeatのモジュール作成方法はこちらの公式サイトで解説されていますが(テンプレートファイルを生成するMakeファイルも用意されています)、ここではFilebeatのパッケージに同梱されているApache用のモジュールを雛形にして作成してみます。またFilebeatモジュール作成作業の概要については前回の「準備編」に説明しましたのでご参照ください。
Apache用モジュールをコピー
cd /usr/share/filebeat/module
cp -r ./apache2 ./squid

error.log用の設定は必要ないので削除する
cd squid
rm -rf error
Squid用モジュールのファイル構成
「準備編」にて説明しました通り以下のような構成でモジュールのファイルを配置します。
/usr/share/filebeat/
   `- module/
        `- squid/
             |- module.yml
             `- access/
                  |- manifest.yml
                  |- config/
                  |    `- access.yml
                  `- ingest/
                       `- default.json
| 説明 | |
|---|---|
| manifest.yml | モジュール関連のファイルパスつまりingest/default.jsonなどのパスやElasticsearchプラグイン設定を記述します。作成するSquidモジュールではElasticsearch側でingest-user-agentプラグインとingest-geoipプラグインをインストールして利用しますのでその設定を行います |
| config/access.yml | Filebeatへの入力ファイル設定(Squidのログファイルパス)を生成するテンプレートを記述。Filebeatの開発言語であるGOのテンプレート機能を利用します。今回は特に変更しません |
| module.yml | ダッシュボード(Kibana)の設定を記述するファイルですが今回はダッシュボードは扱わないのでフィールドの名前だけ変更します |
| ingest/default.json | Elasticsearch/Ingestノードへ注入するPipeline設定(プロセッサの設定)を記述します。SquidモジュールではGrok、Date、Remove、UserAget、GeoIPプロセッサを利用しますのでその設定を行います |
manifest.ymlの設定
module_version: 1.0

var:
  - name: paths
    default:
      # Squidのログファイルパス(FilebeatへのInputソース)
      - /var/log/squid/access.log*

# Ingestノードのパイプライン設定ファイルパス
ingest_pipeline: ingest/default.json

# 入力ソースの設定ファイルパス
input: config/access.yml

# Ingestノードのプラグインの指定
requires.processors:
- name: user_agent
  # ユーザエージェント情報のパーシング
  plugin: ingest-user-agent
- name: geoip
  # 送信先サーバの地理情報の付加
  plugin: ingest-geoip
config/access.ymlの設定
Apache用モジュールからコピーしたまま変更しません。
type: log
paths:
{{ range $i, $path := .paths }}
 - {{$path}}
{{ end }}
exclude_files: [".gz$"]
module.yml
ID値だけ変更しておきます。
dashboards:
- id: Filebeat-Squid-Dashboard
ingest/default.json
Ingestノードに注入するPipeline設定を記述します。
Ingestノードのパイプライン(プロセッサ)の設定
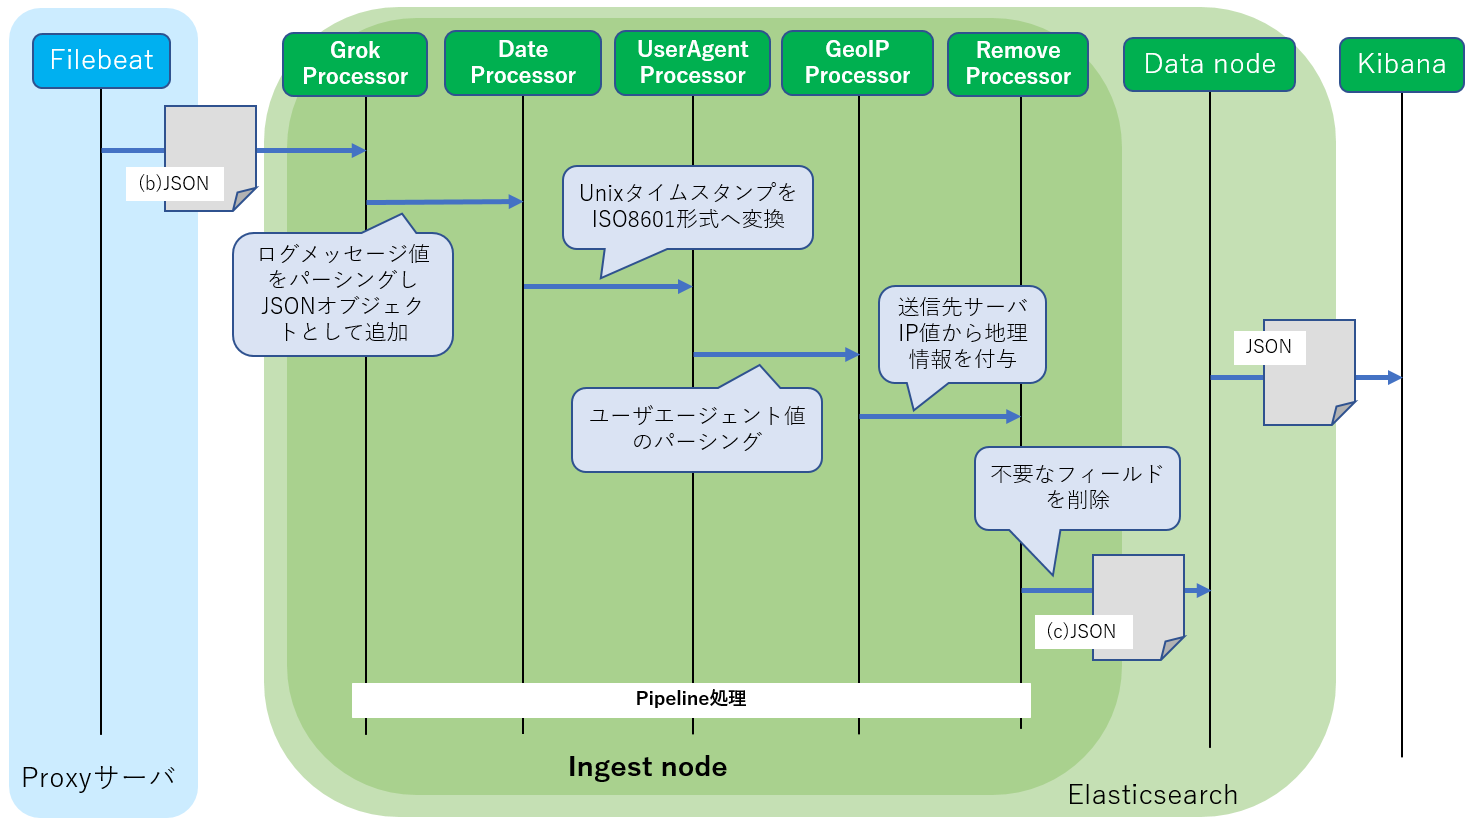
Squid用のログメッセージをパーシングしてJSON形式へ変換し、またユーザエージェント情報のパーシングおよび接続先サーバの地理情報を付加します。以下のプロセッサを利用します。
| 説明 | |
|---|---|
| Grokプロセッサ | ログメッセージのテキストデータをパーシングしてJSON形式へ変換するプロセッサ。 パース形式を正規表現を組み合わせたパターンで記述するだけでOKです |
| Dateプロセッサ | SquidログのUNIXタイムスタンプからISO8601形式タイムスタンプへ変換します |
| User Agentプロセッサ | Webブラウザが送信するユーザエージェント情報(ブラウザ情報)をパーシングします |
| GeoIPプロセッサ | 接続先サーバIPの地理情報を追加します |
| Removeプロセッサ | 不要な情報を削除。 Grokによってパーシングされた後で不要な情報をElasticsearchへ保存する前に削除します |
設定の全体は以下の通りとなります。それぞれのプロセッサ設定について説明していきます。
{
  "description": "Pipeline for parsing Squid access logs. Requires the geoip and user_agent plugins.",
  "processors": [{
    "grok": {
      "field": "message",
      "patterns":[
        "%{IPORHOST:squid.access.client_ip}:%{NUMBER:squid.access.client_port} %{DATA:squid.access.user_ident} %{DATA:squid.access.user_name} \"%{DATA:squid.access.method} %{DATA:squid.access.url} HTTP/%{DATA:squid.access.http_version}\" %{NUMBER:squid.access.response_code} %{NUMBER:squid.access.sent_bytes} %{NUMBER:squid.access.received_bytes} \"%{DATA:squid.access.referrer}\" \"%{DATA:squid.access.agent}\" %{DATA:squid.access.squid_status}:%{DATA:squid.access.squid_hier} \\[%{NUMBER:squid.access.unix_time}\\] %{IPORHOST:squid.access.server_ip}:%{NUMBER:squid.access.server_port} %{IPORHOST:squid.access.server_fqdn}",
        "%{IPORHOST:squid.access.client_ip}:%{NUMBER:squid.access.client_port} %{DATA:squid.access.user_ident} %{DATA:squid.access.user_name} \"%{DATA:squid.access.method} %{DATA:squid.access.url} HTTP/%{DATA:squid.access.http_version}\" %{NUMBER:squid.access.response_code} %{NUMBER:squid.access.sent_bytes} %{NUMBER:squid.access.received_bytes} \"%{DATA:squid.access.referrer}\" \"%{DATA:squid.access.agent}\" %{DATA:squid.access.squid_status}:%{DATA:squid.access.squid_hier} \\[%{NUMBER:squid.access.unix_time}\\] -:- -"
        ],
      "ignore_missing": true,
      "ignore_failure": true
    }
  }, {
    "date": {
      "field": "squid.access.unix_time",
      "target_field": "squid.access.time",
      "formats": [
        "UNIX_MS"
      ],
      "ignore_failure": true
    }
  }, {
    "remove": {
      "field": "message",
      "ignore_missing": true,
      "ignore_failure": true
    }
  }, {
    "user_agent": {
      "field": "squid.access.agent",
      "target_field": "squid.access.user_agent",
      "ignore_failure": true
    }
  }, {
    "rename": {
      "field": "squid.access.agent",
      "target_field": "squid.access.user_agent.original",
      "ignore_failure": true
    }
  }, {
    "geoip": {
      "field": "squid.access.server_ip",
      "target_field": "squid.access.geoip",
      "ignore_missing": true
    }
  }],
  "on_failure" : [{
    "set" : {
      "field" : "error.message",
      "value" : "{{ _ingest.on_failure_message }}"
    }
  }]
}
GrokプロセッサによるログメッセージのJSON変換
GrokプロセッサによりFilebeatから転送された(b)JSONドキュメント内の_source.messageフィールドのログメッセージは、(c)JSONドキュメントのようにパーシングされ_source.squidのJSONオブジェクト形式へ変換されます。
{
  "_index" : "filebeat-6.6.0-2019.xx.xx",
  "_type" : "doc",
  "_id" : "SKMrAmoB5yTtiEEfLG6k",
  "_score" : 1.0,
  "_source" : {
  ......
    "message" : "192.168.xx.xxx:50435 - - \"GET http://xxx.example.com HTTP/1.1\" 200 2991 918 \"http://xxx.example.com/xxx.js\" \"Mozilla/5.0 (Windows NT 10.0; Win64; x64) AppleWebKit/537.36 (KHTML, like Gecko) Chrome/73.0.3683.86 Safari/537.36\" TCP_MISS:HIER_DIRECT [xxxxxxxx35237] 10.xx.xx.xx:80 xxx.example.com",
  ......
  }
}
{
  "_index" : "filebeat-6.6.0-2019.xx.xx",
  "_type" : "doc",
  "_id" : "SKMrAmoB5yTtiEEfLG6k",
  "_score" : 1.0,
  "_source" : {
  ......
    "squid" : {
      "access" : {
        "received_bytes" : "918",
        "squid_hier" : "HIER_DIRECT",
        "response_code" : "200",
        "user_ident" : "-",
        "method" : "GET",
        "user_name" : "-",
        "unix_time" : "xxxxxxxx35237",
        "http_version" : "1.1",
        "squid_status" : "TCP_MISS",
        "url" : "http://xxx.example.com/",
        "sent_bytes" : "2991",
        "client_port" : "50435",
        "referrer" : "http://xxx.example.com/xxx.js",
        "server_fqdn" : "image2.pubmatic.com",
        "server_ip" : "10.xx.xx.xx",
        "server_port" : "80",
        "client_ip" : "192.168.xx.xx",
        "agent": "Mozilla/5.0 (Windows NT 10.0; Win64; x64) AppleWebKit/537.36 (KHTML, like Gecko) Chrome/73.0.3683.86 Safari/537.36",
        "time" : "2019-xx-xxT12:55:35.123Z"
      }
   },
  ......
  }
}
変換先のテンプレート定義
まずGrokプロセッサがインデクスへ格納するログ情報のJSON形式(_source.squidオブジェクト)を定義します。
テンプレートはデフォルトでは/etc/filebeat/fields.ymlに定義されています。このファイルをmy_fields.ymlとしてコピーしSquidモジュール用の定義を追加します。
cd /etc/filebeat
cp fields.yml my_fields.yml
モジュール本体と同様にここでもApache用のテンプレート定義(- key: apache2)を雛形にして作業します。
- key: モジュール名
  title: "モジュール名"
  description: >
    モジュールの説明
  short_config: true
  fields:
    - name: モジュール名
      type: group
      description: >
        フィールドの説明
      fields:
        - name: ログファイル名(インプットソース)
          type: group
          description: >
            ログファイルの説明
          fields:
            - name: フィールド名1
              type: タイプ
              description: >
                フィールド名1の説明
            - name: フィールド名2
              type: タイプ
              description: >
                フィールド名2の説明
            ......
ご欄の通り変換されるJSONオブジェクト形式もモジュール本体のファイル構成と同様に階層(ネスト)構造をとります。よってGrokプロセッサにより変換されたドキュメントに対してElasticsearchで操作をする際のフィールド名の指定も階層(ネスト)構造となります。
(モジュール名).(ログファイル名).(フィールド名)
例えば前述の(C)JSONドキュメントでフィールド名 url を検索条件に含める場合を想定してみましょう。Elasticsearchへの検索でフィールド名の指定は以下のように squid.access.url となります。
curl -XGET http://192.168.2.10:9200/filebeat-2019.xx.xx/_search?pretty -H 'Content-Type: application/json' -d
'{
  "query": {
    "match":{
      "squid.access.url":"xxx.example.com"
    }
  }
}'
Squid用モジュールのテンプレート定義
Squid用モジュールの定義を/etc/filebeat/my_fields.ymlへ追加します。以下では後ほど説明するUser AgentプロセッサおよびGeoIPプロセッサ用のフィールド定義も既に含まれています(Apache用モジュールでも利用しているプロセッサのためそのまま定義を利用でき変更する必要はありません)。
- key: squid
  title: "squid"
  description: >
    Squid Module
  short_config: true
  fields:
    - name: squid
      type: group
      description: >
        Squid fields.
      fields:
        - name: access
          type: group
          description: >
            Contains fields for the Squid access logs.
          fields:
            - name: time
              type: keyword
              description: >
                Timestamp.
            - name: client_ip
              type: keyword
              description: >
                Client IP address.
            - name: client_port
              type: long
              description: >
                Client port.
            - name: user_ident
              type: keyword
              description: >
                The user name from ident.
            - name: user_name
              type: keyword
              description: >
                The user name.
            - name: method
              type: keyword
              example: GET
              description: >
                The request HTTP method.
            - name: url
              type: text
              description: >
                The request HTTP URL.
            - name: http_version
              type: keyword
              description: >
                The HTTP version.
            - name: response_code
              type: long
              description: >
                The HTTP response code.
            - name: sent_bytes
              type: long
              format: bytes
              description: >
                The number of bytes from client.
            - name: received_bytes
              type: long
              format: bytes
              description: >
                The number of bytes from server.
            - name: referrer
              type: text
              description: >
                The HTTP referrer.
            - name: agent
              type: text
              description: >
                Contains the un-parsed user agent string. Only present if the user
                agent Elasticsearch plugin is not available or not used.
            - name: squid_status
              type: keyword
              description: >
                Squid request status (TCP_MISS etc).
            - name: squid_hier
              type: keyword
              description: >
                Squid hierarchy status (DEFAULT_PARENT etc).
            - name: unix_time
              type: keyword
              description: >
                Timestamp by UNIX_MS.
            - name: server_ip
              type: keyword
              description: >
                Server IP address.
            - name: server_fqdn
              type: keyword
              description: >
                Server FQDN.
            - name: server_port
              type: long
              description: >
                Server port.
            - name: user_agent
              type: group
              description: >
                Contains the parsed User agent field. Only present if the user
                agent Elasticsearch plugin is available and used.
              fields:
                - name: device
                  type: keyword
                  description: >
                    The name of the physical device.
                - name: major
                  type: long
                  description: >
                    The major version of the user agent.
                - name: minor
                  type: long
                  description: >
                    The minor version of the user agent.
                - name: patch
                  type: keyword
                  description: >
                    The patch version of the user agent.
                - name: name
                  type: keyword
                  example: Chrome
                  description: >
                    The name of the user agent.
                - name: os
                  type: keyword
                  description: >
                    The name of the operating system.
                - name: os_major
                  type: long
                  description: >
                    The major version of the operating system.
                - name: os_minor
                  type: long
                  description: >
                    The minor version of the operating system.
                - name: os_name
                  type: keyword
                  description: >
                    The name of the operating system.
                - name: original
                  type: text
                  index: false
                  description: >
                    Original user agent value before parsing by ingest-user-agent plugin.
            - name: geoip
              type: group
              description: >
                Contains GeoIP information gathered based on the remote_ip field.
                Only present if the GeoIP Elasticsearch plugin is available and
                used.
              fields:
                - name: continent_name
                  type: keyword
                  description: >
                    The name of the continent.
                - name: country_iso_code
                  type: keyword
                  description: >
                    Country ISO code.
                - name: location
                  type: geo_point
                  description: >
                    The longitude and latitude.
                - name: region_name
                  type: keyword
                  description: >
                    The region name.
                - name: city_name
                  type: keyword
                  description: >
                    The city name.
                - name: region_iso_code
                  type: keyword
                  description: >
                    Region ISO code.
Grokプロセッサの詳細
Grokプロセッサによるログメッセージのパーシング結果を変換するJSON形式を定義できました。次にプロセッサの設定を以下の通り行います。
{
  "description": "Pipeline for parsing Squid access logs. Requires the geoip and user_agent plugins.",
  "processors": [{
    "grok": {
      "field": "message",
      "patterns":[
        "%{IPORHOST:squid.access.client_ip}:%{NUMBER:squid.access.client_port} %{DATA:squid.access.user_ident} %{DATA:squid.access.user_name} \"%{DATA:squid.access.method} %{DATA:squid.access.url} HTTP/%{DATA:squid.access.http_version}\" %{NUMBER:squid.access.response_code} %{NUMBER:squid.access.sent_bytes} %{NUMBER:squid.access.received_bytes} \"%{DATA:squid.access.referrer}\" \"%{DATA:squid.access.agent}\" %{DATA:squid.access.squid_status}:%{DATA:squid.access.squid_hier} \\[%{NUMBER:squid.access.unix_time}\\] %{IPORHOST:squid.access.server_ip}:%{NUMBER:squid.access.server_port} %{IPORHOST:squid.access.server_fqdn}",
        "%{IPORHOST:squid.access.client_ip}:%{NUMBER:squid.access.client_port} %{DATA:squid.access.user_ident} %{DATA:squid.access.user_name} \"%{DATA:squid.access.method} %{DATA:squid.access.url} HTTP/%{DATA:squid.access.http_version}\" %{NUMBER:squid.access.response_code} %{NUMBER:squid.access.sent_bytes} %{NUMBER:squid.access.received_bytes} \"%{DATA:squid.access.referrer}\" \"%{DATA:squid.access.agent}\" %{DATA:squid.access.squid_status}:%{DATA:squid.access.squid_hier} \\[%{NUMBER:squid.access.unix_time}\\] -:- -"
        ],
      "ignore_missing": true,
      "ignore_failure": true
    }
  }, {
......
  }]
}
| 説明 | |
|---|---|
| field: message | Grokプロセッサが処理するフィールド名。ログメッセージが設定されている(b)JSONドキュメントのmessageフィールドを指定します |
| patterns:[...] | fieldで指定されたフィールド値のパーシング規則を正規表現を利用して記述します(詳細は後述) |
| ignore_missing: true | フィールドが存在しない場合にはドキュメント加工処理をスキップします |
| ignore_failure: true | パーシング等に失敗した場合にはドキュメント加工処理をスキップします |
設定の詳細についてはこちらを参照。
Grok patterns(パターン)の説明
JSONドキュメントのフィールドに設定されたテキスト値(本記事の場合には(b)JSONのmessageフィールドのログメッセージ)のパーシング規則を正規表現を利用して定義します。変換されるJSON形式のフィールド毎に正規表現の規則を以下の形式で指定します。
%{正規表現:フィールド名}
例えば以下のようなテキストを想定しましょう。
Alice and Bob are famous couple.
このメッセージをパーシングして人名であるAliceとBobをそれぞれfemaleとmaleというJSONフィールド値として抽出したいとします。
{
  "female":"Alice",
  "male":"Bob"
}
人名が英数字のみで構成されるとするとそれぞれのフィールドは以下のようなパターン定義となります。
%{[a-zA-Z0-9._-]+:female}
%{[a-zA-Z0-9._-]+:male}
そしてこれを組み合わせて以下のようなテキスト値全体のパーシング規則(パターン)を定義します。
%{[a-zA-Z0-9._-]+:female} and %{[a-zA-Z0-9._-]+:male} are famous couple.
一方でGrokパターンでは上記のような正規表現の規則(パターン)にわかりやすいラベルをつけて再利用することができます。
PERSONSNAME [a-zA-Z0-9._-]+
これを利用すると以下のようにわかりやすい形式でパターンを記述することができます。
%{PERSONSNAME :female} and %{PERSONSNAME:male} are famous couple.
Elasticsearchではあらかじめ利用可能な多くのこのようなパターンのラベルが定義されています。
USERNAME [a-zA-Z0-9._-]+
BASE10NUM (?<![0-9.+-])(?>[+-]?(?:(?:[0-9]+(?:\.[0-9]+)?)|(?:\.[0-9]+)))
NUMBER (?:%{BASE10NUM})
BASE16NUM (?<![0-9A-Fa-f])(?:[+-]?(?:0x)?(?:[0-9A-Fa-f]+))
DATA .*?

IPV6 ((([0-9A-Fa-f]{1,4}:){7}([0-9A-Fa-f]{1,4}|:))|(([0-9A-Fa-f]{1,4}:){6}(:[0-9A-Fa-f]{1,4}|((25[0-5]|2[0-4]\d|1\d\d|[1-9]?\d)(\.(25[0-5]|2[0-4]\d|1\d\d|[1-9]?\d)){3})|:))|(([0-9A-Fa-f]{1,4}:){5}(((:[0-9A-Fa-f]{1,4}){1,2})|:((25[0-5]|2[0-4]\d|1\d\d|[1-9]?\d)(\.(25[0-5]|2[0-4]\d|1\d\d|[1-9]?\d)){3})|:))|(([0-9A-Fa-f]{1,4}:){4}(((:[0-9A-Fa-f]{1,4}){1,3})|((:[0-9A-Fa-f]{1,4})?:((25[0-5]|2[0-4]\d|1\d\d|[1-9]?\d)(\.(25[0-5]|2[0-4]\d|1\d\d|[1-9]?\d)){3}))|:))|(([0-9A-Fa-f]{1,4}:){3}(((:[0-9A-Fa-f]{1,4}){1,4})|((:[0-9A-Fa-f]{1,4}){0,2}:((25[0-5]|2[0-4]\d|1\d\d|[1-9]?\d)(\.(25[0-5]|2[0-4]\d|1\d\d|[1-9]?\d)){3}))|:))|(([0-9A-Fa-f]{1,4}:){2}(((:[0-9A-Fa-f]{1,4}){1,5})|((:[0-9A-Fa-f]{1,4}){0,3}:((25[0-5]|2[0-4]\d|1\d\d|[1-9]?\d)(\.(25[0-5]|2[0-4]\d|1\d\d|[1-9]?\d)){3}))|:))|(([0-9A-Fa-f]{1,4}:){1}(((:[0-9A-Fa-f]{1,4}){1,6})|((:[0-9A-Fa-f]{1,4}){0,4}:((25[0-5]|2[0-4]\d|1\d\d|[1-9]?\d)(\.(25[0-5]|2[0-4]\d|1\d\d|[1-9]?\d)){3}))|:))|(:(((:[0-9A-Fa-f]{1,4}){1,7})|((:[0-9A-Fa-f]{1,4}){0,5}:((25[0-5]|2[0-4]\d|1\d\d|[1-9]?\d)(\.(25[0-5]|2[0-4]\d|1\d\d|[1-9]?\d)){3}))|:)))(%.+)?
IPV4 (?<![0-9])(?:(?:[0-1]?[0-9]{1,2}|2[0-4][0-9]|25[0-5])[.](?:[0-1]?[0-9]{1,2}|2[0-4][0-9]|25[0-5])[.](?:[0-1]?[0-9]{1,2}|2[0-4][0-9]|25[0-5])[.](?:[0-1]?[0-9]{1,2}|2[0-4][0-9]|25[0-5]))(?![0-9])
IP (?:%{IPV6}|%{IPV4})
HOSTNAME \b(?:[0-9A-Za-z][0-9A-Za-z-]{0,62})(?:\.(?:[0-9A-Za-z][0-9A-Za-z-]{0,62}))*(\.?|\b)
IPORHOST (?:%{IP}|%{HOSTNAME})
詳細はElasticsearchのgithubを参照してください。
Grok patterns(パターン)の作成ツール
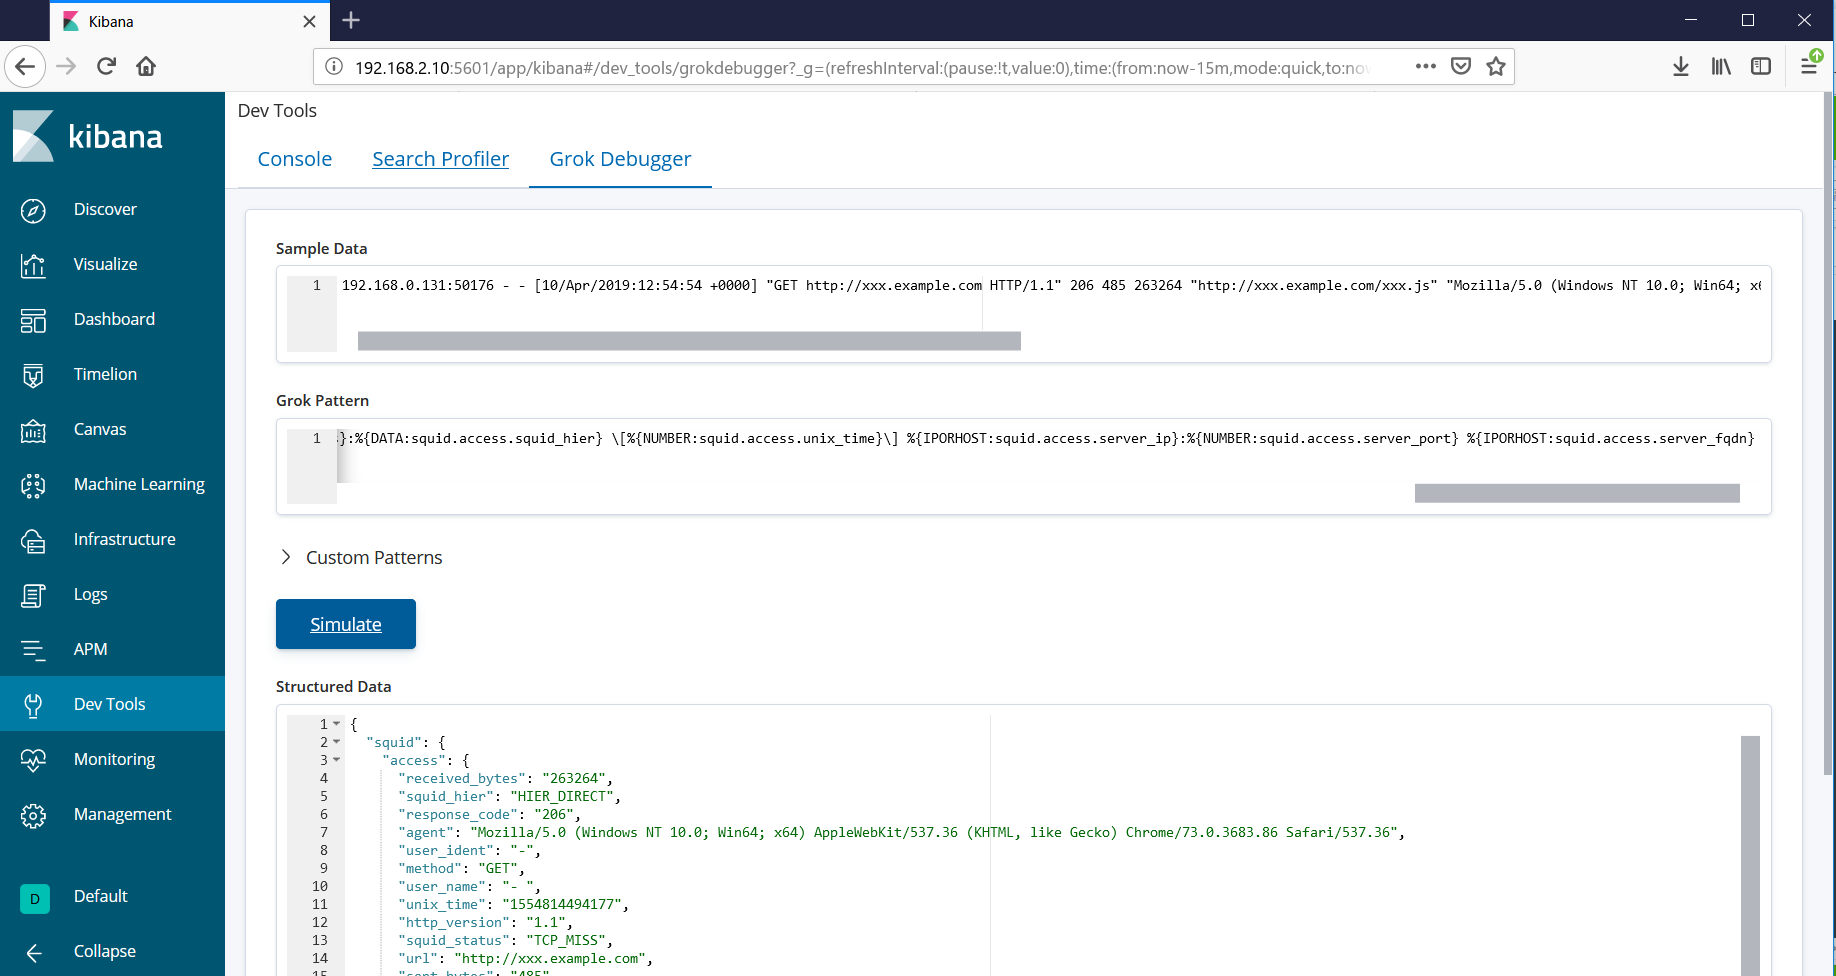
テキスト値のパーシング規則(パターン)を作成とデバッグにはKibanaに付属しているDevTools/Grok Debuggerを利用します。テキスト値とパターンを入力することでそのパーシング結果を表示してくれます。
Squidログパーシング用のGrok patterns(パターン)
KibanaのGrok Debuggerを利用して作成したパターンが以下です。
%{IPORHOST:squid.access.client_ip}:%{NUMBER:squid.access.client_port} %{DATA:squid.access.user_ident} %{DATA:squid.access.user_name} \"%{DATA:squid.access.method} %{DATA:squid.access.url} HTTP/%{DATA:squid.access.http_version}\" %{NUMBER:squid.access.response_code} %{NUMBER:squid.access.sent_bytes} %{NUMBER:squid.access.received_bytes} \"%{DATA:squid.access.referrer}\" \"%{DATA:squid.access.agent}\" %{DATA:squid.access.squid_status}:%{DATA:squid.access.squid_hier} \\[%{NUMBER:squid.access.unix_time}\\] %{IPORHOST:squid.access.server_ip}:%{NUMBER:squid.access.server_port} %{IPORHOST:squid.access.server_fqdn}
%{IPORHOST:squid.access.client_ip}:%{NUMBER:squid.access.client_port} %{DATA:squid.access.user_ident} %{DATA:squid.access.user_name} \"%{DATA:squid.access.method} %{DATA:squid.access.url} HTTP/%{DATA:squid.access.http_version}\" %{NUMBER:squid.access.response_code} %{NUMBER:squid.access.sent_bytes} %{NUMBER:squid.access.received_bytes} \"%{DATA:squid.access.referrer}\" \"%{DATA:squid.access.agent}\" %{DATA:squid.access.squid_status}:%{DATA:squid.access.squid_hier} \\[%{NUMBER:squid.access.unix_time}\\] -:- -
- '['および']'は'\'でエスケープします。
- ingest/default.jsonのgrok/patternsは配列型ですので複数パターンを同時に記述できます。
- フィールド名は前述のテンプレート定義で説明した通り、階層(ネスト)構造で指定します。
- ingest/default.jsonへ設定する場合には'"'および'\'をさらに'\'でエスケープします。
DateプロセッサによるISO8601形式タイムスタンプの追加
Squidのログで記録されるUNIXタイムスタンプからISO8601形式タイムスタンプを生成し追加します。
{
  "description": "Pipeline for parsing Squid access logs. Requires the geoip and user_agent plugins.",
  "processors": [{
  ......
  }, {
      "date": {
        "field": "squid.access.unix_time",
        "target_field": "squid.access.time",
        "formats": [
            "UNIX_MS"
        ],
        "ignore_failure": false
      }
  ......
  }],
  ......
}
| 説明 | |
|---|---|
| field | UNIXタイムスタンプのフィールド名を指定します |
| target_field | 変換結果を書き込むフィールド名を指定します |
| formats | 変換元の値としてUNIXタイムスタンプ(ミリ秒)を指定します |
| ignore_failure: true | パーシング等でエラーが発生した場合に処理をスキップします |
詳細についてはこちらを参照。
User Agentプロセッサによるブラウザ情報のパーシング
ユーザエージェント情報(squid.access.user_agentフィールド)をパーシングします。
{
  "_index" : "filebeat-6.6.0-2019.xx.xx",
  "_type" : "doc",
  "_id" : "SKMrAmoxxxxtiEEfLG6k",
  "_score" : 1.0,
  "_source" : {
  ......
    "squid" : {
      "access" : {
        "method" : "GET",
        ......
        "http_version" : "1.1",
        "response_code" : "200",
        "url" : "http://xxx.example.com/",
        ......
        "agent": "Mozilla/5.0 (Windows NT 10.0; Win64; x64) AppleWebKit/537.36 (KHTML, like Gecko) Chrome/73.0.3683.86 Safari/537.36",
        ......
      }
   },
  ......
  }
}
{
  "_index" : "filebeat-6.6.0-2019.xx.xx",
  "_type" : "doc",
  "_id" : "SKMrAmoxxxxtiEEfLG6k",
  "_score" : 1.0,
  "_source" : {
  ......
    "squid" : {
      "access" : {
        "method" : "GET",
        ......
        "http_version" : "1.1",
        "response_code" : "200",
        "url" : "http://xxx.example.com/",
        ......
        "user_agent" : {
          "patch" : "3683",
          "original" : "Mozilla/5.0 (Windows NT 10.0; Win64; x64) AppleWebKit/537.36 (KHTML, like Gecko) Chrome/73.0.3683.86 Safari/537.36",
          "major" : "73",
          "minor" : "0",
          "os" : "Windows 10",
          "name" : "Chrome",
          "os_name" : "Windows 10",
          "device" : "Other"
        }
        ......
      }
   },
  ......
  }
}
User Agentプロセッサの設定
{
  "description": "Pipeline for parsing Squid access logs. Requires the geoip and user_agent plugins.",
  "processors": [{
  ......
  }, {
    "user_agent": {
      "field": "squid.access.agent",
      "target_field": "squid.access.user_agent",
      "ignore_failure": true
    }
  ......
  }],
  ......
}
| 説明 | |
|---|---|
| field | パーシングするフィールド名を指定します |
| target_field | パーシング結果を書き込むフィールド名を指定します |
| ignore_failure: true | パーシング等でエラーが発生した場合に処理をスキップします |
詳細についてはこちらを参照。
User AgentプラグインをElasticsearchへインストール
User Agentプロセッサを利用するためにはElasticsearchへプラグインを追加する必要があります。以下のようにしてインストールしてください(インターネット接続が発生する場合があります)。
/usr/share/elasticsearch/bin/elasticsearch-plugin install ingest-user-agent
GeoIPプロセッサによる接続先サーバの地理情報の付加
接続先サーバIPアドレスの地理情報を付加します。
{
  "_index" : "filebeat-6.6.0-2019.xx.xx",
  "_type" : "doc",
  "_id" : "SKMrAmoxxxxtiEEfLG6k",
  "_score" : 1.0,
  "_source" : {
  ......
    "squid" : {
      "access" : {
        "method" : "GET",
        ......
        "http_version" : "1.1",
        "response_code" : "200",
        "url" : "http://xxx.example.com/",
        "server_ip" : "10.xx.xx.xx",

        ......
      }
   },
  ......
  }
}
{
  "_index" : "filebeat-6.6.0-2019.xx.xx",
  "_type" : "doc",
  "_id" : "SKMrAmoxxxxtiEEfLG6k",
  "_score" : 1.0,
  "_source" : {
  ......
    "squid" : {
      "access" : {
        "method" : "GET",
        ......
        "http_version" : "1.1",
        "response_code" : "200",
        "url" : "http://xxx.example.com/",
        "server_ip" : "10.xx.xx.xx",
        ......
        "geoip" : {
          "continent_name" : "Asia",
          "country_iso_code" : "JP",
          "location" : {
            "lon" : 1xx.xx,
            "lat" : xx.xx
          }
        },
        ......
      }
   },
  ......
  }
}
GeoIPプロセッサの設定
{
  "description": "Pipeline for parsing Squid access logs. Requires the geoip and user_agent plugins.",
  "processors": [{
  ......
  }, {
    "geoip": {
      "field": "squid.access.server_ip",
      "target_field": "squid.access.geoip",
      "ignore_missing": true
    }
  ......
  }],
  ......
}
| 説明 | |
|---|---|
| field | 地理情報を求めるIPアドレスのフィールド名を指定します |
| target_field | 地理情報を書き込むフィールド名を指定します |
| ignore_missing: true | フィールド値が見つからない場合に処理をスキップします |
詳細についてはこちらを参照。
GeoIPプラグインをElasticsearchへインストール
GeoIPプロセッサを利用するためにはElasticsearchへプラグインを追加する必要があります。以下のようにしてインストールしてください(インターネット接続が発生する場合があります)。
/usr/share/elasticsearch/bin/elasticsearch-plugin install ingest-geoip
Removeプロセッサによる不要な情報の削除
不要または冗長な情報を削除します。
Removeプロセッサの設定
パーシングしたmessageフィールドは不要のため削除します。
{
  "description": "Pipeline for parsing Squid access logs. Requires the geoip and user_agent plugins.",
  "processors": [{
  ......
  }, {
    "remove": {
      "field": "message",
      "ignore_missing": true,
      "ignore_failure": true
    }
  ......
  }],
  ......
}
| 説明 | |
|---|---|
| field | 削除するフィールド名を指定します |
| ignore_missing: true | フィールド値が見つからない場合に処理をスキップします |
| ignore_failure: true | エラーが発生した場合に処理をスキップします |
詳細についてはこちらを参照。
Filebeatモジュールの設定手順
Squid用のモジュールが完成しましたのでそれをdmz.example.comへデプロイします。
モジュールの設定ファイル作成
/etc/filebeat/
   `- modules.d/
       `- squid.yml.disabled
こちらもApache用の設定ファイルを雛形にして多少変更するだけです。
cd /etc/filebeat/modules.d
cp apache2.yml.disabled squid.yml.disabled
- module: squid
  # Access logs
  access:
    enabled: true

    # Set custom paths for the log files. If left empty,
    # Filebeat will choose the paths depending on your OS.
    #var.paths:
モジュールのテンプレート設定を追加
/etc/filebeat/
   `- my_fields.yml
さきほど作成したmy_fields.ymlのパスをFilebeatの設定ファイル(/etc/filebeat/filebeat.yml)で変更します。以下のsetup.template.fieldsで説明します。
Filebeatの設定ファイルを修正
/etc/filebeat/
   `- filebeat.yml
| 説明 | |
|---|---|
| hosts: ["log.example.com:9200"] | Elasticsearchが動作するホストアドレスとポート番号を指定 |
| filebeat.overwrite_pipelines: true | Elasticsearchへの接続毎にIngestノードのパイプライン設定を注入(デバッグ用) |
| setup.template.enabled: true | テンプレート設定の注入を有効化 |
| setup.template.fields: "/etc/filebeat/my_fields.yml" | テンプレート設定ファイルの場所を変更 |
| setup.template.overwrite: true | 既存のテンプレート設定を更新 |
詳細は/etc/filebeat/filebeat.reference.ymlを参照してください。
hosts: ["log.example.com:9200"]

#運用時にはコメントアウト
filebeat.overwrite_pipelines: true

setup.template.enabled: true
setup.template.fields: "/etc/filebeat/my_fields.yml"
setup.template.overwrite: true
Filebeatを再起動します。
systemctl restart filebeat.service
モジュールの有効化
以上の設定作業が終わったらSquid用のモジュールを有効化します。
filebeat modules enable squid
モジュールのテンプレート設定をElasticsearchへ注入
filebeat setup --template
モジュールのパイプライン設定をElasticsearchへ注入
filebeat setup --pipelines -modules squid
補足
テンプレートの参照
curl -XGET http://log.example.com:9200/_template/filebeat-*?pretty

テンプレートの削除
curl -XDELETE http://log.example.com:9200/_template/filebeat-*

パイプライン設定の参照
curl -XGET http://log.example.com:9200/_ingest/pipeline/filebeat-*?pretty

パイプライン設定の削除
curl -XDELETE http://log.example.com:9200/_ingest/pipeline/filebeat-*

ログの取得
curl -XGET http://log.example.com:9200/filebeat-*/_search?pretty -H 'Content-Type: application/json' -d
'{
  "query": {
    "match_all":{}
  },
  "size":100
}'

インデクスのリスト
curl http://log.example.com:9200/_cat/indices?v

registryファイルのクリア
rm /var/lib/filebeat/registry
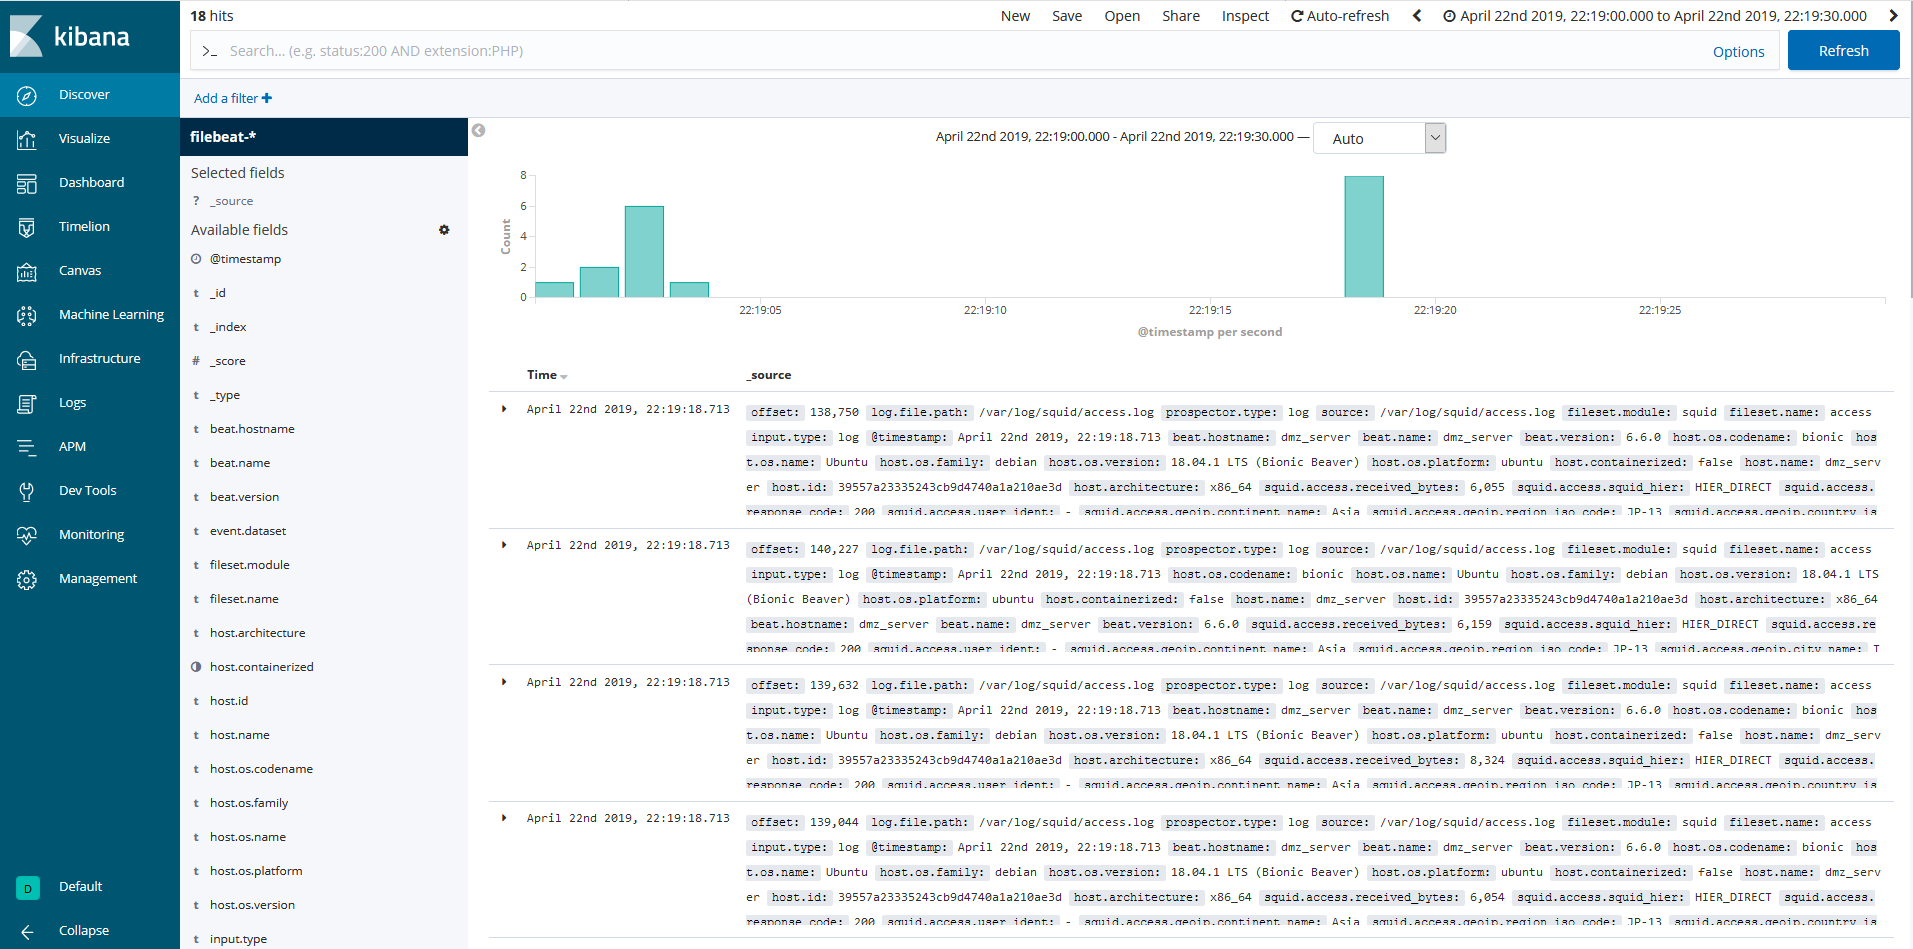
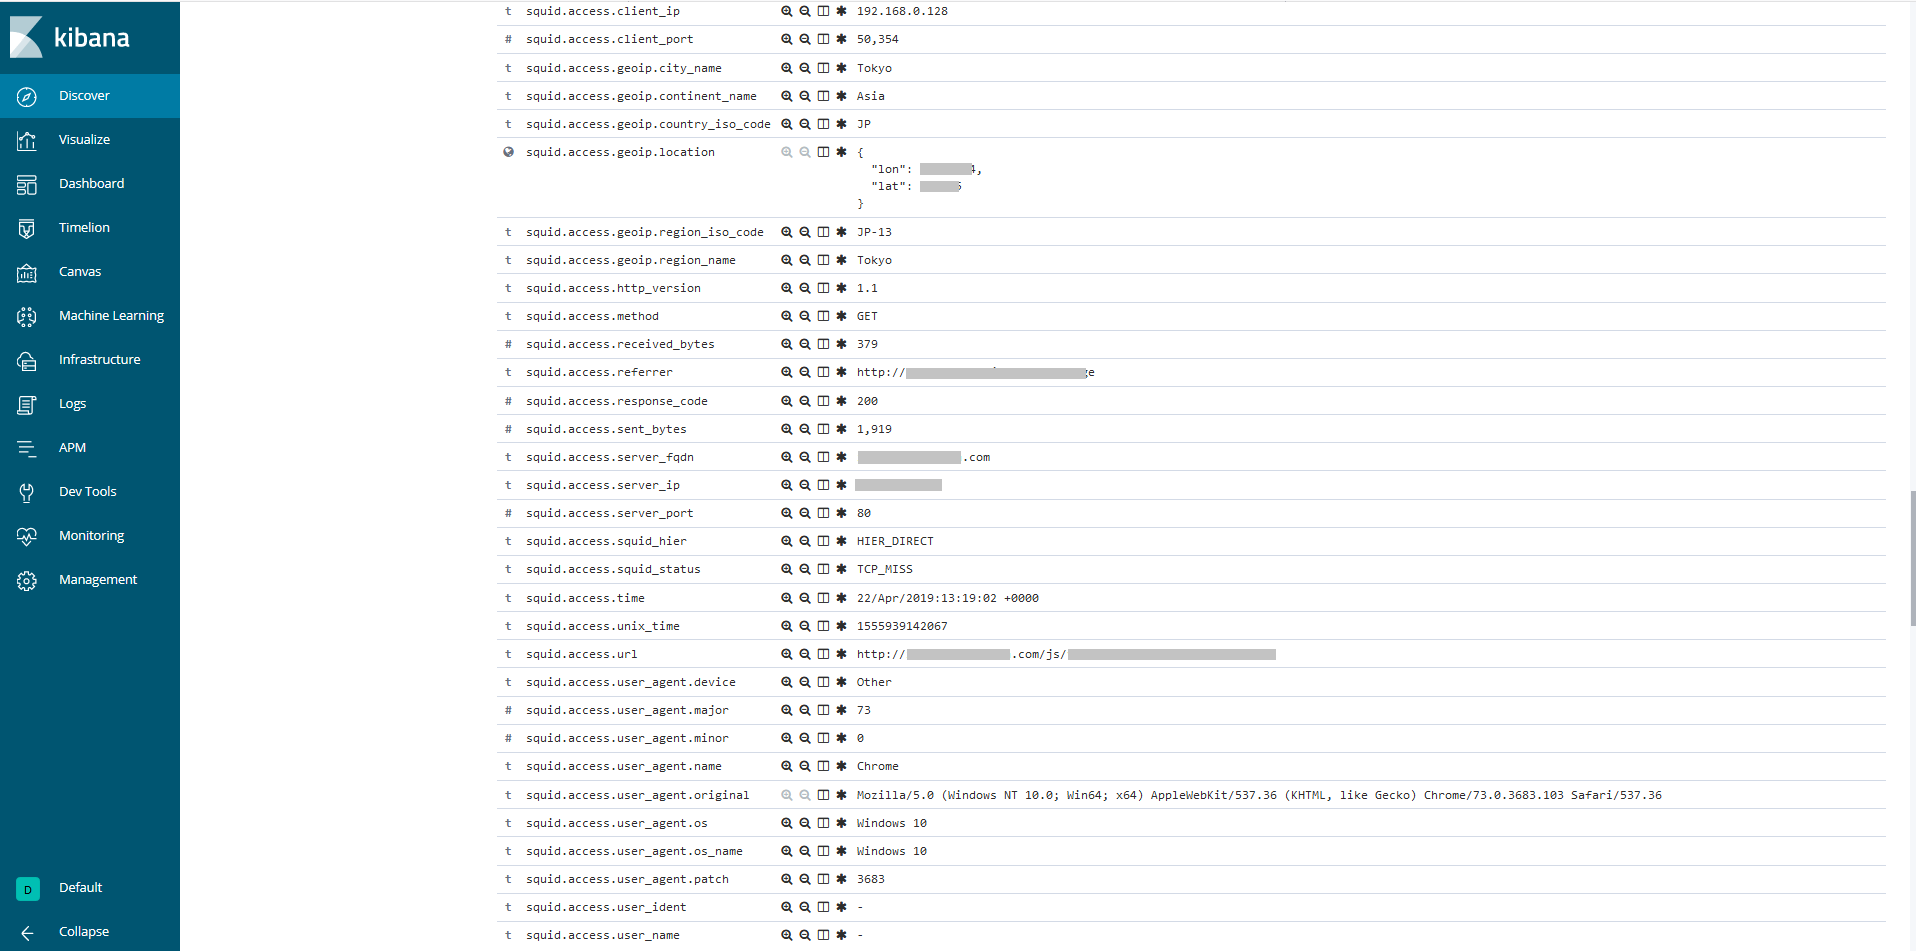
Kibanaでログを確認
- Management/Create Index Patternにて filebeat-*を指定してインデクスパターンを生成
-
Discoverにてsquid.access.*フィールドへパーシングされたログを確認できます。
まとめ
JPCERT/CCによる「高度サイバー攻撃への対処におけるログの活用と分析方法」で推奨されるプロキシサーバのログ設定をもとにSquidおよびElasticsearchを利用したログ解析基盤を構築してみました。
次回の記事ではメールサーバ(Postfix)のコンフィグレーションを追加していきます。
「メールサーバ編」へ続く
本記事の続編は以下の通りです。
* 「メールサーバ編」
* 「エンドポイントログ編(その1- 概要/Sysmon)」
* 「エンドポイントログ編(その2- Winlogbeat/Elasticsearch)」