プロジェクトの作成
まず、eclipseを開いてプロジェクトを作成しましょう。
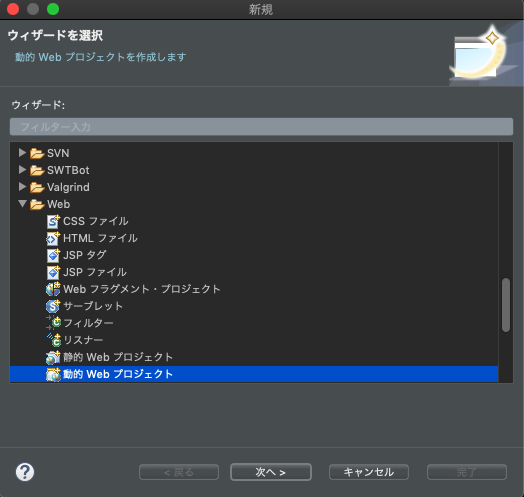
ファイル -> 新規 -> その他と進んで「動的Webプロジェクト」を選択して「次へ」を押しましょう。
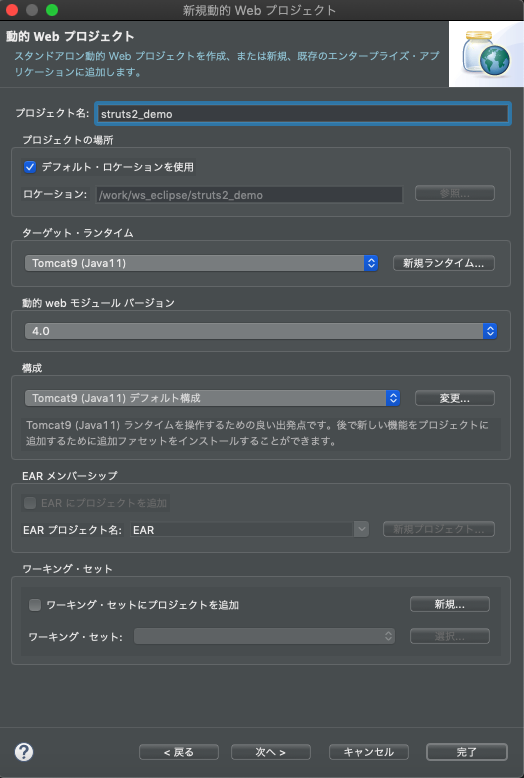
「プロジェクト名」にプロジェクト名(struts2_demo)を入力し、適当なTomcatサーバを選択して完了を押しましょう。
プロジェクトにStruts2を組み込み
Struts2に必要なライブラリをダウンロードしましょう。
はじめての方は”struts-バージョン-all.zip”となっているファイルをダウンロードしましょう。
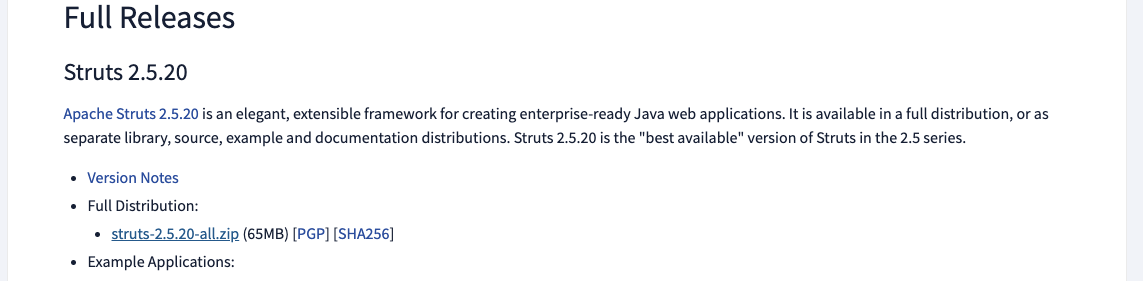
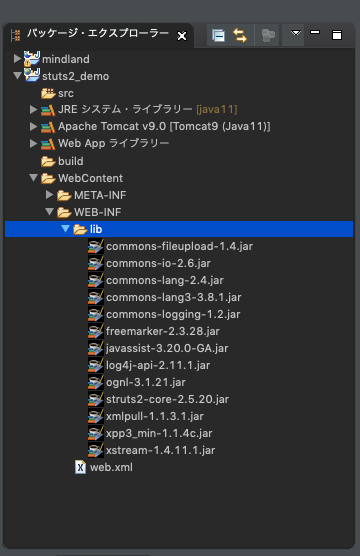
ダウンロードしたStruts-2.5.20-all.zipを展開しstruts-2.5.20->libから次の13個を
- commons-fileupload-1.4.jar
- commons-io-2.6.jar
- commons-lang-2.4.jar
- commons-lang3-3.8.jar
- commons-logging-1.2.jar
- freemarker-2.3.28.jar
- javassist-3.20.0-GA.jar
- log4j-api-2.11.1.jar
- ognl-3.1.21.jar
- struts2-core-2.5.20.jar
- xmlpull-1.1.3.1.jar
- xpp3_min-1.1.4c.jar
- xstream-1.4.11.jar
プロジェクトの配下のWebContent->WEB-INF->libにコピーします。
eclipseのプロジェクトエクスプローラー(左の小窓)上の同じ場所のlibをリフレッシュして環境に反映しましょう。
にドラッグ&ドロップしましょう。
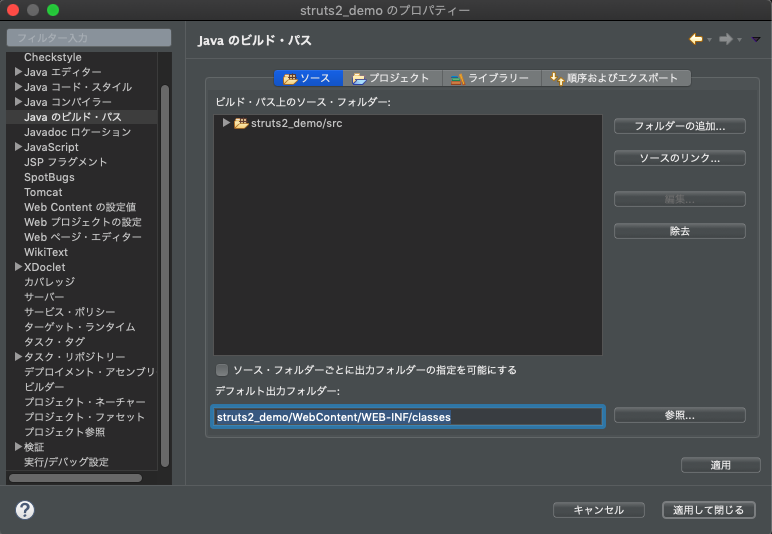
プロジュエクト名を右クリックして、Javaのビルド・パスから、クラスの作成先のパスを変更します。
フォーム画面(index.jsp)
プロジェクトエクスプローラー(左の小窓)のWebContentの上で右クリック
新規->ファイルを押してJSPファイルを作成しましょう。
下記の画面が表示されるのでFile nameに”index.jsp”と入力して”Finish”を押しましょう。
以下のようにフォーム画面(index.jsp)を記述しましょう。
<%@ page language="java" contentType="text/html; charset=ISO-8859-1"
pageEncoding="ISO-8859-1"%>
<!DOCTYPE html PUBLIC
  "-//W3C//DTD HTML 4.01 Transitional//EN"
  "http://www.w3.org/TR/html4/loose.dtd">
<html>
    <head>
        <meta http-equiv="Content-Type" content="text/html; charset=ISO-8859-1">
    <title>Hello Struts2!</title>
    </head>
    <body>
        <form action = "HelloStruts2">
            <label for = "name">Please enter your name</label><br/>
            <input type = "text" name = "name"/>
            <input type = "submit" value = "OK"/>
        </form>
    </body>
</html>
結果画面(HelloStruts.jsp)
以下のように結果表示画面(HelloStruts.jsp)を記述しましょう。
<%@ taglib prefix="s" uri="/struts-tags" %>
<%@ page language="java" contentType="text/html; charset=ISO-8859-1" pageEncoding="ISO-8859-1"%>
<!DOCTYPE html PUBLIC
  "-//W3C//DTD HTML 4.01 Transitional//EN"
  "http://www.w3.org/TR/html4/loose.dtd">
<html>
    <head>
        <meta http-equiv="Content-Type" content="text/html; charset=ISO-8859-1">
        <title>Hello Struts2!</title>
    </head>
    <body>
        Hello Struts2, <s:property value="name"/>
    </body>
</html>
🌾「<%@ taglib prefix="s" uri="/struts-tags" %>」は、Jspのタグライブラリにページロードされています。
アクションファイルを作成
一見完成したように思えますがまだ未完成です。
なぜなら、フォーム画面から結果画面へ変数(name)を受け渡す必要があるからです。
そこで、変数の受け渡しを行うアクションファイル(HelloStruts2Action.java)を作成します。
HelloStruts2Action.javaをsrcの下にパッケージ名をhelloで作成します。
プロジェクトエクスプローラー(左の小窓)のJava Resources->srcで右クリックしHelloStruts2Action.javaを作ります。
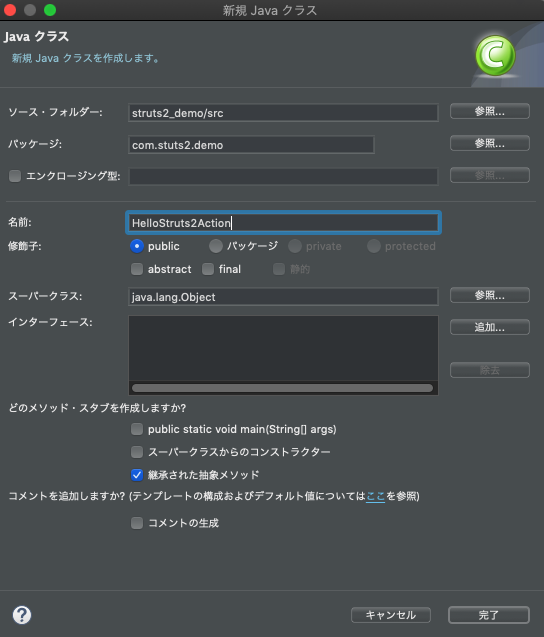
以下のようにHelloStruts2Action.javaを記述しましょう。
package com.stuts2.demo;

public class HelloStruts2Action {
    private String name;
    public String execute() throws Exception {
        return "success";
    }
    public String getName() {
        return name;
    }
    public void setName(String name) {
        this.name = name;
    }
}
Struts.xmlの作成(Strutsのルール)
「フォームの処理をHelloStruts2Action.excecute()で行い戻り値が”success”だったら”HelloWorld.jsp”(結果画面)を表示する」
ルールを明記する必要があります。
それはstruts2_demo->src->struts.xmlに記述します。
struts.xmlを下記のように記述しましょう。
<?xml version="1.0" encoding="UTF-8" ?>
<!DOCTYPE struts PUBLIC
    "-//Apache Software Foundation//DTD Struts Configuration 2.0//EN"
    "http://struts.apache.org/dtds/struts-2.0.dtd">
<struts>
    <constant name="struts.devMode" value="true" />
    <package name="Demo" extends="struts-default">
        <action name="HelloStruts2" class="com.stuts2.demo.HelloStruts2Action" method="execute">
        <result name="success">/HelloStruts.jsp</result>
        </action>
    </package>
</struts>
package要素の属性には、以下の値が設定できます
| 要素 | 解説 |
|---|---|
| name | 複数のアクションをグループ可する際の名前。別のpakage名と重複しないようにする(必須) |
| extends |
別のpackageを継承する。継承することによりそのパッケージの要素にアクセスできるようになる(任意) |
| namespace | urlの一部になる(任意) |
| abstract | trueを設定すると、子要素のactionが必須項目でなくなる(任意) |
web.xmlの設定(URLのルーティング)
Strutsは、バージョンによってMVCフレームワークを開発環境に導入実現も違います。今回Struts2.5をロードしますので、
WebContent->WEB-INF->web.xmlに、以下のように内容を編集します。
<?xml version="1.0" encoding="UTF-8"?>
<web-app xmlns:xsi="http://www.w3.org/2001/XMLSchema-instance" xmlns="http://xmlns.jcp.org/xml/ns/javaee" xsi:schemaLocation="http://xmlns.jcp.org/xml/ns/javaee http://xmlns.jcp.org/xml/ns/javaee/web-app_4_0.xsd" id="WebApp_ID" version="4.0">
    <display-name>struts2_demo</display-name>
    <filter>
        <filter-name>struts2</filter-name>
        <filter-class>org.apache.struts2.dispatcher.filter.StrutsPrepareAndExecuteFilter</filter-class>
    </filter>
    <filter-mapping>
        <filter-name>struts2</filter-name>
        <url-pattern>/*</url-pattern>
    </filter-mapping>
    <welcome-file-list>
        <welcome-file>index.html</welcome-file>
        <welcome-file>index.jsp</welcome-file>
    </welcome-file-list>
</web-app>
TomcatにContextを配置
Tomcatサーバのconf/Catalina/localhostディレクトリの下に、struts2_demo.xmlを作ります。
struts2_demo.xmlの中身は以下とないrます。
<Context path="/struts2_demo" docBase="/work/ws_eclipse/struts2_demo/WebContent" reloadable="false" source="org.eclipse.jst.jee.server:struts2_demo" />
| オプション | 解説 |
|---|---|
| path |
Request-URIに対応するパスです。 ※ Request-URIの参照リンク:http://www.javadrive.jp/servlet/request/index6.html |
| reloadable | /WEB-INF/classes/ や /WEB-INF/libが変更されると、自動的に読み込みます。 |
| docBase | WebAppのContextフォルダを指定します。Tomcatは実行するとき、WebAppのフォルダーを探しその中のContextファイルを読んで画面表示に備えます。 |
| workDir | サーバレットのフォルダーを指定します。WebAppとやりとりするとき、temporary read-write(仮読みー書き)のために使います。 |
eclipseでstruts2アプリを起動
EclipseからTomcatを起動します。
起動するログには、以下のメッセージが確認できれば、struts2_demoが立ち上がりました。

画面で動かしましよう。
ブラウザーに、「http://localhost:8080/struts2_demo/index.jsp」を入力すると、以下の画面が表示します。
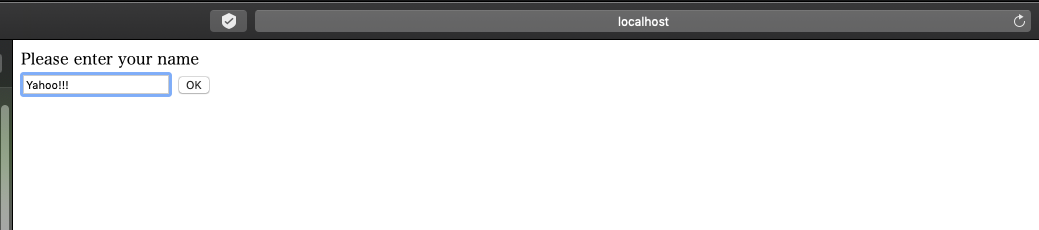
任意文言を書いてOKを押すと、次のページに遷移します。

最後に、上記で作られたプロジェクトの構築は以下の通りになりました。
