はじめに
コンテナベースでインフラ実現するに伴って色々AWS上でのコンテナ周り調べたり、本番導入した際のまとめ的なメモです。
大雑把にこんなことを書いてます。
- 構成概念と基礎知識
- terraformによるコードデプロイ連携でのブルーグリーンデプロイ
- terraformによるメトリクスベースでのオートスケーリング
ECS+Fargateのインフラアーキテクチャ全体像
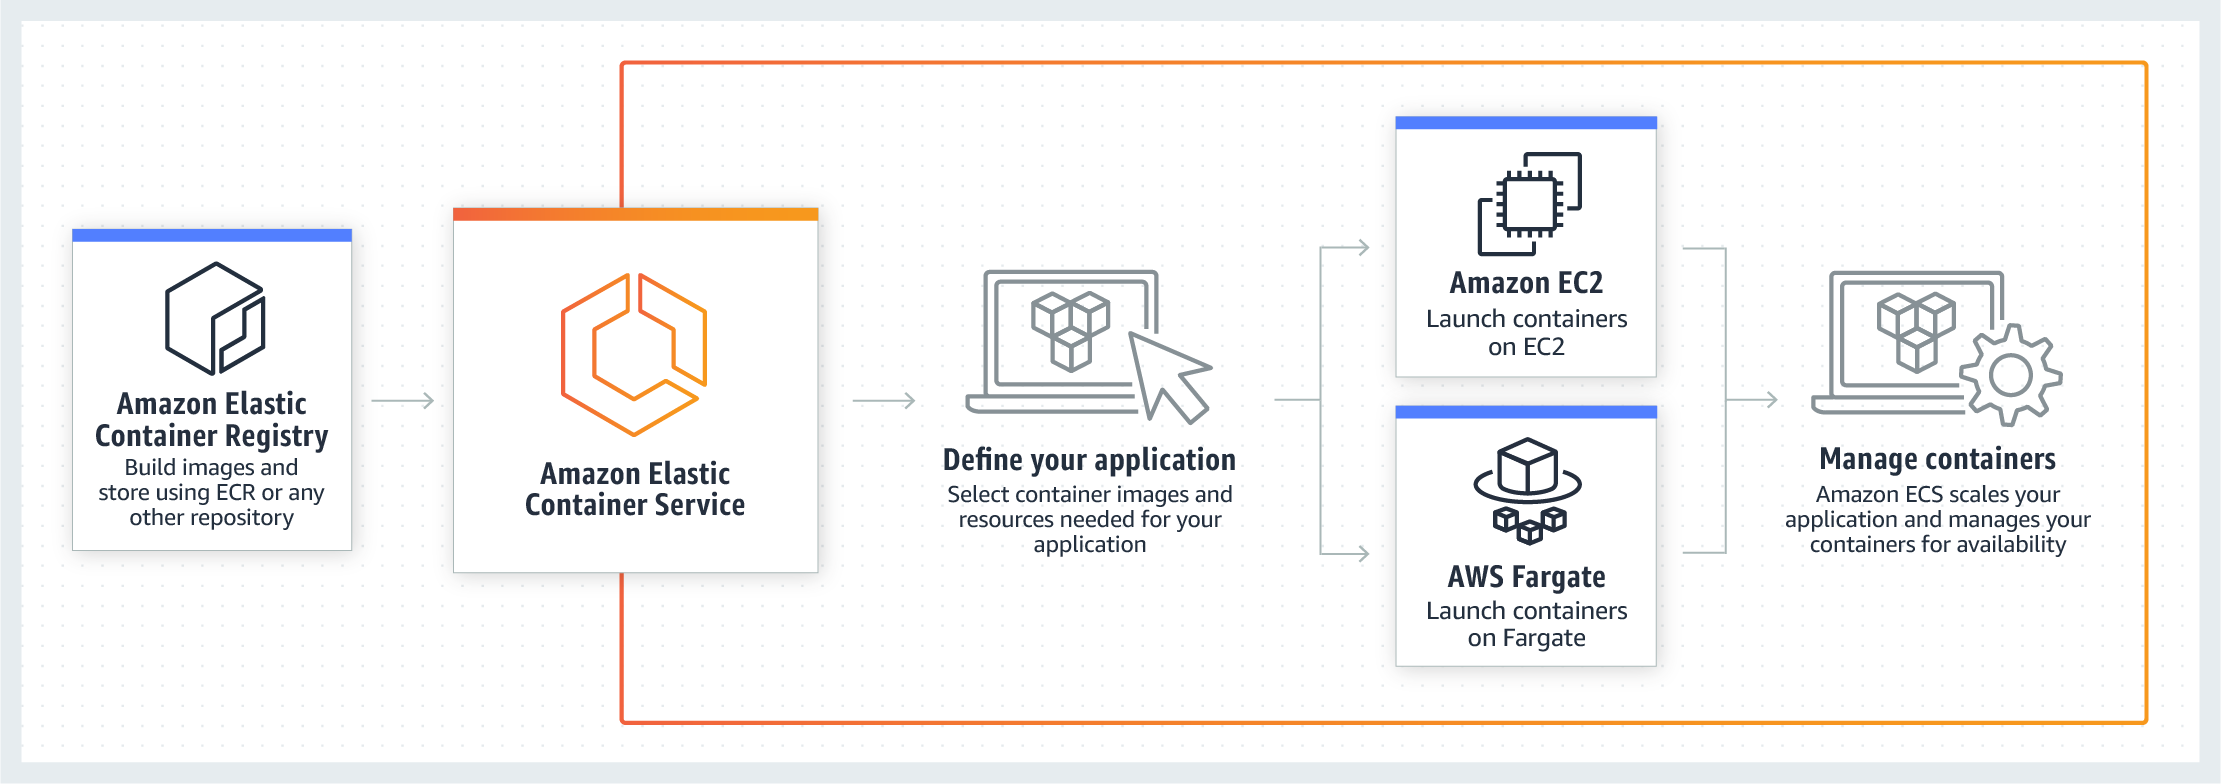
* AWS公式からの引用
ECSとは
ECSはAWSが提供するk8sと同じようなクラスタ構成でのコンテナオケーストレーション
を実現するサービス。
ECSは実際にコンテナが稼働する複数のworkerNodeとその操作・管理を担当するmasterNodeの
クラスタ構造を採用する事で分散・冗長化・スケーラブルなインフラを構築できる。
具体的には以下のような機能を提供をしている。
- クラスタの管理(workerNodeへの自動参加・死活監視や操作など)
- クラスタ上でのコンテナのデプロイメント(ノードに対する配置戦略・生成・ローリングアップデート)
- コンテナ群のスケールイン/アウト
- 外部サービス公開用のインタフェースの定義と動作するコンテナとロードバランサとの紐付けといったような外部との接合)
- コンテナに対するヘルスチェック機能(成否に伴なった外部アクセスに対するアタッチ・デタッチやコンテナ自体に不備発生した場合の再起動)
- スケジュールジョブ
Fargateとは
ECSクラスタのワーカーノードにあたる部分は自分でecsエージェントを起動させたEC2のオートスケーリンググループを組み、
リソース管理やスケールインアウトを操作する必要があった。
ECS Fargateはワーカー部分も含めて、フルマネージドで実現しているので
Fargateを採用する事で実際にコンテナを起動させていたEC2の管理や
スケールイン/アウト/アップに伴うクラスタ自身のリソース管理や作成から解放される。
AWSではEKSというkubernetesを採用したコンテナオーケストレーションサービスもあるのだけど、
こちらは現時点(2019/01)ではFargate未対応でEKS最適化されたamiイメージを元に
EC2でWorkerNodeを構成することになる。
サポートするVCPUとMemoryの組み合わせはこちら
Fargateの制約やデメリット
大雑把に。
awsvpcモード必須
logDriverがawslogsに限定される
cloudwatchとの連携は用意だがそれ以外のログの収集や送信(たとえばfluentdなど)との複数コンテナ稼働時のログ収集においては一工夫しないといけなかったり。
- 共有ボリュームは~4GB
概ねサイドカーエージェントでログ転送とかする際の置き場になる気がするんだけど、上限が低いので
ローテートとかちゃんと組まないと枯渇する
kill時の設定が素のECSよかいじれなかったり
デプロイと起動が素のECSより少し遅い。
EC2と同スペック比較すると15~20%くらいは高くなる。
この辺はtask定義のパラメータにも記載があるので
また起動数などのサービス制約もあるので、緩和申請なども場合によっては必要
ECSを構成する要素
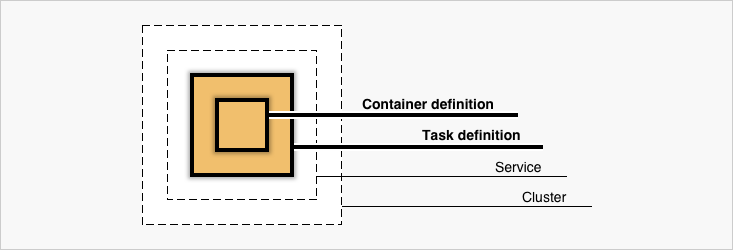
(AWS公式のチュートリアルからの引用
- Cluster
- Service
- Container Definition
- Task & TaskDefinition
によってECSは構成されている。
次項で項目別に記載していく。
実際にはTaskDefinition中にContainerDefinitionは内包されている。
Cluster
ServiceやTaskが所属する論理的なグルーピング。
FargateでなくEC2起動タイプを選択している場合は所属するクラスタのworkerNodeであるEC2インスタンスを共有する。
Task & TaskDefinition
Task
TaskDefinitionの定義を実行に移している実行されている複数のコンテナを指す。
例えばgoとnginxを組み合わせて動いているようなwebアプリケーションを二つのコンテナ構成で動作させる場合は
以下のようなコンテナの組み合わせが1Taskとして扱われる。
* sample_go_application_task
  - nginx
  - go
TaskDefinition
Taskの定義というと(まんま)
アプリケーションをどのようにコンテナを組み合わせるか、リソースをどれくらい許容するか、
IAMやネットワークはどのようにするか、というようなコンテナの動作に必要な情報を設定する。
具体的には以下のような情報を定義する。
すごく大雑把にいうと、docker-composeにawsインフラの情報や定義の一部が足されたようなイメージ。
- コンテナを動かすのに必要な情報(DockerImage,Port,protocolなど)
- 動かしたいコンテナの組み合わせ
- コンテナ起動時の実行コマンドやdocker関連のパラメーター設定
- ネットワークモードや動作させるネットワーク情報
- 使用するリソース量(CPU/メモリ)
ざっくりとした例
{
        "family": "sample",
        "networkMode": "awsvpc",
        "containerDefinitions": [
            {
                "name": "nginx",
                "image": "nginx:latest",
                "essential": true,
                "dockerLabels": {"role:nginx"}
            }, {
                "name": "go-app",
                "image": "your-go-app:latest",
                "essential": true,
                "environment": [
                    {
                        "name": "ENV_1",
                        "value": "hoge"
                    },
                    {
                        "name": "ENV_2",
                        "value": "fuga"
                    }
                ]
           }
        ],
        "requiresCompatibilities": [
            "FARGATE"
        ],
        "cpu": "256",
        "memory": "512"
}
動かすだけなら簡単に動きますが、例えばweb serverとして動作させる場合はulimitの値を設定しておかないと
ファイルディスクリプタが枯渇して爆死したりとか、memoryReservationを全く指定しないでハードリミット超えてコンテナがご臨終したりするので、パラメーターセットは公式を一度しっかり見て把握した方が良いと思います。
- 作成
aws ecs register-task-definition --cli-input-json file://$PWD/task-definitions.json
更新はfamilyが存在していれば同一コマンドで行われて、バージョン値が自動でincrementされる。
Service
TaskDefinitionを束ねて外部にどのように公開するか、オートスケールを
どのような閾値で行うか、起動タイプ(EC2/Fargate)などの設定を記載できる。
例えばロードバランサへのtargetGroup追加したりなど。
- aws cliから雛形をダウンロード
aws ecs create-service --generate-cli-skeleton > service.json
- service生成
aws ecs create-service --cli-input-json file://$PWD/service.json
更新はupdate-serviceで行う。
全ての項目が更新可能ではなく作成時にしか変更できない項目もあり、項目数が多いので、詳細な説明は公式を確認した方が良いです。
例としてはこんな感じ
{
    "cluster": "test-ecs-cluster",
    "serviceName": "test-service",
    "taskDefinition": "test:30",
    "loadBalancers": [
        {
            "targetGroupArn": "loadbarancerArn",
            "containerName": "test-nginx",
            "containerPort": 80
        }
    ],
    "desiredCount": 2,
    "clientToken": "",
    "launchType": "FARGATE",
    "platformVersion": "LATEST",
    "deploymentConfiguration": {
        "maximumPercent": 200,
        "minimumHealthyPercent": 100
    },
    "networkConfiguration": {
        "awsvpcConfiguration": {
            "subnets": [
                "subnet-xxxxx",
                "subnet-xxxxx"
            ],
            "securityGroups": [
                "sg-xxxxx",
            ],
            "assignPublicIp": "DISABLED"
        }
    },
    "healthCheckGracePeriodSeconds": 0,
    "schedulingStrategy": "REPLICA",
    "deploymentController": {
        "type": "CODE_DEPLOY"
    },
    "propagateTags": "TASK_DEFINITION",
    "tags": [
        {
            "key": "env",
            "value": "stage"
        },
        {
            "key": "region",
            "value": "jp"
        }
    ],
    "enableECSManagedTags": false
}
fargate利用の場合、alb/nlbのどちらかが必須であることと、TargetGroupのtarget_typeをipで作る必要がある。
Blue/Green Deploymentしてみよう。
同じAWSのコンポーネントであるCodeDeployと連携させると結構簡単にロードバランサー振替ベースでの
Blue/Green Deploymentを実現できる。
GUIでは指示に従っていけば概ね簡単に作れるので、割愛。
CUIとterraformを使っての説明。
VPC,subnet,securityGroupは説明を省くので、よしなに作ってください。
クラスタ作成
resource "aws_ecs_cluster" "ecs_cluster" {
  name = "test-nginx-cluster"
}

resource "aws_cloudwatch_log_group" "ecs_log_group" {
  name = "/ecs/test-nginx"
  tags {
    hoge = "hoge"
    fuga = "fuga"
  }
}
ロードバランサ作成
手元で作ったのがNLBだったので、今回はNLBで。
ALBでもほぼ変わりません。
resource "aws_lb" "lb" {
  name     = "test-nginx-lb"
  internal = false

  subnets = [
    "your_subnetid",
    "your_subnetid",
  ]
  load_balancer_type = "network"
  enable_http2       = false
}

## Target Group
resource "aws_lb_target_group" "lb_target_blue" {
  name        = "blue-nlb-tg"
  port        = 80
  protocol    = "TCP"
  vpc_id      = "your_vpc_id"
  target_type = "ip"

  health_check {
    interval            = 10
    healthy_threshold   = 3
    unhealthy_threshold = 3
    protocol            = "TCP"
    port                = "traffic-port"
  }
}

## Target Group
resource "aws_lb_target_group" "lb_target_green" {
  name        = "green-nlb-tg"
  port        = 80
  protocol    = "TCP"
  vpc_id      = "your_vpc_id"
  target_type = "ip"

  health_check {
    interval            = 10
    healthy_threshold   = 3
    unhealthy_threshold = 3
    protocol            = "TCP"
    port                = "traffic-port"
  }
}

## Listeners
resource "aws_lb_listener" "lb_listner" {
  load_balancer_arn = "${aws_lb.lb.arn}"
  port              = 8081
  protocol          = "TCP"

  # blueとgreenのtgを動的に入れ替えるのでignoreする
  lifecycle {
    ignore_changes = ["default_action"]
  }

  default_action {
    target_group_arn = "${aws_lb_target_group.lb_target_blue.arn}" #初回はblueにattach
    type             = "forward"
  }
}
IAM設定
クラスタ初回作成時に自動的でecsTaskExecutionRoleとAWSServiceRoleForECSが作成されます。
ECS運用時のどちらも必要になりますので、なければとりあえず手動でコンソールからぽちぽちと
クラスタ作っておくと吉。
task定義作成
terraformでもできますが、特段terraformで扱うメリットもない気がするので
ここではaws公式に沿ってjsonで。
{
    "family": "test",
    "executionRoleArn": "arn:aws:iam::xxxxxxxx:role/ecsTaskExecutionRole",
    "networkMode": "awsvpc",
    "containerDefinitions": [
        {
            "name": "test-nginx",
            "image": "nginx:latest",
            "ulimits": [
                {
                    "name": "nofile",
                    "softLimit": 65536,
                    "hardLimit": 65536
                }
            ],
            "entryPoint": [
                "sh",
                 "-c"
            ],
            "portMappings": [
                {
                    "hostPort": 80,
                    "protocol": "tcp",
                    "containerPort": 80
                }
            ],
            "command": [
                "echo blue > /usr/share/nginx/html/index.html | /usr/sbin/nginx -g \"daemon off;\""
            ],
            "memoryReservation": 256,
            "essential": true,
            "logConfiguration": {
                "logDriver": "awslogs",
                "options": {
                    "awslogs-group": "/ecs/test-nginx",
                    "awslogs-region": "ap-northeast-1",
                    "awslogs-stream-prefix": "test-nginx"
                }
            }
        }
    ],
    "requiresCompatibilities": [
        "FARGATE"
    ],
    "cpu": "512",
    "memory": "4096",
}
service作成
resource "aws_ecs_service" "ecs" {
  name                               = "test-nginx"
  cluster                            = "${aws_ecs_cluster.ecs_cluster.id}"
  task_definition                    = "test-nginx:1"
  desired_count                      = 2
  launch_type                        = "FARGATE"
  deployment_minimum_healthy_percent = 100
  deployment_maximum_percent         = 200

  network_configuration {
    subnets = [
      "your_subnet_ids"
    ]

    security_groups = [
      "yours_secuiry_groups",
    ]

    assign_public_ip = "false"
  }

  health_check_grace_period_seconds = 0

  load_balancer {
    target_group_arn = "${aws_lb_target_group.lb_target_blue.arn}"
    container_name   = "test-nginx"
    container_port   = 80
  }

  scheduling_strategy = "REPLICA"

  deployment_controller {
    type = "CODE_DEPLOY"
  }
  // deployやautoscaleで動的に変化する値を差分だしたくないので無視する
  lifecycle {
    ignore_changes = [
      "desired_count",
      "task_definition",
      "load_balancer",
    ]
  }
  propagate_tags = "TASK_DEFINITION"
}
コードデプロイアプリケーションとデプロイグループの作成
- iamを付与
resource "aws_iam_role" "codedeploy" {
  name               = "codedeploy"
}

## ECS CodedeployPolicy

resource "aws_iam_role_policy_attachment" "ecs_deploy" {
  role       = "${aws_iam_role.codedeploy.id}"
  policy_arn = "arn:aws:iam::aws:policy/AWSCodeDeployRoleForECS"
}

## Codedeploy IAM Role Policy
data "aws_iam_policy_document" "codedeploy_iam_role_policy" {
  statement {
    actions = [
      "autoscaling:CompleteLifecycleAction",
      "autoscaling:DeleteLifecycleHook",
      "autoscaling:DescribeAutoScalingGroups",
      "autoscaling:DescribeLifecycleHooks",
      "autoscaling:PutLifecycleHook",
      "autoscaling:RecordLifecycleActionHeartbeat",
      "ec2:DescribeInstances",
      "ec2:DescribeInstanceStatus",
      "sns:*",
      "tag:GetTags",
      "tag:GetResources",
    ]

    effect    = "Allow"
    resources = ["*"]
  }
}
コードデプロイはこんな感じにリソースを作成する
resource "aws_codedeploy_app" "app" {
  compute_platform = "ECS"
  name             = "test-ecs"
}

resource "aws_codedeploy_deployment_group" "group" {
  app_name               = "test-bg-deploy"
  deployment_group_name  = "test-bg-deploy-dg"
  service_role_arn       = "${aws_iam_role.codedeploy.arn}"
  deployment_config_name = "CodeDeployDefault.ECSAllAtOnce"

  auto_rollback_configuration {
    enabled = true
    events  = ["DEPLOYMENT_FAILURE"]
  }

  blue_green_deployment_config {
    deployment_ready_option {
      action_on_timeout = "CONTINUE_DEPLOYMENT"
    }

    terminate_blue_instances_on_deployment_success {
      action                           = "TERMINATE"
      termination_wait_time_in_minutes = "10" # デプロイ成功後の環境保持時間
    }
  }

  deployment_style {
    deployment_option = "WITH_TRAFFIC_CONTROL"
    deployment_type   = "BLUE_GREEN"
  }

  ecs_service {
    cluster_name = "your_ecs_cluster_name"
    service_name = "your_ecs_service_name"
  }

  load_balancer_info {
    target_group_pair_info {
      prod_traffic_route {
        listener_arns = ["${aws_lb_listener.lb_listner.arn}"]
      }

      target_group {
        name = "${aws_lb_target_group.lb_target_blue.name}"
      }

      target_group {
        name = "${aws_lb_target_group.lb_target_green.name}"
      }
    }
  }
}
ブルーグリーン関連で設定できる内容として
- 新環境にテストポートのみ振り当てて公開する
- 新環境の保持期間
- 環境振替を手動で行う or 時間指定
などが設定できるので、細かくは公式を
デプロイしてみる
このへんはECSのコンソール上から手動なりお好みで。
吐き出してるhtmlをblue,greenで切り替えつつ、while loopなどでcurlで叩き続けると
blue/greenの切り替わりが観察できます。
fargateTaskをオートスケーリングしたい
オートスケールはGUI上でサービス作成をする際は画面上から一貫して作れますが
実際には別リソースなので、terraformで作成する際は、appautoscaling_targetを使います。
ここではCloudWatchAlarmと連携してCPUメトリクスでスケールイン/アウトするサンプルを。
resource "aws_appautoscaling_target" "test_ecs_target" {
  service_namespace  = "ecs"
  resource_id        = "service/your_cluster_name/service_name"
  scalable_dimension = "ecs:service:DesiredCount"
  role_arn           = "${data.aws_iam_role.ecs_service_autoscaling.arn}"
  min_capacity       = 2
  max_capacity       = 12
}

# Automatically scale capacity up by one
resource "aws_appautoscaling_policy" "test_scale_up" {
  name               = "scale_up"
  service_namespace  = "ecs"
  resource_id        = "service/your_cluster_name/service_name"
  scalable_dimension = "ecs:service:DesiredCount"

  step_scaling_policy_configuration {
    adjustment_type         = "ChangeInCapacity"
    cooldown                = 600
    metric_aggregation_type = "Average"

    step_adjustment {
      metric_interval_lower_bound = 0
      scaling_adjustment          = 1
    }
  }

  depends_on = ["aws_appautoscaling_target.test_ecs_target"]
}

# Automatically scale capacity down by one
resource "aws_appautoscaling_policy" "test_scale_down" {
  name               = "scale_down"
  service_namespace  = "ecs"
  resource_id        = "service/your_cluster_name/service_name"
  scalable_dimension = "ecs:service:DesiredCount"

  step_scaling_policy_configuration {
    adjustment_type         = "ChangeInCapacity"
    cooldown                = 600
    metric_aggregation_type = "Average"

    step_adjustment {
      metric_interval_upper_bound = 0
      scaling_adjustment          = -1
    }
  }

  depends_on = ["aws_appautoscaling_target.test_ecs_target"]
}

# Cloudwatch alarm that triggers the autoscaling up policy
resource "aws_cloudwatch_metric_alarm" "test_cpu_high" {
  alarm_name          = "cpu_utilization_high"
  comparison_operator = "GreaterThanOrEqualToThreshold"
  evaluation_periods  = "2"
  metric_name         = "CPUUtilization"
  namespace           = "AWS/ECS"
  period              = "60"
  statistic           = "Average"
  threshold           = "60"

  dimensions {
    ClusterName = "your_ecs_cluster_name"
    ServiceName = "your_ecs_service_name"
  }

  alarm_actions = ["${aws_appautoscaling_policy.test_scale_up.arn}"]
}

# Cloudwatch alarm that triggers the autoscaling down policy
resource "aws_cloudwatch_metric_alarm" "test_cpu_low" {
  alarm_name          = "cpu_utilization_low"
  comparison_operator = "LessThanOrEqualToThreshold"
  evaluation_periods  = "2"
  metric_name         = "CPUUtilization"
  namespace           = "AWS/ECS"
  period              = "60"
  statistic           = "Average"
  threshold           = "30"

  dimensions {
    ClusterName = "your_ecs_cluster_name"
    ServiceName = "your_ecs_service_name"
  }

  alarm_actions = ["${aws_appautoscaling_policy.test_scale_down.arn}"]
}

data "aws_iam_role" "ecs_service_autoscaling" {
  name = "AWSServiceRoleForApplicationAutoScaling_ECSService"
}