fukuoka.ex代表のpiacereです
ご覧いただいて、ありがとうございます ![]()
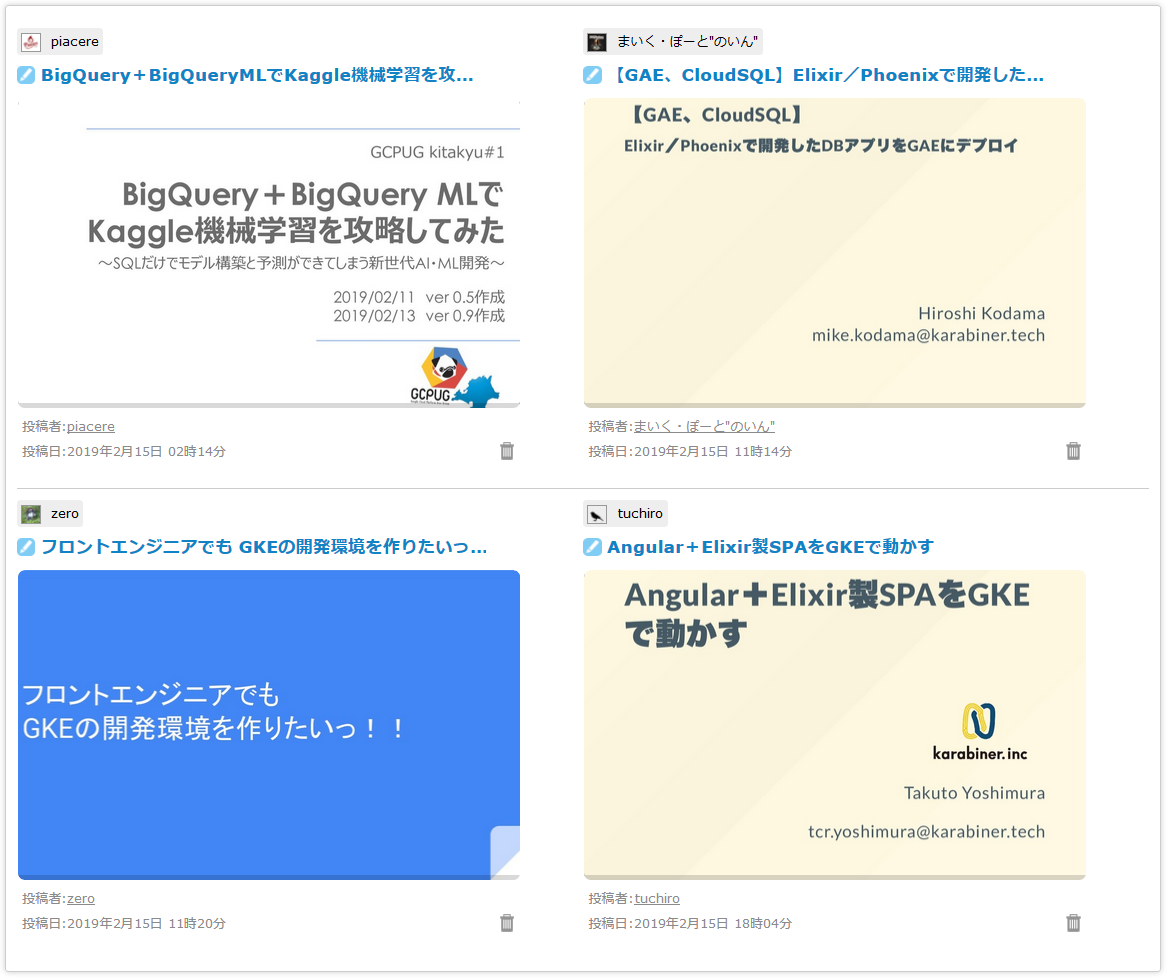
先日、新たに発足/開催した、「GCPUG kitakyu #1: 発足MeetUp~入門LTと懇親会~」では、「BigQuery/BigQuery MLでKaggle機械学習の攻略」を行いましたが、このコラムでは、Elixir/Phoenixから、GCPのBigQuery APIを叩いて攻略していこうと思います
今回は、BigQueryデータを読み込んで、Web表示するところまでいきます
本コラムの検証環境
本コラムは、以下環境で検証しています(Windowsで実施していますが、Linuxやmacでも動作する想定です)
なお今回、BigQueryの取得結果をPhoenixで表示している関係で、Phoenix PJで検証を行っていますが、BigQuery APIライブラリの利用にPhoenixは必須ではありません
- Windows 10
- Elixir 1.7.4 ※最新版のインストール手順はコチラ
- Phoenix 1.4.0 ※最新版のインストール手順はコチラ
なお、「Phoenix」は、ElixirのWebフレームワークで、「Gigalixir」は、Herokuに似たPhoenixが動くクラウド(PaaS)です
BigQuery APIライブラリをインストール
BigQueryを動かすためのPhoenix PJを作成します
mix phx.new big_query_sample --no-webpack --no-ecto
 …(ファイル作成ログが続く)…
Fetch and install dependencies? [Yn] (←n、Enterを入力)
cd big_query_sample
BigQueryを利用するためのライブラリを、mix.exsの「def deps do」配下に追記します(:phoenix~の記載の上行に追加)
…
  defp deps do
    [
      { :google_api_big_query , "~> 0.0.1" },
      { :goth, "~> 0.7.0" },
      …
ライブラリをインストールします
mix deps.get
BigQuery API呼出用GCPアカウントの設定
BigQuery APIを利用するためのGCPアカウントをPhoenixに設定します
…
config :goth,
    json: "./config/client_secret.json" |> File.read!
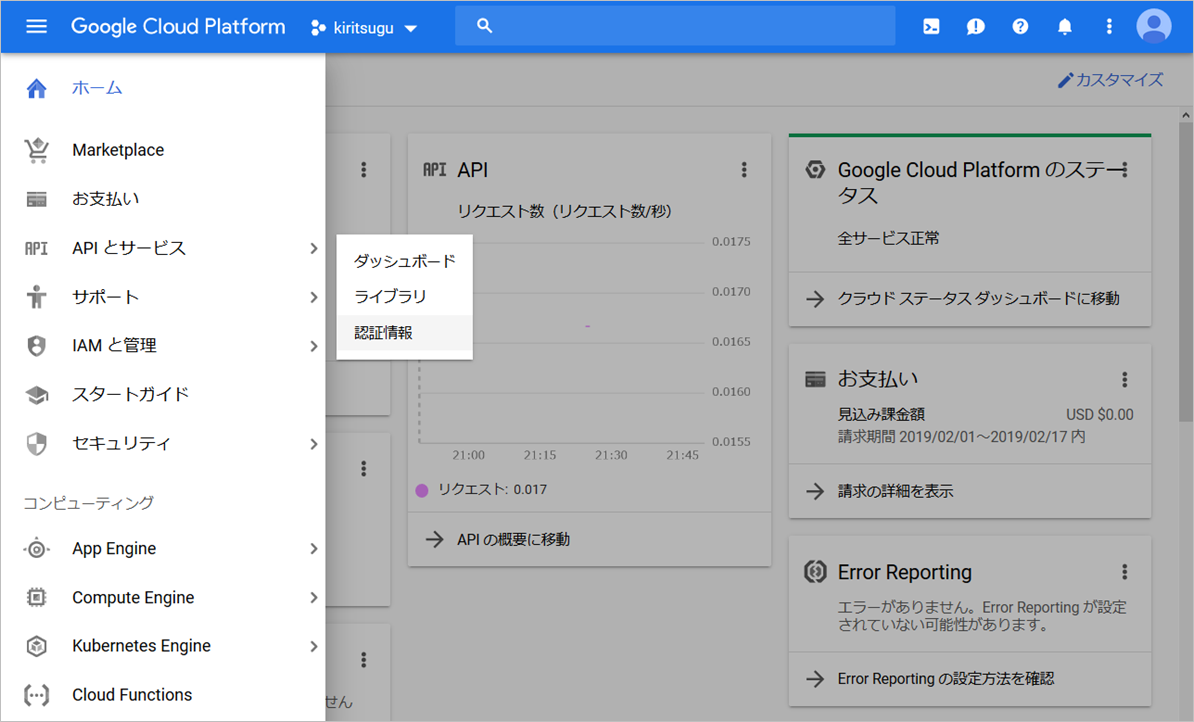
GCPにログインし、メニューから「APIとサービス」-「認証情報」を選択します
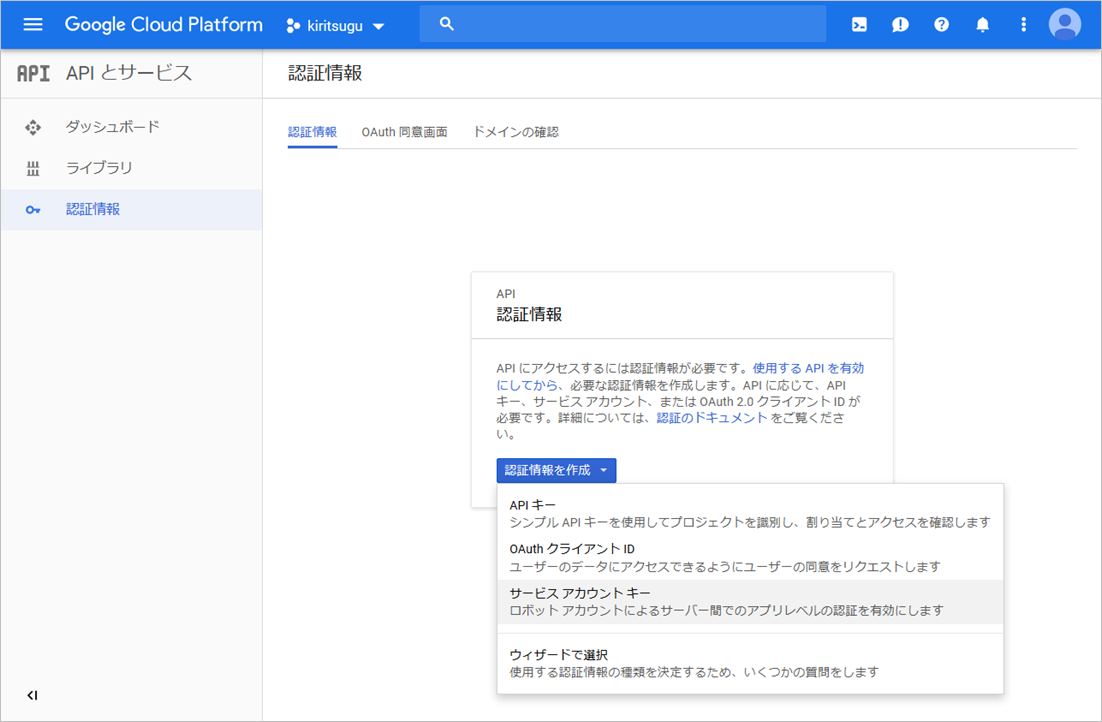
「認証情報を作成」ボタンをクリックして、「サービスアカウントキー」を選択します
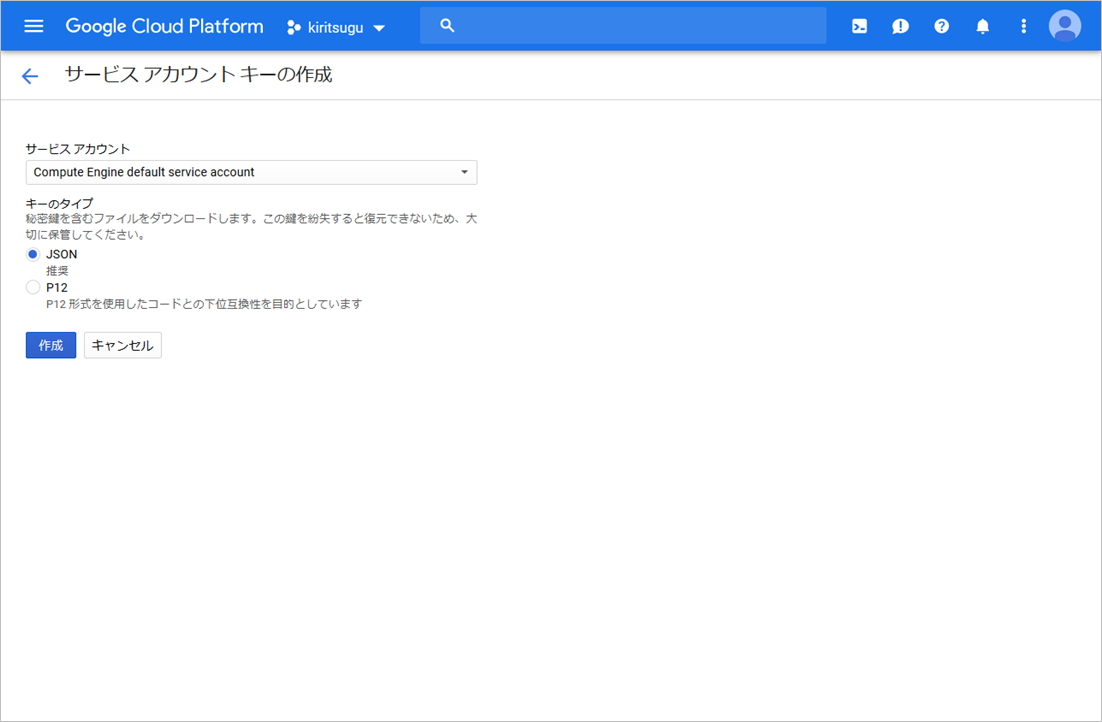
「サービスアカウント」から「Compute Engine default service account」を選択し、「作成」ボタンをクリックします
JSONのダウンロードが始まるので、Phoenix PJ配下の、config/config.exs というファイルで保存します(個人情報はxxxxxxxで伏字しています)
{
  "type": "service_account",
  "project_id": "xxxxxxxxxx-xxxxxx",
  "private_key_id": "xxxxxxxxxxxxx",
  "private_key": "-----BEGIN PRIVATE KEY-----\nxxxxxxxxxxxxxxxx\n-----END PRIVATE KEY-----\n",
  "client_email": "xxxxxxxxxxxx-compute@developer.gserviceaccount.com",
  "client_id": "xxxxxxxxxxxxxxxxxxx",
  "auth_uri": "https://accounts.google.com/o/oauth2/auth",
  "token_uri": "https://oauth2.googleapis.com/token",
  "auth_provider_x509_cert_url": "https://www.googleapis.com/oauth2/v1/certs",
  "client_x509_cert_url": "https://www.googleapis.com/robot/v1/metadata/x509/xxxxxxxxxxxxx-compute%40developer.gserviceaccount.com"
}
Phoenixを起動します
iex -S mix phx.server
ブラウザで「 http://localhost:4000 」をアクセスすると、以下ページが表示されます
GCPアカウントでアクセス確認
iexで以下を入力し、上記で設定したGCPアカウントでアクセスできることを確認します
iex> Goth.Token.for_scope( "https://www.googleapis.com/auth/cloud-platform" )
成功時は、以下のようなログが出ます(個人情報はxxxxxxxで伏字しています)
{:ok,
 %Goth.Token{
   expires: 1550413159,
   scope: "https://www.googleapis.com/auth/cloud-platform",
   token: "xxxxxxxxxxxxxxxxxxxx",
   type: "Bearer"
 }}
エラー時は、以下のようなログが出るので、上記の config/config.exs や config/client_secret.json を確認し、Phoenixを再起動した後、再度、試してください
{:error, "Could not retrieve token, response: {\n  \"error\": \"invalid_grant\",\n  \"error_description\": \"Not a valid email or user ID.\"\n}"}
    (goth) lib/goth/token.ex:94: Goth.Token.retrieve_and_store!/1
BigQueryアクセスモジュールを作る
PJフォルダ内のlibフォルダ配下にutilフォルダを掘り、BigQueryにアクセスする以下モジュールを作ります
なお、このモジュールは、「Excelから関数型言語マスター3回目:WebにDBデータ表示」のDbモジュールとほぼ同じ仕様です
defmodule BigQuery do

    alias GoogleApi.BigQuery.V2.Api.Jobs
    alias GoogleApi.BigQuery.V2.Connection

    def query( sql, pj_id ) when sql != "" do
        { :ok, token } = Goth.Token.for_scope( "https://www.googleapis.com/auth/cloud-platform" )
        { :ok, response } = Connection.new( token.token )
            |> Jobs.bigquery_jobs_query( pj_id, [ body: %{ query: sql } ] )
        response
    end
    def columns_rows( result ) do
        result
        |> rows
        |> Enum.map( fn row -> Enum.into( List.zip( [ columns( result ), row ] ), %{} ) end )
    end
    def rows( %{ rows: rows } = _result ) do
        rows
        |> Enum.map( & &1.f |> Enum.map( fn cell -> cell.v end ) )
    end
    def columns( %{ schema: schema } = _result ), do: schema.fields |> Enum.map( & &1.name )
end
GCPのプロジェクトIDを調べる
BigQuery.queryの第二引数には、GCPの「プロジェクトID」を指定しますが、config/client_secret.json の"project_id"に記載しています
{
  "type": "service_account",
  "project_id": "xxxxxxxxxx-xxxxxx",
…
BigQueryデータをWeb表示
さて、準備が整いましたので、BigQueryデータを、「Excelから関数型言語マスター4回目:Webに外部APIデータ表示」でのPostgreSQLやMySQLと同様、Web表示してみます
BigQueryには、適当なテーブルを事前に作成しておいてください(ここでは、titanic.fit_trainというテーブルを作成しています)
<%
result = BigQuery.query( "select * from titanic.fit_train ", "xxxxxxxxxx-xxxxxx" )
data = result |> BigQuery.columns_rows
columns = result |> BigQuery.columns
%>
<table border="1">
<tr>
  <%= for column <- columns do %>
  <th><%= column %></td>
  <% end %>
</tr>
<%= for record <- data do %>
<tr>
  <%= for column <- columns do %>
  <td><%= record[ column ] %></td>
  <% end %>
</tr>
<% end %>
</table>
以下のようなWebページが表示されるようになります
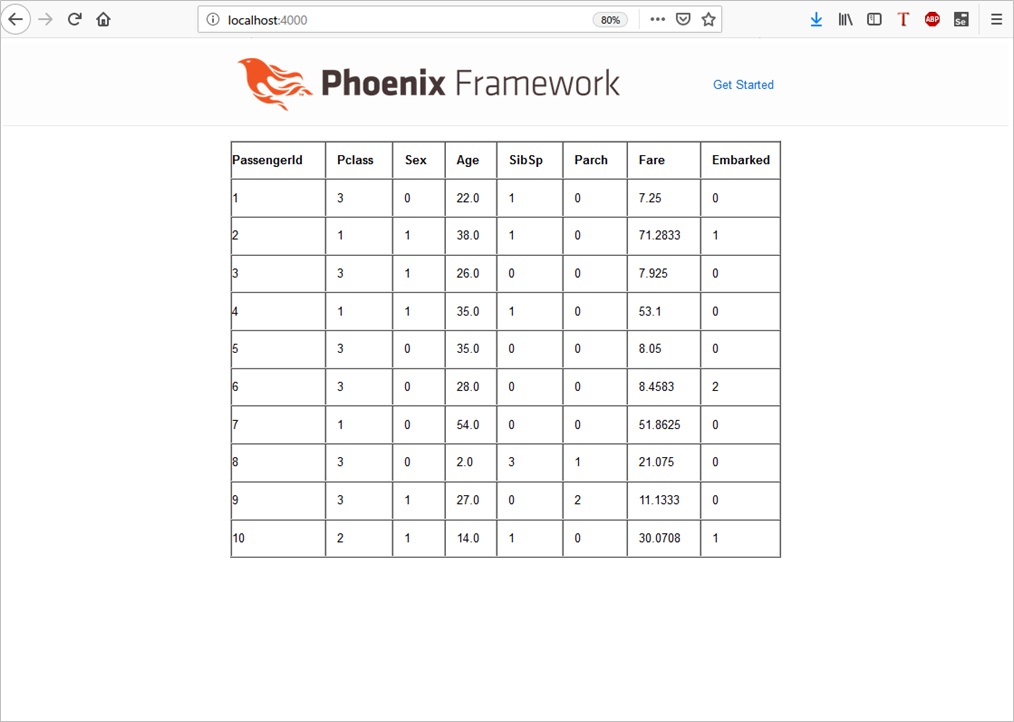
BigQueryと同じデータが表示されていることが確認できます

終わり
今回は、BigQueryデータをWeb表示しました
次回は、BigQueryのその他の機能をAPI呼び出してみます
p.s.「いいね」よろしくお願いします
よろしければ、ページ左上の  や
や  のクリックをお願いしますー
![]()