はじめに
Bootstrap4 + gulp 環境の構築手順を紹介します。
その後、gulpでコンパイルしたBootstrap4のcssを
どのようにモックアップに組み込むのか説明します。
※ マシンのOSのバージョンは、macOS High Sierra 10.13.4です。
1. Node.jsのインストール
npmを使って、Bootstrap4、gulp本体及びgulp関連のプラグインを
インストールする為、最初にNode.jsをインストールします。
※ Node.jsのインストール方法を詳しく知りたい方は、
参考情報(Node.jsのインストール)をご参考ください。
2. 作業ディレクトリの準備
モックアップを作成する作業ディレクトリを準備します。
このディレクトリにBootstrap4、gulpをインストールします。
2-1. 任意のディレクトリを作成する。
$ mkdir bootstrap_sample
※ 任意のpathで問題ありません。
2-2. 作成したディレクトリに移動する。
$ cd bootstrap_sample
2-3. 各ディレクトリの作成
以下のディレクトリ構成を作成します。
bootstrap_sample/
└ src/
├ css/
├ html/
├ js/
└ scss/
| Directory | Note |
|---|---|
| src/css/ | cssを配置します。 ※ Bootstrap4 のsassをコンパイルしたcssもここに配置します。 |
| src/html/ | htmlを配置します。 |
| src/js/ | jsを配置します。 ※ Bootstrap4 付属のjs、jqueryなどもここに配置します。 |
| src/scss/ | sassを配置します。 ※ Bootstrap4 のsassもここに配置します。 |
2-4. npmの設定
npmを使用して、Bootstrap4、gulpをインストールする為、
作業ディレクトリに対して、npmの初期化を行います。
"npm init -y"を実行し、作業ディレクトリにpackage.jsonを作成します。
* -yオプションは、問い合わせ無しにpackage.jsonを作成します。
* package.json:インストールされたモジュールが記入されています。
$ npm init -y
この時点で以下のディレクトリ構成が出来上がります。
bootstrap_sample/
├ src/
│ ├ css/
│ ├ html/
│ ├ js/
│ └ scss/
└ package.json
3. Bootstrap4のインストール
本投稿のメインとなるBootstrap4のインストールを行います。
3-1. 事前準備
bootstrapと依存関係があるpopper.js、jqueryをインストールします。
※ 両パッケージを事前にインストールしておくと
bootstrapインストール時に依存関係のWARNが発生しません。
$ npm install popper.js
npm WARN bootstrap_sample@1.0.0 No description
npm WARN bootstrap_sample@1.0.0 No repository field.

+ popper.js@1.14.5
added 1 package from 2 contributors and audited 1 package in 3.181s
found 0 vulnerabilities
$ npm install jquery
npm WARN bootstrap_sample@1.0.0 No description
npm WARN bootstrap_sample@1.0.0 No repository field.

+ jquery@3.3.1
added 1 package from 1 contributor and audited 2 packages in 7.518s
found 0 vulnerabilities
3-2. bootstrapのインストール
"npm install bootstrap"を実行します。
$ npm install bootstrap
npm WARN bootstrap_sample@1.0.0 No description
npm WARN bootstrap_sample@1.0.0 No repository field.

+ bootstrap@4.1.3
added 1 package from 2 contributors and audited 3 packages in 1.517s
found 0 vulnerabilities
4. gulpのインストール
gulp本体、gulp関連のプラグインをインストールします。
4-1. gulp本体のインストール
"npm install -D gulp@next"を実行します。
$ npm install -D gulp@next
4-2. gulp-sassのインストール
gulp-sassは、sassをコンパイルするためのプラグインです。
"npm install -D gulp-sass"を実行します。
$ npm install -D gulp-sass
4-3. autoprefixerのインストール
autoprefixerは、必要なベンダープレフィックスを自動で付与するためのプラグインです。
"npm install -D autoprefixer"を実行します。
$ npm install -D autoprefixer
npm WARN bootstrap_sample@1.0.0 No description
npm WARN bootstrap_sample@1.0.0 No repository field.

+ autoprefixer@9.4.0
added 10 packages from 43 contributors and audited 6062 packages in 7.154s
found 0 vulnerabilities
4-4. gulp-postcssのインストール
autoprefixerを利用するため、PostCSSをインストールします。
PostCSSは、CSSツールを作るためのフレームワークで、
autoprefixerもPostCSSのツールの1つです。
"npm install -D gulp-postcss"を実行します。
$ npm install -D gulp-postcss
npm WARN bootstrap_sample@1.0.0 No description
npm WARN bootstrap_sample@1.0.0 No repository field.

+ gulp-postcss@8.0.0
added 14 packages from 21 contributors and audited 6106 packages in 11.712s
found 0 vulnerabilities
4-5. browser-syncのインストール
browser-syncは、ブラウザを自動リロードするためのプラグインです。
"npm install -D browser-sync"を実行します。
$ npm install -D browser-sync
npm WARN bootstrap_sample@1.0.0 No description
npm WARN bootstrap_sample@1.0.0 No repository field.

+ browser-sync@2.26.3
added 154 packages from 160 contributors and audited 8708 packages in 21.969s
found 0 vulnerabilities
4-6. gulp-plumberのインストール
gulp-plumberは、sassのコンパイルエラーを検知するためのプラグインです。
"npm install -D gulp-plumber"を実行します。
$ npm install -D gulp-plumber
npm WARN bootstrap_sample@1.0.0 No description
npm WARN bootstrap_sample@1.0.0 No repository field.

+ gulp-plumber@1.2.1
added 12 packages from 3 contributors and audited 8744 packages in 12.742s
found 0 vulnerabilities
4-7. gulp-notifyのインストール
gulp-notifyは、デスクトップ通知するためのプラグインです。
"npm install -D gulp-notify"を実行します。
$ npm install -D gulp-notify
npm WARN bootstrap_sample@1.0.0 No description
npm WARN bootstrap_sample@1.0.0 No repository field.

+ gulp-notify@3.2.0
added 16 packages from 17 contributors and audited 8788 packages in 21.728s
found 0 vulnerabilities
この時点で以下のディレクトリ構成が出来上がります。
bootstrap_sample/
├ node_modules/
│ ├ autoprefixer/
│ ├ browser-sync/
│ ├ bootstrap/
│ │ ├ dist/
│ │ │ └ js/
│ │ │ └ bootstrap.bundle.min.js
│ │ └ scss/
│ │ └ bootstrap.scss
│ ├ gulp/
│ ├ gulp-notify/
│ ├ gulp-plumber/
│ ├ gulp-postcss/
│ └ gulp-sass/
├ src/
│ ├ css/
│ ├ html/
│ ├ js/
│ └ scss/
├ package-lock.json
└ package.json
※ 本投稿に関係のないディレクトリ、ファイルについては割愛しています。
インストール作業はここまでです。
5. sassファイルのコンパイル(cssファイルの作成)
Bootstrap4のsassファイルをgulp-sassでコンパイルし、
cssファイルを作成する手順について説明します。
5-1. gulpfile.jsの作成
gulp コマンド実行時に読み込むgulpfile.jsを手動で作成します。
※ 配置先は、作業ディレクトリ直下です。
コンパイルを行うだけの最も簡単なgulpfile.jsを以下に示します。
// プラグインの読み込み
var gulp = require("gulp");
var gulpsass = require("gulp-sass");

// デフォルトタスク
gulp.task('default', function() {
    return gulp.src('./src/scss/**/*scss')                 // コンパイル対象のsassディレクトリを指定
        .pipe(gulpsass({                                   // コンパイル実行(sass->css)
            includePaths: './node_modules/bootstrap/scss'
        }))
        .pipe(gulp.dest('./src/css/'));                    // cssをcssディレクトリに出力
});
5-2. sassファイルの準備
コンパイル対象のsassファイルを準備します。
"cp node_modules/bootstrap/scss/bootstrap.scss src/scss/bootstrap-custom.scss"を実行し、
bootstrap.scssをsrc/scssの直下にコピーします。
※ node_modules/bootstrap/scss/bootstrap.scssのコンパイルも可能ですが、
直接の修正を避けたい為、コピーを行っています。
$ cp node_modules/bootstrap/scss/bootstrap.scss src/scss/bootstrap-custom.scss
5-3. コンパイル
"npx gulp"を実行し、sassファイルのコンパイルを行います。
$ npx gulp
[22:43:55] Using gulpfile ~/Documents/bootstrap_sample/gulpfile.js
[22:43:55] Starting 'default'...
[22:43:55] Finished 'default' after 288 ms
src/cssにbootstrap-custom.cssが作成されていれば、コンパイル成功です。
6. モックアップの作成
Bootstrap4(css、js)を使ったモックアップを作成します。
6-1. jsの準備
bootstrap.bundle.min.js、jquery.slim.min.jsを準備します。
以下のコマンドを実行し、それぞれsrc/jsにコピーして下さい。
$ cp node_modules/bootstrap/dist/js/bootstrap.bundle.min.js src/js/
$ cp node_modules/jquery/dist/jquery.slim.min.js src/js/
6-2. モックアップの準備
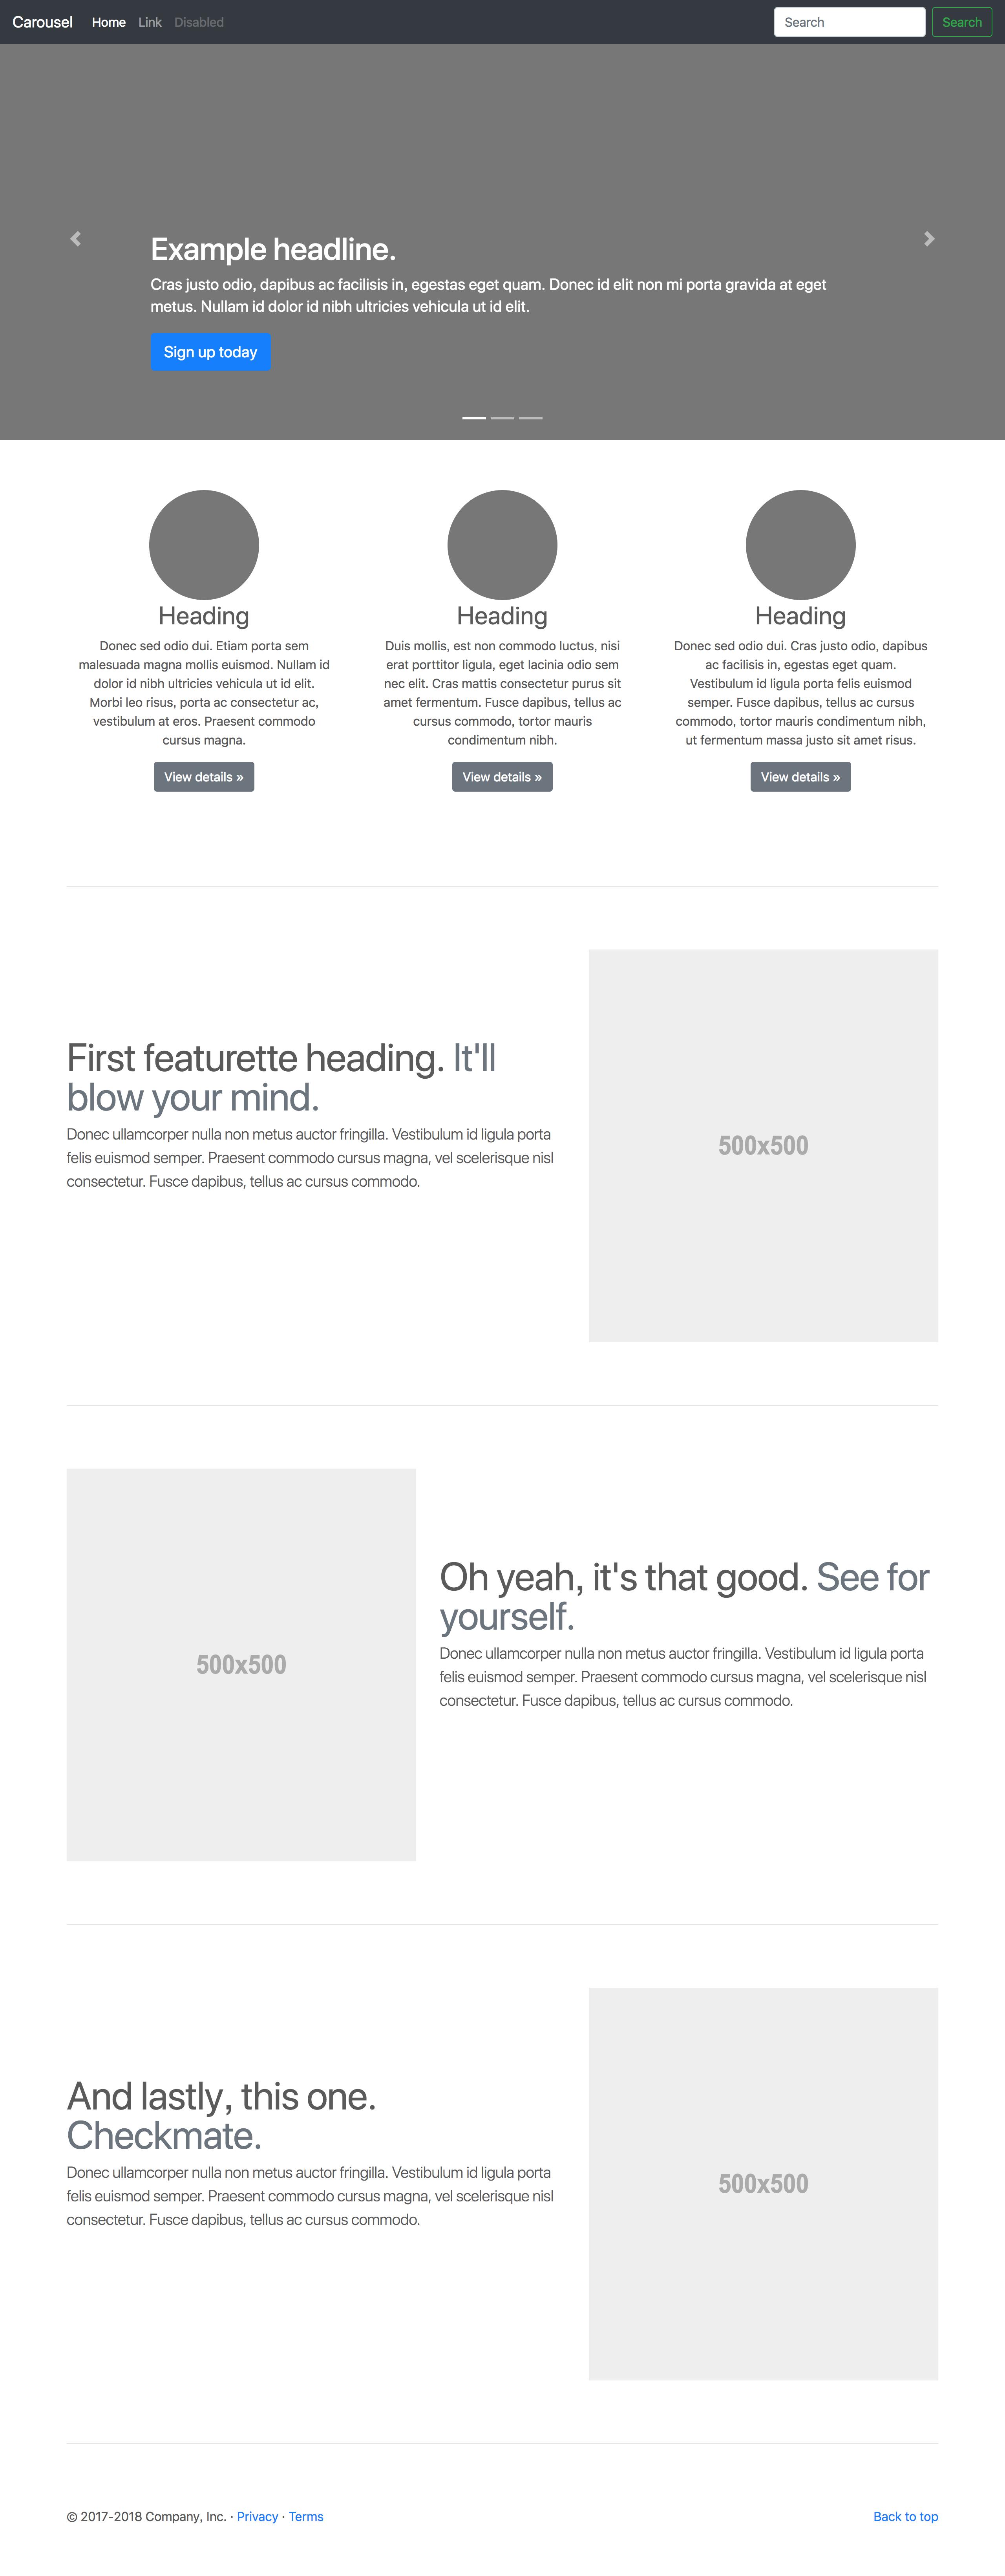
(1) ここでは、Bootstrapの公式サイト(Bootstrap Examples)から、サンプルを取得します。
この例では、Carouselを選択しています。
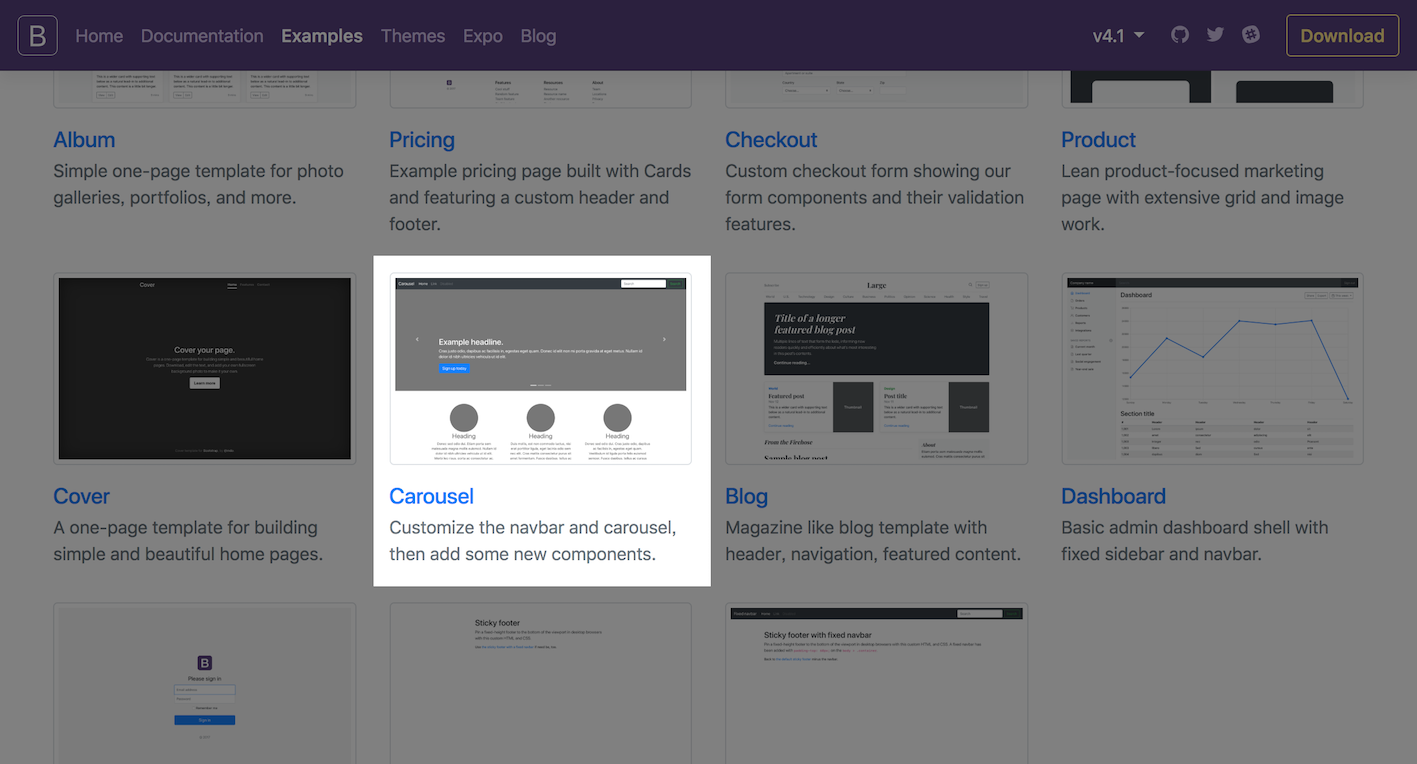
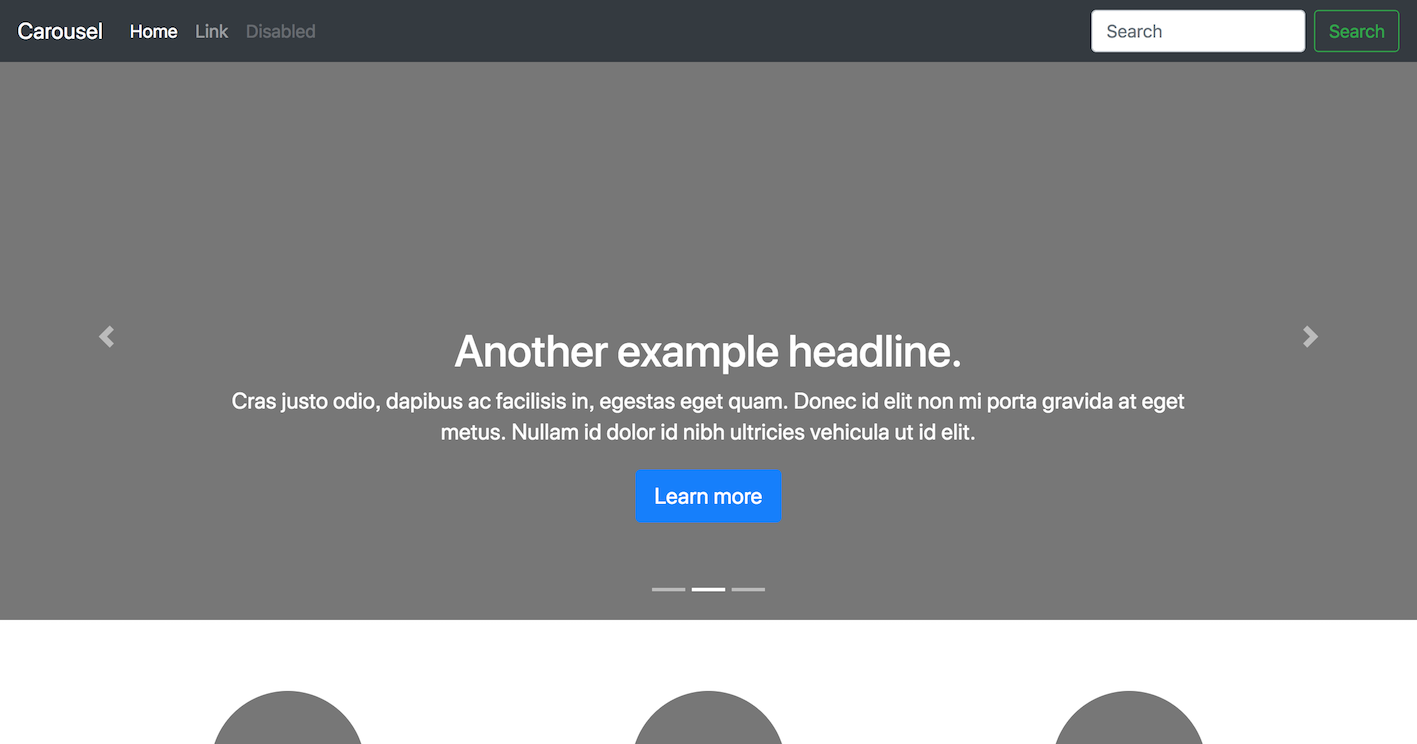
(2) Carouselのページが開くので、ページをローカルPCに保存して下さい。(形式:ウェブーページ、全体)
(3) ローカルPCに保存されたCarouselのhtml本体とcarousel.cssを作業ディレクトリにコピーします。
※ html本体については、index.htmlに名前変更しています。
※ コピー元については、各自環境に合わせて変更して下さい。
$ cp "/Users/admin/Downloads/Carousel Template for Bootstrap.htm" src/html/index.html
$ cp "/Users/admin/Downloads/Carousel Template for Bootstrap_files/carousel.css" src/css/
この時点で作業ディレクトリのsrcに以下のディレクトリ構成が出来上がります。
bootstrap_sample/
└ src/
├ css/
│ ├ bootstrap-custom.css
│ └ carousel.css
├ html/
│ └ index.html
├ js/
│ ├ bootstrap.bundle.min.js
│ └ jquery.slim.min.js
└ scss/
└ bootstrap-custom.scss
(4) この時点でindex.htmlを開くと以下のようにページが崩れています。
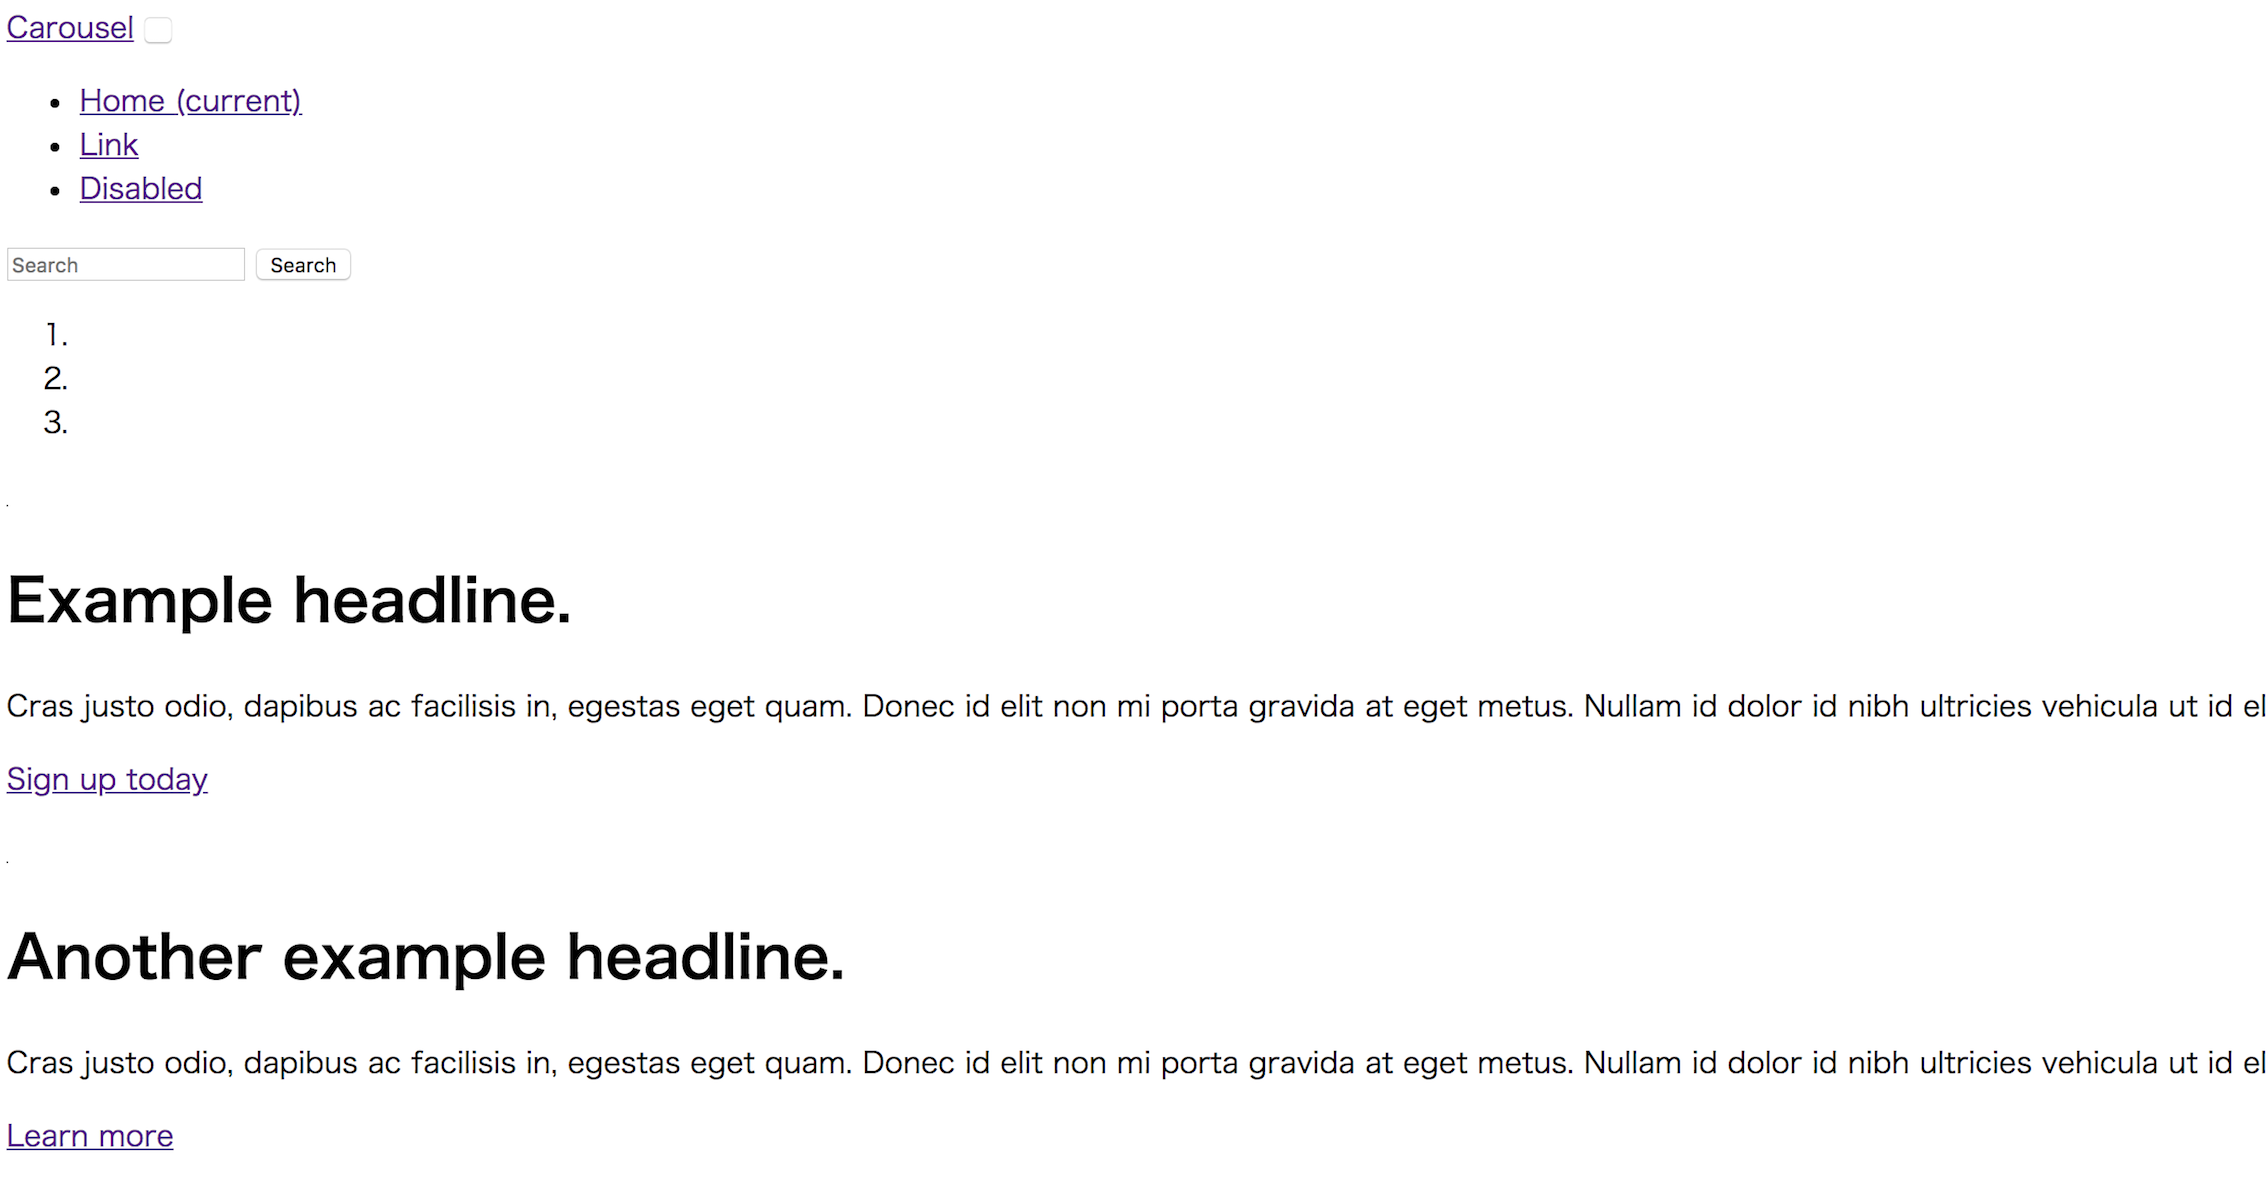
index.htmlのソースを開き、以下の修正を行って下さい。
① ./Carousel Template for Bootstrap_files/bootstrap.min.css
→ ../css/bootstrap-custom.css
② ./Carousel Template for Bootstrap_files/carousel.css
→ ../css/carousel.css
③ https://getbootstrap.com/docs/4.1/examples/carousel/
→ 空白
※ スペースではなく、このパスを全て削除して下さい。
④ ./Carousel Template for Bootstrap_files/jquery-3.3.1.slim.min.js
→ ../js/jquery.slim.min.js
※ また、integrityとcrossorigin属性を削除して下さい。
⑤ ./Carousel Template for Bootstrap_files/bootstrap.min.js
→ ../js/bootstrap.bundle.min.js
これで、サンプルページと同じレイアウトで開き、
また、Carouselが正しく動作するようになります。
7. sassファイルの修正
最後にインストールしたgulp関連のプラグインを利用し、
sassファイルを修正する実践的な方法について説明します。
7-1. gulpfile.jsの修正
一例ですが、5-1.で説明したgulpfile.jsに対し、以下の修正を加えます。
| No. | Note |
|---|---|
| (1) | gulpコマンド実行時、sassのコンパイルとbrowser-syncの起動を直列で実行します。 |
| (2) | コンパイルでエラーが発生した場合、plumberがエラーを検知し、notifyがブラウザにエラーメッセージを出力します。 また、コンパイルが正常に終了した場合も、notifyがブラウザに正常時のメッセージを出力します。 |
| (3) | autoprefixerにより、各ブラウザの最新の2バージョンに合わせたベンダープレフィックスを付与します。 ※ コンパイルされたcssに対して行います。 |
| (4) | browser-syncにより、sassに修正があった場合は、自動でコンパイルを行い、ブラウザに修正部分を差し込みます。 ※ ページ全体のリロードは行いません。 |
| (5) | browser-syncにより、html、jsに修正があった場合は、自動でページ全体のリロードを行います。 |
修正後のgulpfile.jsを以下に示します。
// プラグインの読み込み
var gulp = require("gulp");
var gulpsass = require("gulp-sass");
var postcss = require("gulp-postcss");
var autoprefixer = require("autoprefixer");
var browserSync = require('browser-sync').create();
var plumber = require('gulp-plumber');
var notify = require('gulp-notify');

// ソースディレクトリ
var source = 'src/';

// Bootstrap sass ディレクトリ
var bootstrapSass = {
    in: './node_modules/bootstrap/scss'
};

// sass、css関連の変数を設定
var sass = {
    in: source + 'scss/**/*scss',
    out: source + 'css/',
    watch: source + 'scss/**/*',
    sassOpts: {
        outputStyle: 'nested',                       // 圧縮方法を指定(作成されたcssの可読性、容量に影響する。)
        includePaths: [bootstrapSass.in]             // @import機能で利用できるパスを指定
    }
};

// browser-syncの初期設定
gulp.task('browser-sync', function() {
    browserSync.init({
        server: {
            baseDir: source                          // browser-syncのコンテキストルートを指定
        },
        startPath: 'html/index.html'                 // 最初に開くページを指定
    });

    // sassディレクトリを監視し、更新があれば自動コンパイルと修正したcssをブラウザに反映する。
    gulp.watch(sass.watch, gulp.series('sass'));
    // htmlディレクトリ、jsディレクトリを監視し、更新があればブラウザをリロードする。
    gulp.watch([source + 'html/*', source + 'js/*']).on('change', browserSync.reload);

});

// sassをコンパイルするタスク
gulp.task('sass', function() {
    return gulp.src(sass.in)                         // コンパイル対象のsassディレクトリを指定
        .pipe(plumber({                              // コンパイルエラー時、エラーメッセージをデスクトップ通知する。
            errorHandler: notify.onError("Error: <%= error.message %>")
        }))
        .pipe(gulpsass(sass.sassOpts))               // コンパイル実行(sass->css)
        .pipe(postcss([                              // 作成されたcssにベンダープレフィックスを付与
            autoprefixer({
                browsers: ["last 2 versions"]        // 各ブラウザの最新の2バージョンに合わせたベンダープレフィックスを指定
            })
        ]))
        .pipe(gulp.dest(sass.out))                   // cssをcssディレクトリに出力
        .pipe(browserSync.stream())                  // cssをブラウザに反映する。(ブラウザのリロード無し)
        .pipe(notify({                               // コンパイル成功時、正常メッセージをデスクトップ通知する。
            message: 'Finished sass.'
        }));
});

// デフォルトタスク
// sassタスク、browser-syncタスクを直列で実行する。
gulp.task('default', gulp.series('sass', 'browser-sync'));
7-2. sassファイルの修正
(1) bootstrap-custom.scss
最初にbootstrap-custom.scssの名前変更を行います。
$ mv src/scss/bootstrap-custom.scss src/scss/_bootstrap-custom.scss
sassファイルの先頭にアンダーバーが付いていると、
gulp-sassのコンパイル対象から外れます。
後で説明するmain.cssで_bootstrap-custom.scssを参照しますが、
_bootstrap-custom.scss自体のcssは必要ない為、コンパイル対象から外しています。
※ コンパイル対象から外れても、他のsassファイルから参照は可能です。
また、_bootstrap-custom.scssの修正例としては、
必要のない参照を削除し、css全体の容量を軽くすることが出来ます。
例えば、今回のサンプル(Carousel)では、alert、progressは使用しない為、
以下のようにコメントアウトが可能です。
/*!
 * Bootstrap v4.1.3 (https://getbootstrap.com/)
 * Copyright 2011-2018 The Bootstrap Authors
 * Copyright 2011-2018 Twitter, Inc.
 * Licensed under MIT (https://github.com/twbs/bootstrap/blob/master/LICENSE)
 */

@import "functions";
@import "variables";
@import "mixins";
@import "root";
@import "reboot";
@import "type";
@import "images";
@import "code";
@import "grid";
@import "tables";
@import "forms";
@import "buttons";
@import "transitions";
@import "dropdown";
@import "button-group";
@import "input-group";
@import "custom-forms";
@import "nav";
@import "navbar";
@import "card";
@import "breadcrumb";
@import "pagination";
@import "badge";
@import "jumbotron";
//@import "alert";
//@import "progress";
@import "media";
@import "list-group";
@import "close";
@import "modal";
@import "tooltip";
@import "popover";
@import "carousel";
@import "utilities";
@import "print";
(2) _override-variables.scss
次にBootstrap4のレイアウト(色など)を修正する例を説明したい為、
オーバーライド用に_override-variables.scssをsrc/scssに作成します。
※ _override-functions.scssについては、今回修正しませんが、
_override-variables.scssとの依存関係がある為、このファイルもコピーしています。
※ 両ファイルとも、_bootstrap-custom.scssと同様、
ファイル名の先頭にアンダーバーを付けます。
$ cp node_modules/bootstrap/scss/_variables.scss src/scss/_override-variables.scss
$ cp node_modules/bootstrap/scss/_functions.scss src/scss/_override-functions.scss
(3) main.scssの作成
main.scssを作成します。
$ touch src/scss/main.scss
main.scssについては、以下のように記述します。
@import "override-functions";
@import "override-variables";
@import "bootstrap-custom";
このようにbootstrap-custom内で参照しているvariablesよりも
先にoverride-variablesを参照することで、Bootstrap4のレイアウト(色など)を修正できます。
(4) gulpの実行
コンパイルを再実行して下さい。
※ 実行前に、5-3.で作成したsrc/css/bootstrap-custom.cssを削除して下さい。
$ npx gulp
[16:17:01] Using gulpfile ~/Documents/bootstrap_sample/gulpfile.js
[16:17:01] Starting 'default'...
[16:17:01] Starting 'sass'...
[16:17:02] gulp-notify: [Gulp notification] Finished sass.
[16:17:02] Finished 'sass' after 733 ms
[16:17:02] Starting 'browser-sync'...
[Browsersync] Access URLs:
 -----------------------------------------------------
       Local: http://localhost:3000/html/index.html
    External: http://10.27.38.232:3000/html/index.html
 -----------------------------------------------------
          UI: http://localhost:3001
 UI External: http://localhost:3001
 -----------------------------------------------------
[Browsersync] Serving files from: src/
src/css/main.cssが作成され、
ブラウザが自動に起動し、以下のようなページが表示されていれば成功です。
※ http://localhost:3000/html/index.htmlが立ち上がります。
※ src/css/bootstrap-custom.cssを削除している為、レイアウトが崩れています。
(5) index.htmlの修正
index.htmlのソースを開き、以下の修正を行って下さい。
① ../css/bootstrap-custom.css
→ ../css/main.css
修正を行うと、自動的にブラウザ(http://localhost:3000/html/index.html)がリロードされ、レイアウトが直ります。
(6) _override-variables.scssの修正
_override-variables.scssのソースを開き、以下の修正を行って下さい。
Carouselの文字の色を白から赤に変更しています。
① $carousel-caption-color: $white !default;
→ $carousel-caption-color: $red !default;
修正内容が自動的にブラウザ(http://localhost:3000/html/index.html)に反映されます。

以上となります。
モックアップを作成するBootstrap4の環境構築手順、
モックアップの作成手順について、明快になっていれば幸いです。
最後に、最終的な作業ディレクトリのsrcについて、ディレクトリ構成を以下に示します。
bootstrap_sample/
└ src/
├ css/
│ ├ carousel.css
│ └ main.css
├ html/
│ └ index.html
├ js/
│ ├ bootstrap.bundle.min.js
│ └ jquery.slim.min.js
└ scss/
├ _bootstrap-custom.scss
├ _override-functions.scss
├ _override-variables.scss
└ main.scss
参考情報(Node.jsのインストール)
一例ですが、以下の順でインストールしました。
本手順を参考に記載します。
(1) homebrew
(2) nodebrew
(3) Node.js(npm)
1-1. homebrewのインストール
Mac用のパッケージ管理システムです。
Xcodeの最新化後、homebrewをインストールもしくはアップデートして下さい。
1-2. nodebrewのインストール
Node.jsのバージョンを管理するツールです。
(1) "brew install nodebrew"を実行します。
(2) "nodebrew setup"を実行します。
$ nodebrew setup
Fetching nodebrew...
Installed nodebrew in $HOME/.nodebrew

========================================
Export a path to nodebrew:

export PATH=$HOME/.nodebrew/current/bin:$PATH
========================================
(3) "nodebrew setup"を実行した際、コンソールに出力された行を
.bash_profileに追加します。
※ "open ~/.bash_profile"を実行し、編集して下さい。
# nodebrew
export PATH=$HOME/.nodebrew/current/bin:$PATH
(4) "source ~/.bash_profile"を実行します。
1-3. Node.js(npm)のインストール
(1) "nodebrew use stable"を実行します。
※ stable = 安定版
※ latest = 最新版
$ nodebrew use stable
use v10.13.0
(2) Node.js、npmのバージョンをそれぞれ確認します。
$ node -v
v10.13.0
$ npm -v
6.4.1
npmのインストールはこれで終了です。