今回は、エンドポイントのURLにアクセスしたらローカルのMySQLから情報をとってきてJSON形式で返すシンプルなAPIサーバーを作って行きたいと思います。
データベースは、MySQLを使用して、GoとDBの連携には、GORMを利用します。
GORMの詳細は、公式ドキュメントが詳しいです。
http://doc.gorm.io/
Goのwebフレームワークは、revelを使います。
installなどの初期設定は公式が良いです。
https://revel.github.io/tutorial/gettingstarted.html
実行環境
Mac OS Mojave 10.14
go version go1.11.1 darwin/amd64
Revel Version = "0.20.0"
revelを使って新規プロジェクトの生成
$ revel new api-server #$GOPATH内でディレクトリが生成されます
$ revel run -a api-server
ブラウザでlocalhost:9000にアクセスすると、ちゃんとサーバーが起動していることが確認できます。IPアドレスの設定やport番号を変えたいときは、conf/app.confで変更することが可能です。
DBとの接続
revel内では、appフォルダ下にmoldesフォルダを生成して、その中でデータ構造の定義をしていきます。構造体の中の要素は大文字で始めることと、gorm:"column:Description"のようにMySQLにおいて対応するcolumn名を書いておくことに注意します。また、フィールドの型とMySQLのデータの型が一致するようにします。json.RawMessageで型を定義することでjson形式のデータも扱うことができます。
package models

import "encoding/json"

type User struct {
    Id int `gorm:"column:Id"`
    Age int `gorm:"column:Age"`
    Name string `gorm:"column:Name"`
    Description string `gorm:"column:Description"`
    SiblingInfo json.RawMessage `gorm:"column:SiblingInfo"`
}
デフォルトでは、構造体名の複数形がDB側のtable名になるので、MySQL側でデータを作るときは気をつけてください。MySQLでのDB構造は次の通りです。
DROP TABLE IF EXISTS Users;
CREATE TABLE Users (
  Id INT  PRIMARY KEY auto_increment,
  Age INT,
  Name VARCHAR (255),
  Description VARCHAR(255),
  SiblingInfo json
);

INSERT Users (Age, Name, Description, SiblingInfo) values (22, "suzuki", "ダミーデータ1", '[{"sibling":"brother", "name":"akito"},{"sibling":"sister", "name":"ayaka"}, {"sibling":"brother", "name":"taro"}]');
INSERT Users (Age, Name, Description, SiblingInfo) values (34, "sato", "ダミーデータ2", '[{"sibling":"sister", "name":"kana"},{"sibling":"brother", "name":"ken"}]');
INSERT Users (Age, Name, Description, SiblingInfo) values (45, "kobayashi", "ダミーデータ3", '[{"sibling":"brother", "name":"ryo"}]');
DBとの接続には、gormのパッケージを利用しています。
package controllers

import (
    "github.com/jinzhu/gorm"
    _ "github.com/jinzhu/gorm/dialects/mysql"
)

var DB *gorm.DB

func InitDB() {
    DBMS     := "mysql"
    USER     := "root"
    PASS     := ""
    PROTOCOL := "tcp(localhost)"  //tcp(##.###.##.###:3306)
    DBNAME   := "GoApiServer"

    CONNECT := USER+":"+PASS+"@"+PROTOCOL+"/"+DBNAME + "?charset=utf8&parseTime=True&loc=Local"
    db,err := gorm.Open(DBMS, CONNECT)

    if err != nil {
        panic(err.Error())
    }
    db.DB()

    DB = db
}
init.goに追記します。
func init() {
    revel.Filters = []revel.Filter{
    ...省略...
    }
    revel.OnAppStart(controllers.InitDB) // 追記
}
apiをjsonで返す関数を作る
package controllers

import (
    "github.com/revel/revel"
    "go-api-server/app/models"
)

type UserApi struct {
    *revel.Controller
}

type JsonResponse struct {
    Response interface{} `json:"response"`
}

func (c UserApi) GetUsers() revel.Result {

    Users := []models.User{}

    DB.Find(&Users)

    response := JsonResponse{}
    response.Response = Users

    return c.RenderJSON(response)
}
エンドポイントの設定
#UserのAPI
GET     /api/v1/users                       UserApi.GetUsers
エンドポイントにアクセスしてみる
ここまでできたらブラウザでlocalhost:9000/api/v1/usersにアクセスしてみるとjson形式でリスポンスが返ってくると思います。
{
  "response": [
    {
      "Id": 1,
      "Age": 22,
      "Name": "suzuki",
      "Description": "ダミーデータ1",
      "SiblingInfo": [
        {
          "name": "akito",
          "sibling": "brother"
        },
        {
          "name": "ayaka",
          "sibling": "sister"
        },
        {
          "name": "taro",
          "sibling": "brother"
        }
      ]
    },
    {
      "Id": 2,
      "Age": 34,
      "Name": "sato",
      "Description": "ダミーデータ2",
      "SiblingInfo": [
        {
          "name": "kana",
          "sibling": "sister"
        },
        {
          "name": "ken",
          "sibling": "brother"
        }
      ]
    },
    {
      "Id": 3,
      "Age": 45,
      "Name": "kobayashi",
      "Description": "ダミーデータ3",
      "SiblingInfo": [
        {
          "name": "ryo",
          "sibling": "brother"
        }
      ]
    }
  ]
}
特定のIDのユーザー情報をGETする
次に、特定のIDのユーザーを指定して情報を取ってこれるようにしましょう。
新しい関数GetUserを追加します。
func (c UserApi) GetUser() revel.Result {
    //int型に変換する
    number , _ := strconv.Atoi(c.Params.Get("number"))

    Users := []models.User{}

    DB.Find(&Users)

    response := JsonResponse{}
    response.Response = Users[number]

    return c.RenderJSON(response)
}
また、confファイルもにエンドポイントを設定します。
#UserのAPI
GET     /api/v1/users                       UserApi.GetUsers
GET     /api/v1/user/:number                UserApi.GetUser   #追加
以上で、URLでIDを指定するとそのユーザーの情報だけをGETすることができます。
ブラウザでlocalhost:9000/api/v1/user/1にアクセスします。
{
  "response": {
    "Id": 2,
    "Age": 34,
    "Name": "sato",
    "Description": "ダミーデータ2",
    "SiblingInfo": [
      {
        "name": "kana",
        "sibling": "sister"
      },
      {
        "name": "ken",
        "sibling": "brother"
      }
    ]
  }
}
ちゃんとユーザー情報を取れてきていることが確認できます。
ユーザー情報をURLに乗せてGETする
DBにアクセスしてデータを追加できるようにしていきます。
まずは、json型のデータをDBに渡すために、新しくstructを定義します。
type SiblingInfo struct {
    Sibling string `json:"sibling"`
    Name string `json:"name"`
}
次に、新しいメソッドを追加します。
json.Marshalを使って、struct型のデータ構造をjson.RawMessage型に直します。
func (c UserApi) PostUser(age int, name string, description string, info [][]string) revel.Result {

     var TotalNewData = []models.SiblingInfo{}
    length := len(info)
    fmt.Println(length)

    for i := 0; i < length; i++ {

        NewData := models.SiblingInfo{
            Sibling:info[i][0],
            Name:info[i][1],
        }

        TotalNewData = append(TotalNewData, NewData)
    }

    //structからjson.RawMessage型に変換
    RawData, err := json.Marshal(TotalNewData)
    if err != nil {
        log.Panic(err)
    }

    //挿入するデータの生成
    User := models.User{
        Age: age,
        Name: name,
        Description: description,
        SiblingInfo: RawData,
    }

    //DBに追加
    DB.NewRecord(User)
    DB.Create(&User)

    //結果表示用
    response := JsonResponse{}
    response.Response = User

    return c.RenderJSON(response)
}
また、confファイルもにエンドポイントを設定します。
#UserのAPI
GET     /api/v1/users                       UserApi.GetUsers
GET     /api/v1/user/:number                UserApi.GetUser
GET     /api/v1/createUser                  UserApi.PostUser #追加
以上で、URLにユーザー情報を乗せて、DB上に新しいデータを追加することができます。
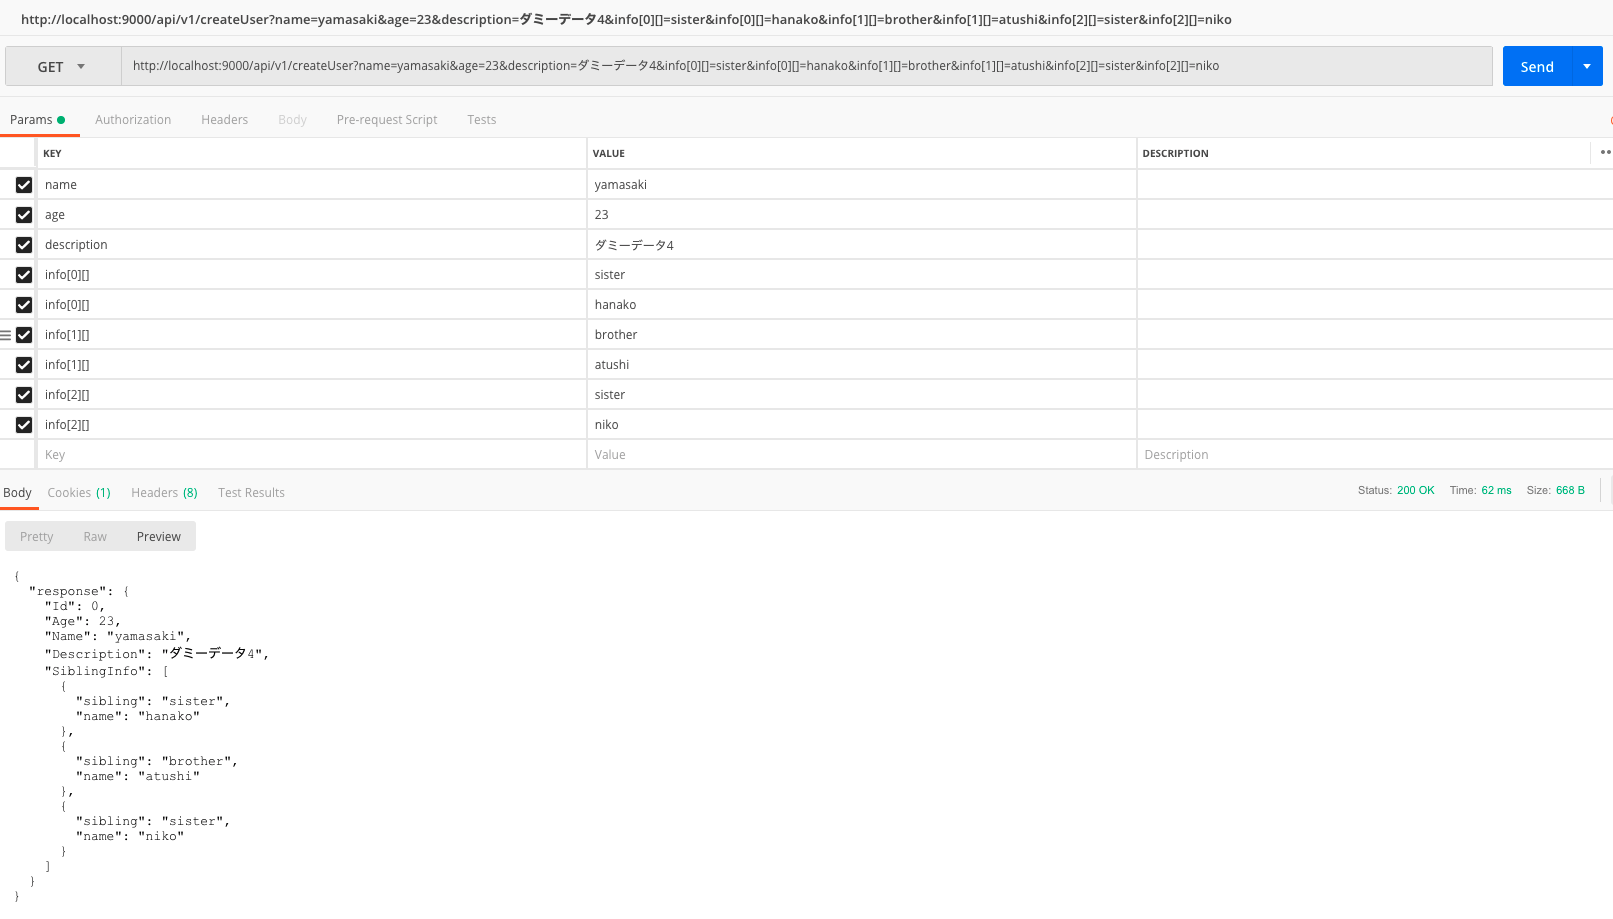
ブラウザでhttp://localhost:9000/api/v1/createUser?name=yamasaki&age=23&description=ダミーデータ4&info[0][]=sister&info[0][]=hanako&info[1][]=brother&info[1][]=atushi&info[2][]=sister&info[2][]=nikoにアクセスします。
ここまでくると、要素数が多いので、postmanなどを使うと良いです。