結構前の勉強会でコードのレベルはともかく、とりあえず動くものを作成しましたので、その時に行ったことを書かせていただきます。m(_ _)m
私自身初心者でググりながらやってますのであまり当てにしないでください。
参考
とても参考になりましたm(_ _)m
バージョン
- macOS High Sierra
- Vagrant 2.2.2
- VirtualBox 5.2.22
- Google Chrome 71.0.3578.98
- OBS 22.0.3
centos7を起動する
boxを追加
$ vagrant box add centos/7
==> box: Loading metadata for box 'centos/7'
    box: URL: https://vagrantcloud.com/centos/7
This box can work with multiple providers! The providers that it
can work with are listed below. Please review the list and choose
the provider you will be working with.

1) hyperv
2) libvirt
3) virtualbox
4) vmware_desktop

Enter your choice: 3  # <- virtualboxを使うので3を選択
==> box: Adding box 'centos/7' (v1809.01) for provider: virtualbox
    box: Downloading: https://vagrantcloud.com/centos/boxes/7/versions/1809.01/providers/virtualbox.box
    box: Download redirected to host: cloud.centos.org
==> box: Successfully added box 'centos/7' (v1809.01) for 'virtualbox'!
box listで追加されていたらOK
$ vagrant box list
centos/7     (virtualbox, 1809.01)
仮想マシンでCentOSを立ち上げる
好きなディレクトリを作成し、そこで作業をする
$ vagrant init centos/7
A `Vagrantfile` has been placed in this directory. You are now
ready to `vagrant up` your first virtual environment! Please read
the comments in the Vagrantfile as well as documentation on
`vagrantup.com` for more information on using Vagrant.
VagrantFileができているので、35行目ぐらいにあるconfig.vm.networkのコメントを外しておく
$ vi Vagrantfile
-  # config.vm.network "private_network", ip: "192.168.33.10"
+  config.vm.network "private_network", ip: "192.168.33.10"
仮想マシンを起動
$ vagrant up
起動されいることを確認
$ vagrant status
Current machine states:

default                   running (virtualbox)

The VM is running. To stop this VM, you can run `vagrant halt` to
shut it down forcefully, or you can run `vagrant suspend` to simply
suspend the virtual machine. In either case, to restart it again,
simply run `vagrant up`.
ssh接続し、yum updateを実行しておく
$ vagrant ssh
[vagrant@localhost ~]$ sudo yum update
nginxのインストール
$ sudo yum groupinstall "Development Tools"
$ sudo yum -y install pcre-devel zlib-devel openssl-devel wget

$ cd /usr/local/src/
$ sudo wget http://nginx.org/download/nginx-1.8.0.tar.gz
$ sudo tar -zxvf nginx-1.8.0.tar.gz
$ sudo wget https://github.com/arut/nginx-rtmp-module/archive/master.zip
$ sudo unzip master.zip

$ cd nginx-1.8.0
$ sudo ./configure --user=nginx --group=nginx --with-http_ssl_module --add-module=../nginx-rtmp-module-master
$ sudo make
$ sudo make install

$ sudo groupadd nginx
$ sudo useradd -g nginx nginx
$ sudo usermod -s /bin/false nginx
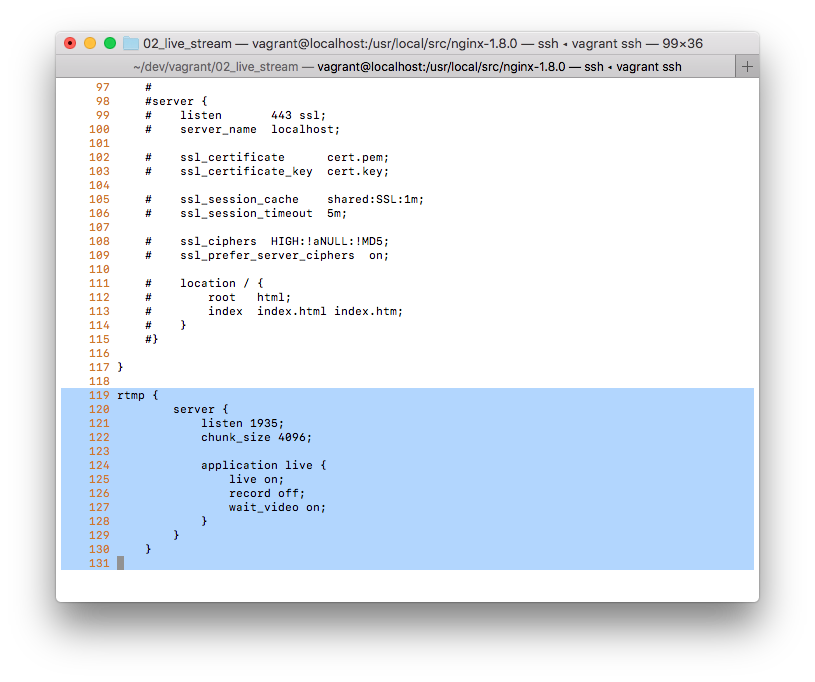
nginxの設定ファイルの一番下に以下の設定を追加
$ sudo vi /usr/local/nginx/conf/nginx.conf
rtmp {
        server {
            listen 1935;
            chunk_size 4096;

            application live {
                live on;
                record off;
                wait_video on;
            }
        }
    }
ファイアーウォールを切る
$ sudo systemctl stop firewalld
$ sudo systemctl disable firewalld
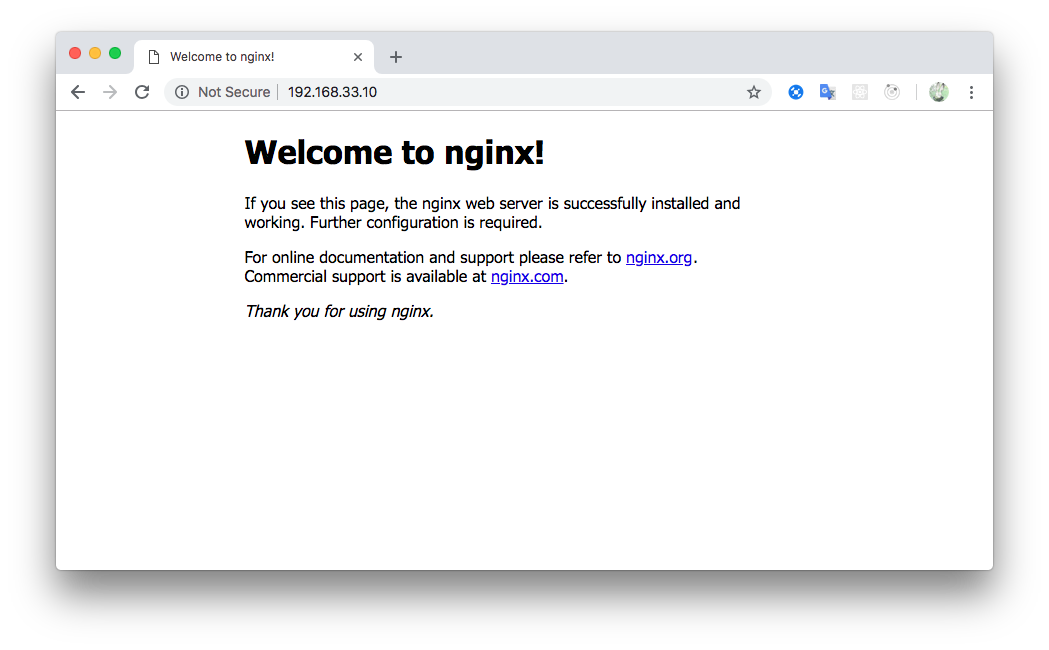
nginx起動
$ sudo /usr/local/nginx/sbin/nginx # <- 起動
$ sudo /usr/local/nginx/sbin/nginx -s quit # <- 停止
Vagrantfileに設定してあるipアドレスにブラウザからアクセス
配信する方の設定
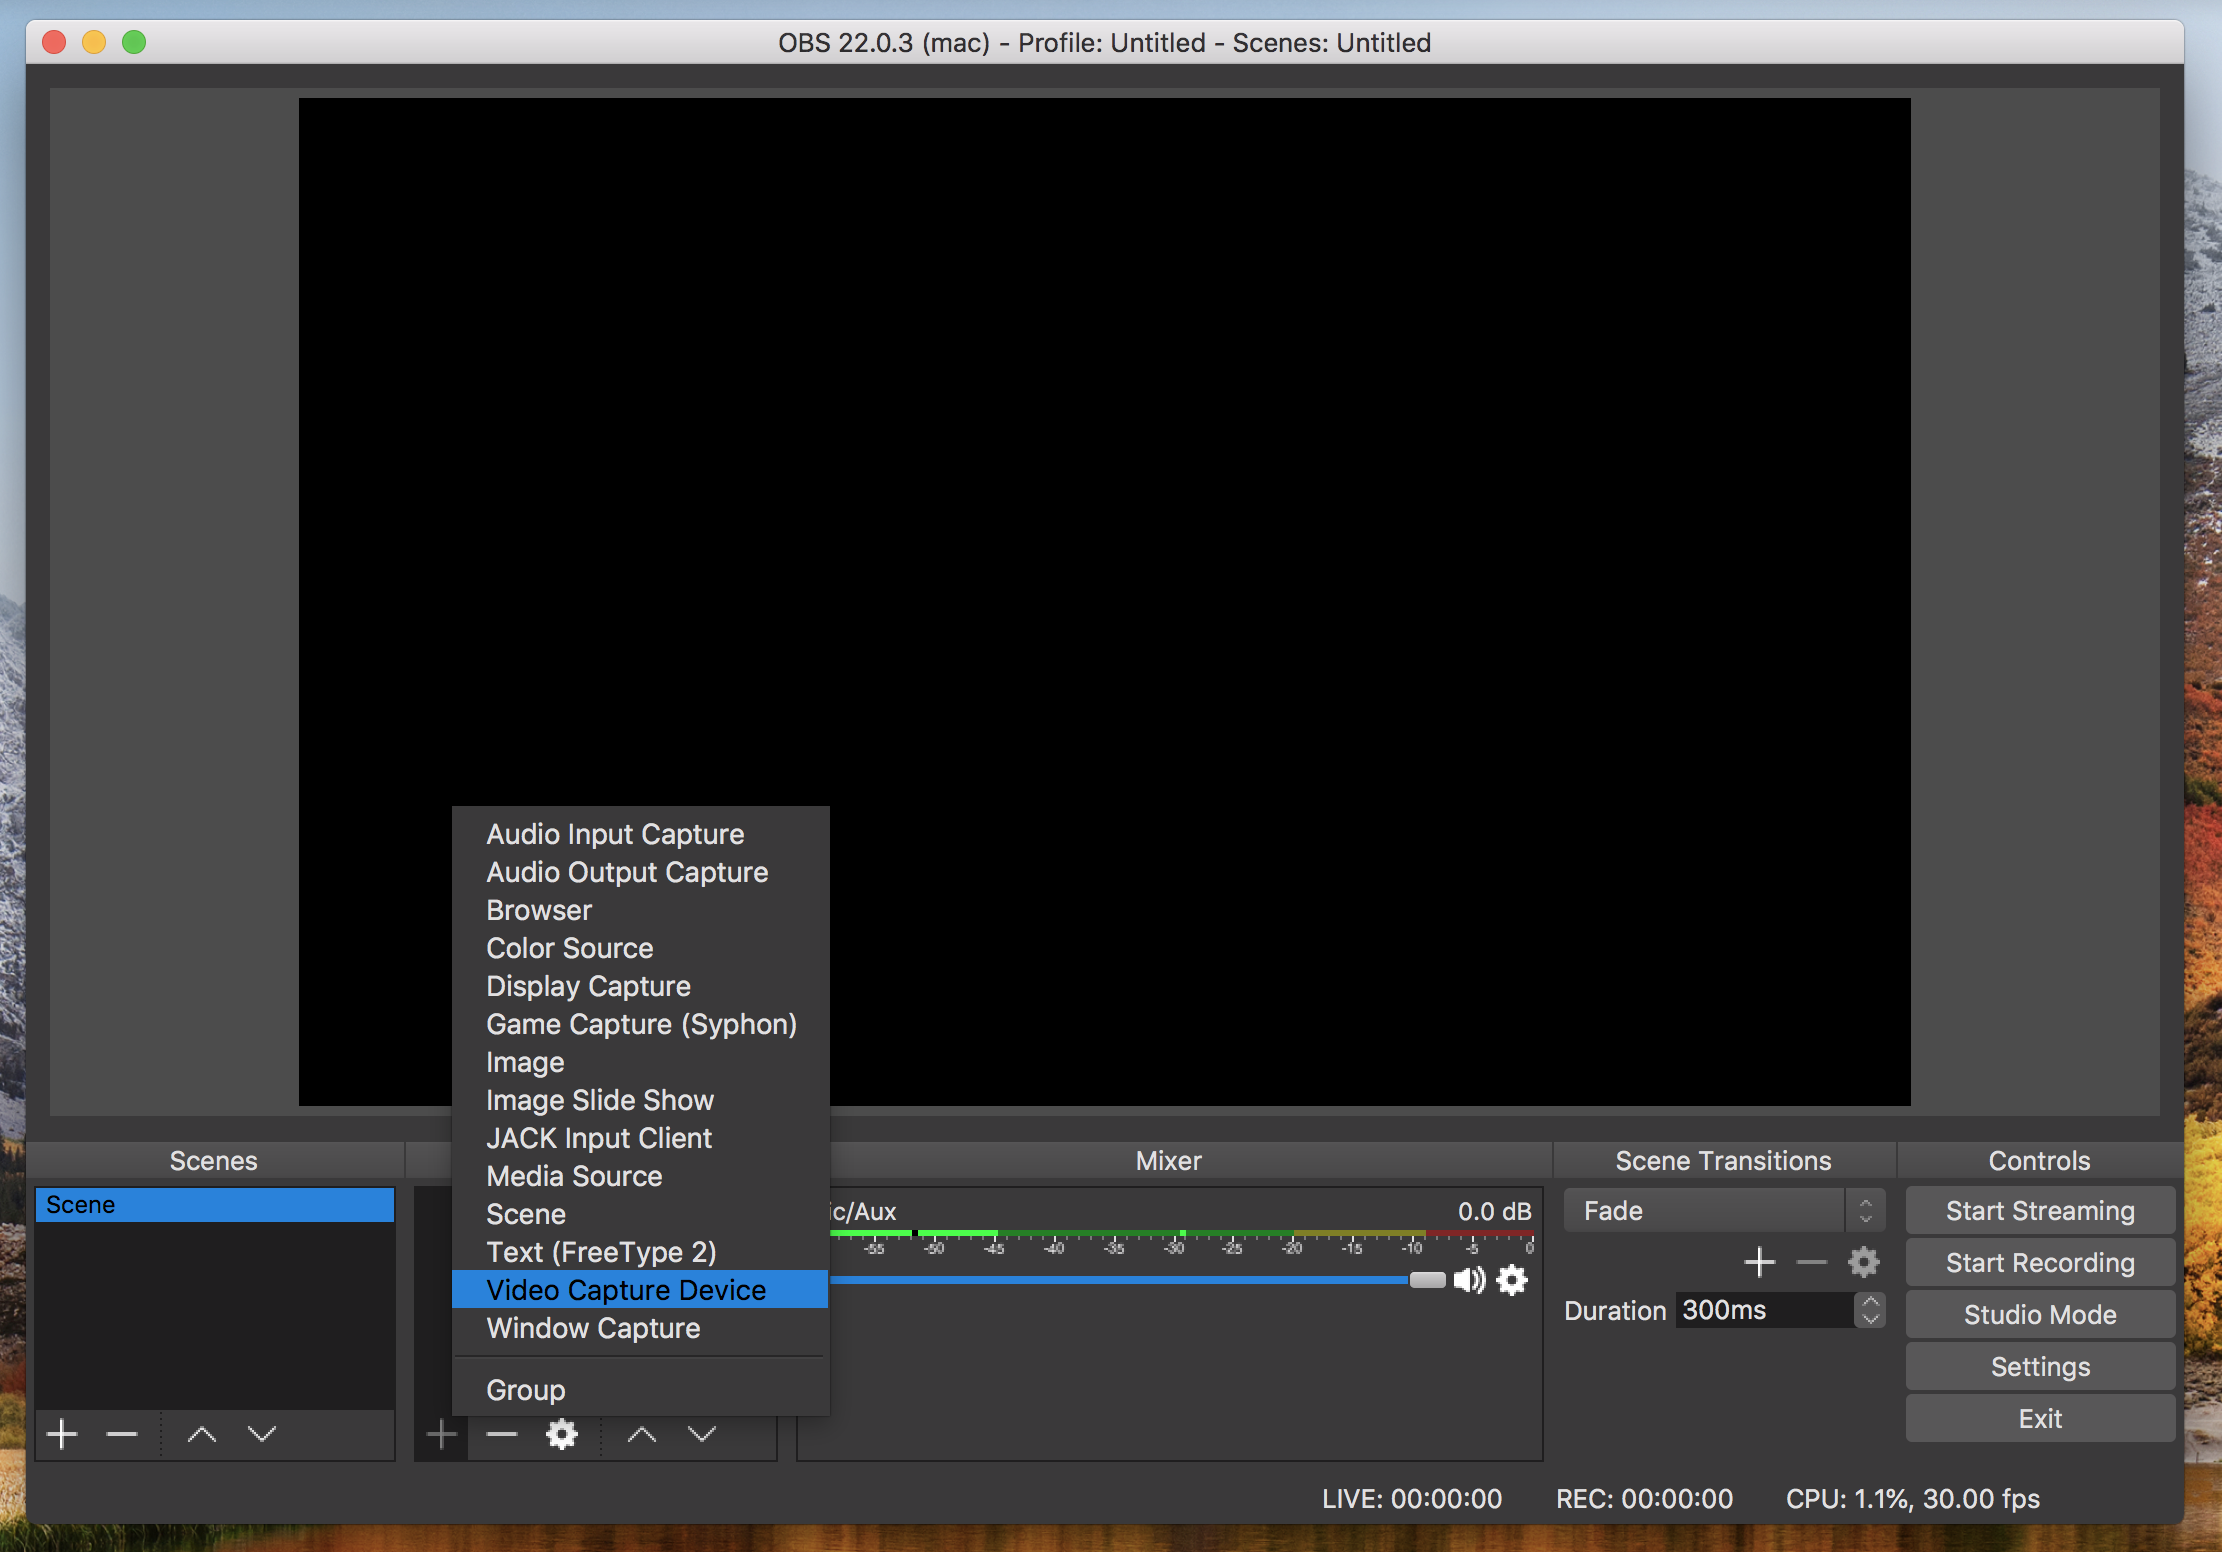
フリーソフトの「OBS」をインストールする
- 「Video Capture Device」を選択↓
- 「OK」を押す↓
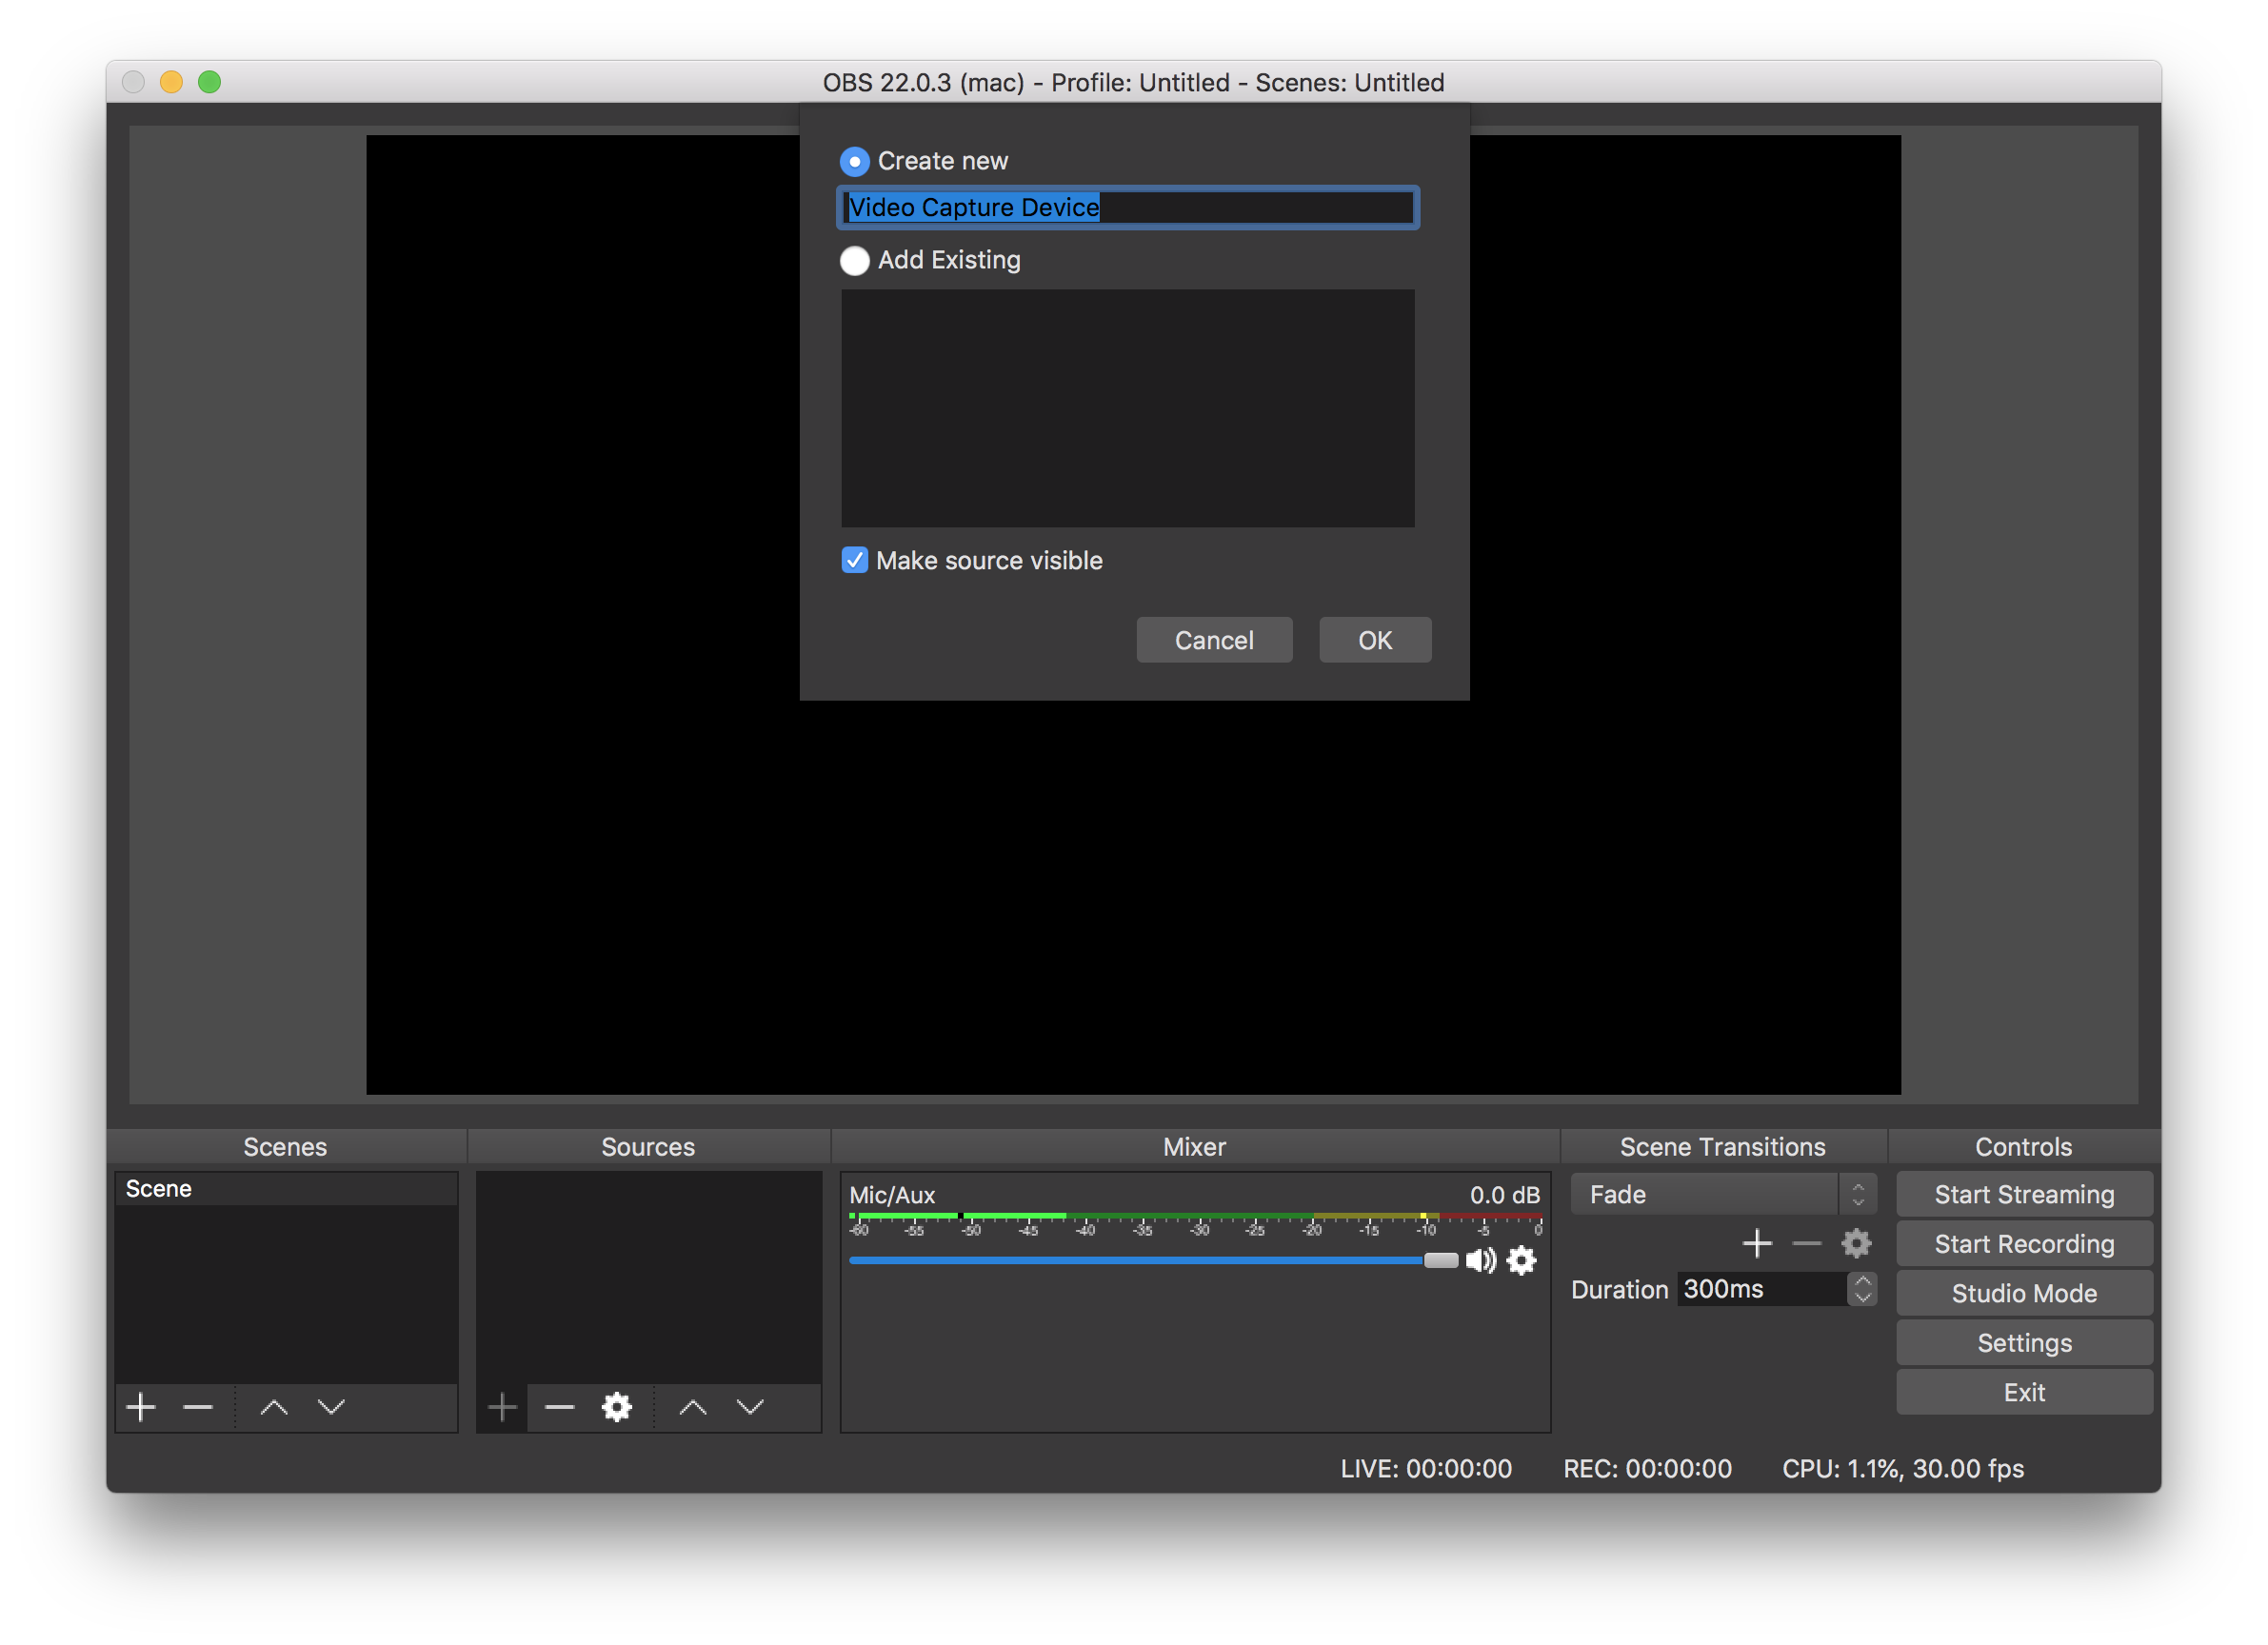
- macの内蔵カメラを使うので「FaceTime HD Camera」を選択し「OK」を押す↓

- 右下の「Settings」をクリック

- 「Stream」の設定
- Strream Type -> Custom Streaming Server
- URL -> rtmt://ipアドレス/アプリケーション名
- Stream key -> 「test」と設定しました

※URLのアプリケーション名はnginx.confに設定した名前、今回では「live」になる

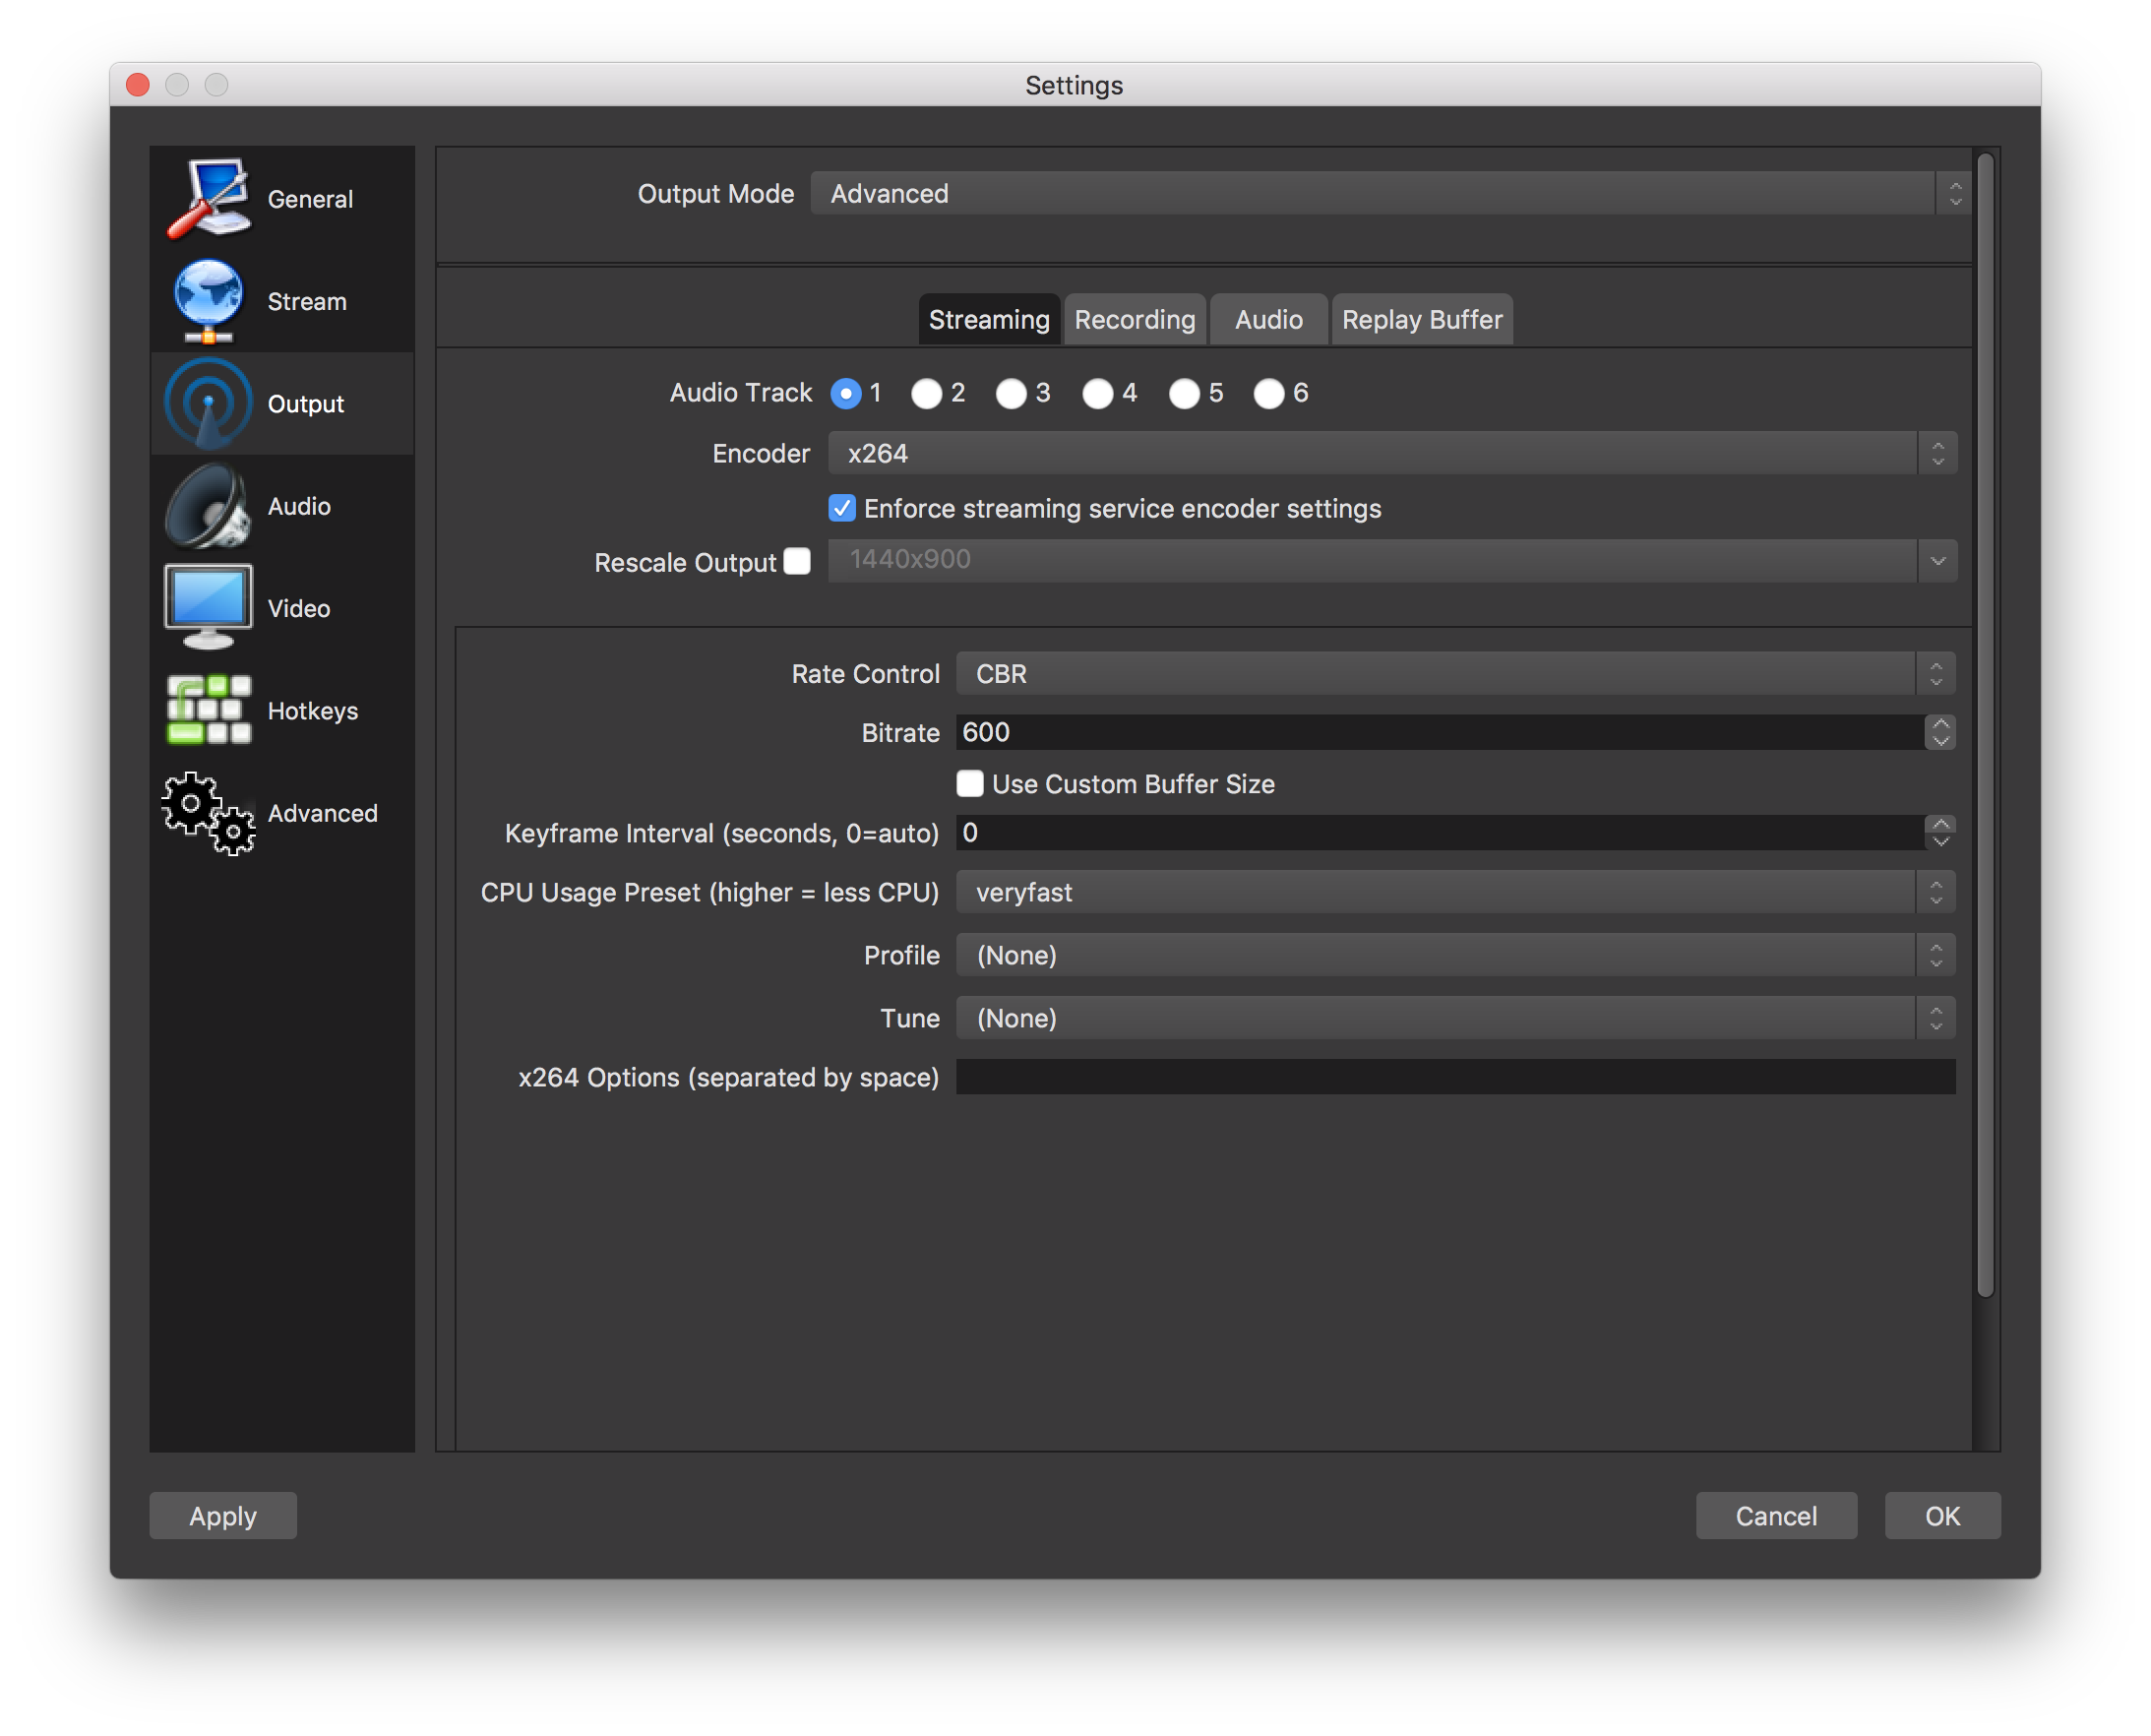
- 「Output」の設定
設定を変えなくても配信に問題ありませんでした
- 右下の「Start Streaming」を押すと配信が開始される

受信する方の設定
- 受信用のhtmlを作成
$ sudo vi /usr/local/nginx/html/live.html
<!DOCTYPE html>
<html lang="ja">
  <head>
    <meta charset="UTF-8">
    <meta name="viewport" content="width=device-width, initial-scale=1.0">
    <meta http-equiv="X-UA-Compatible" content="ie=edge">
    <title>Document</title>
    <link rel="stylesheet" href="https://cdnjs.cloudflare.com/ajax/libs/skeleton/2.0.4/skeleton.css" />
    <link href="https://vjs.zencdn.net/7.3.0/video-js.css" rel="stylesheet">
    <script src="https://vjs.zencdn.net/7.3.0/video.js"></script>
    <script src="https://cdnjs.cloudflare.com/ajax/libs/videojs-flash/2.1.2/videojs-flash.min.js"></script>
    <style>
        .disabled {
            cursor: not-allowed;
            opacity: .5;
        }
    </style>
  </head>
  <body>
    <div class="container">
        <video id="example_video_1" class="video-js vjs-default-skin u-full-width" height="500" controls preload="none" poster="" data-setup="{}">
            <source src="rtmp://192.168.33.10/live/test" type="rtmp/mp4">
            <p class="vjs-no-js">To view this video please enable JavaScript, and consider upgrading to a web browser that
                <a href="http://videojs.com/html5-video-support/" target="_blank">supports HTML5 video</a>
            </p>
        </video>
        <hr>
        <div class="u-pull-right">
            <a id="record" class="button" href="#">保存開始</a>
            <a id="download" class="button button-primary disabled" href="" download>ダウンロード</a>
        </div>
    </div>
  </body>
</html>
- chrome://settings/content/flash を開き、「Ask frist」に設定しておく↓

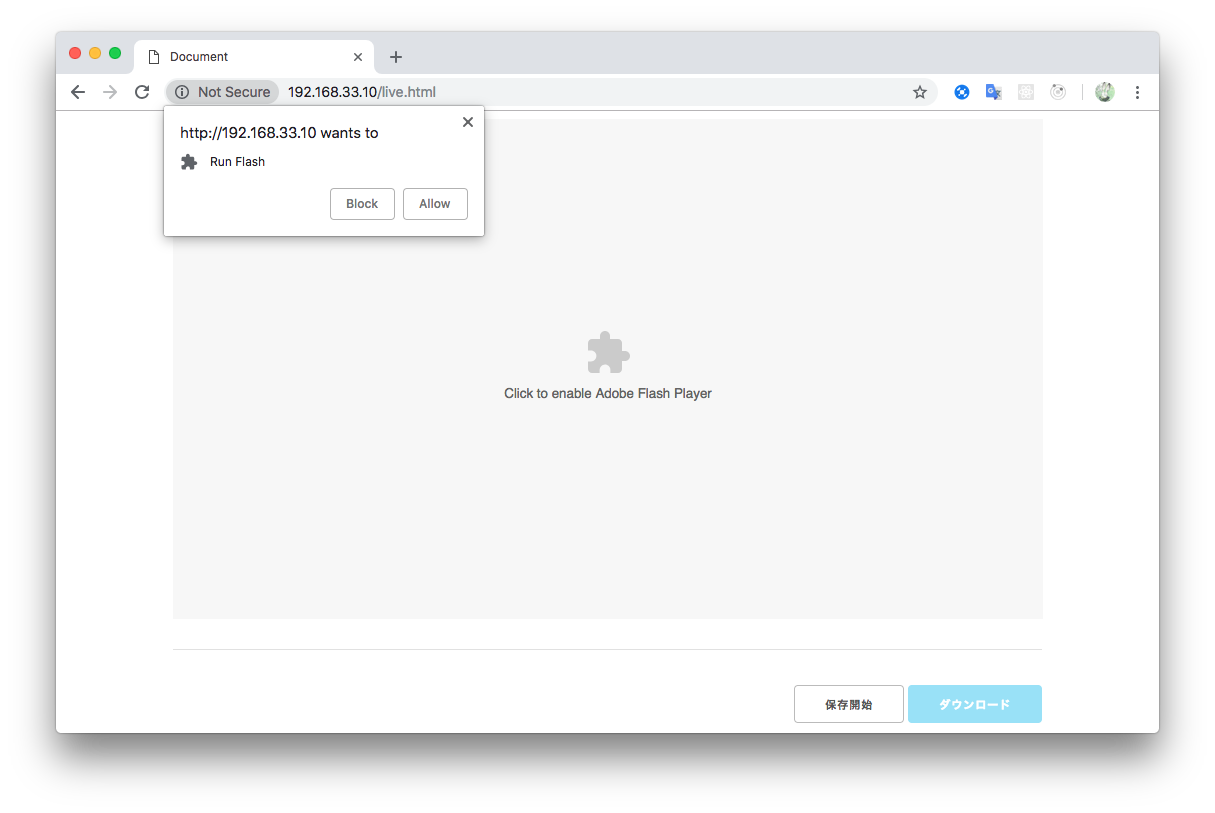
- flashを許可すると、OBSで配信中の映像が見れる
ストリーミング配信をファイルに保存する
ffmpegをインストール
$ sudo yum -y install epel-release
$ sudo rpm --import http://li.nux.ro/download/nux/RPM-GPG-KEY-nux.ro
$ sudo rpm -Uvh http://li.nux.ro/download/nux/dextop/el7/x86_64/nux-dextop-release-0-1.el7.nux.noarch.rpm
$ sudo yum -y install ffmpeg ffmpeg-devel
$ ffmpeg -h # ヘルプが表示されたらOK
phpのインストール
$ sudo yum -y install php
$ php --version
PHP 5.4.16 (cli) (built: Oct 30 2018 19:30:51)
Copyright (c) 1997-2013 The PHP Group
Zend Engine v2.4.0, Copyright (c) 1998-2013 Zend Technologies
php-frmのインストール
$ sudo yum -y install php-fpm
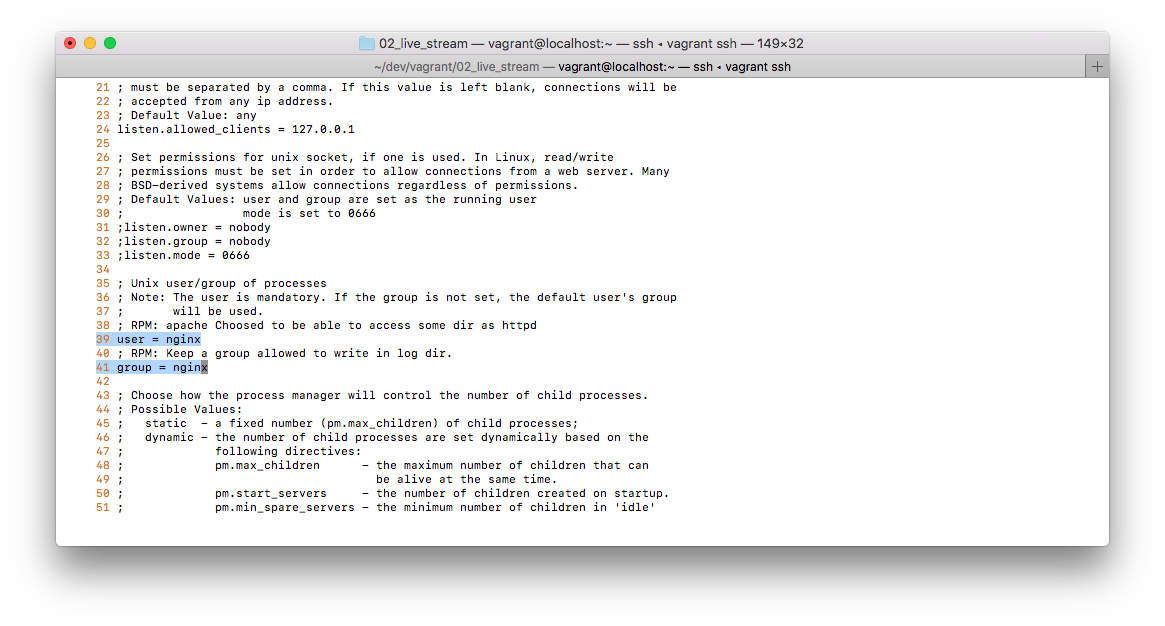
$ sudo vi /etc/php-fpm.d/www.conf
- apacheからnginxに変更
  ; Unix user/group of processes
  ; Note: The user is mandatory. If the group is not set, the default user's group
  ;       will be used.
  ; RPM: apache Choosed to be able to access some dir as httpd
- user = apache
+ user = nginx
  ; RPM: Keep a group allowed to write in log dir.
- group = apache
+ group = nginx
- php-fpmを起動
$ sudo systemctl start php-fpm
$ sudo systemctl enable php-fpm
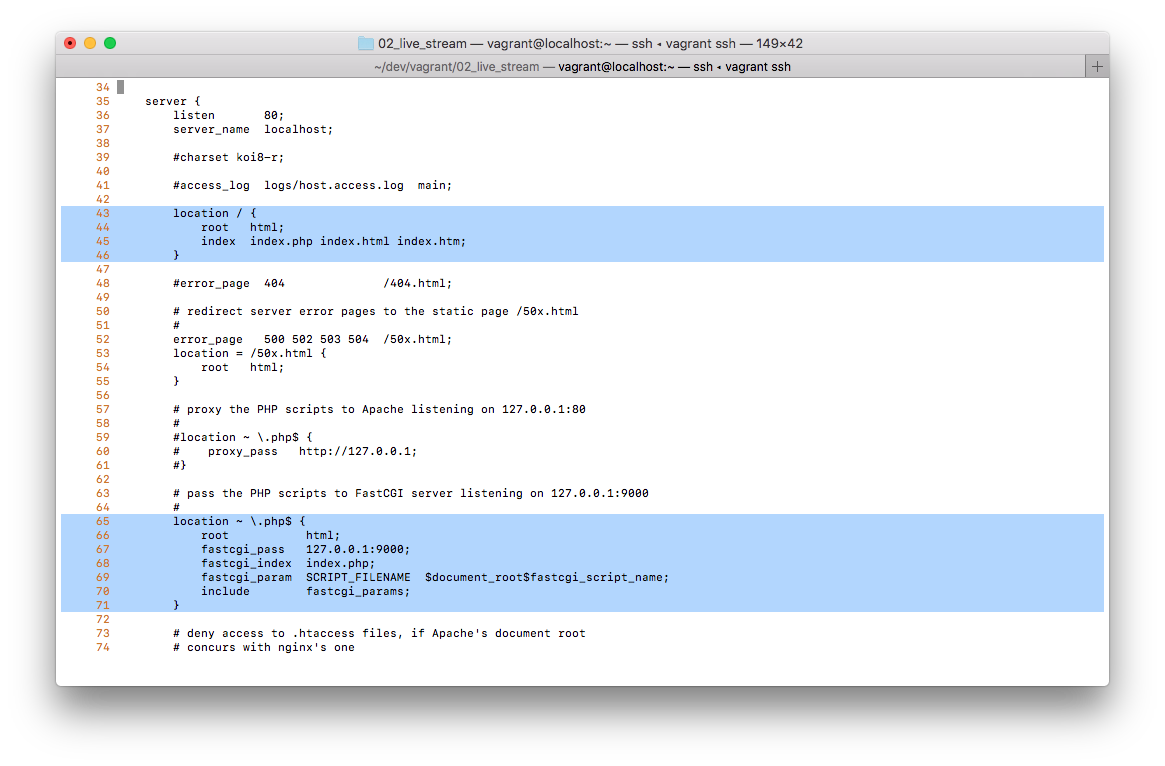
- nginxの設定変更
$ sudo vi /usr/local/nginx/conf/nginx.conf
   location / {
        root   html;
-       index  index.html index.htm;
+       index  index.php index.html index.htm;
   }

  (省略)

-  #location ~ \.php$ {
-  #    root           html;
-  #    fastcgi_pass   127.0.0.1:9000;
-  #    fastcgi_index  index.php;
-  #    fastcgi_param  SCRIPT_FILENAME  /scripts$fastcgi_script_name;
-  #    include        fastcgi_params;
-  #}
+  location ~ \.php$ {
+       root           html;
+       fastcgi_pass   127.0.0.1:9000;
+       fastcgi_index  index.php;
+       fastcgi_param  SCRIPT_FILENAME  $document_root$fastcgi_script_name;
+       include        fastcgi_params;
+  }
- nginx再起動
$ sudo /usr/local/nginx/sbin/nginx -s reload
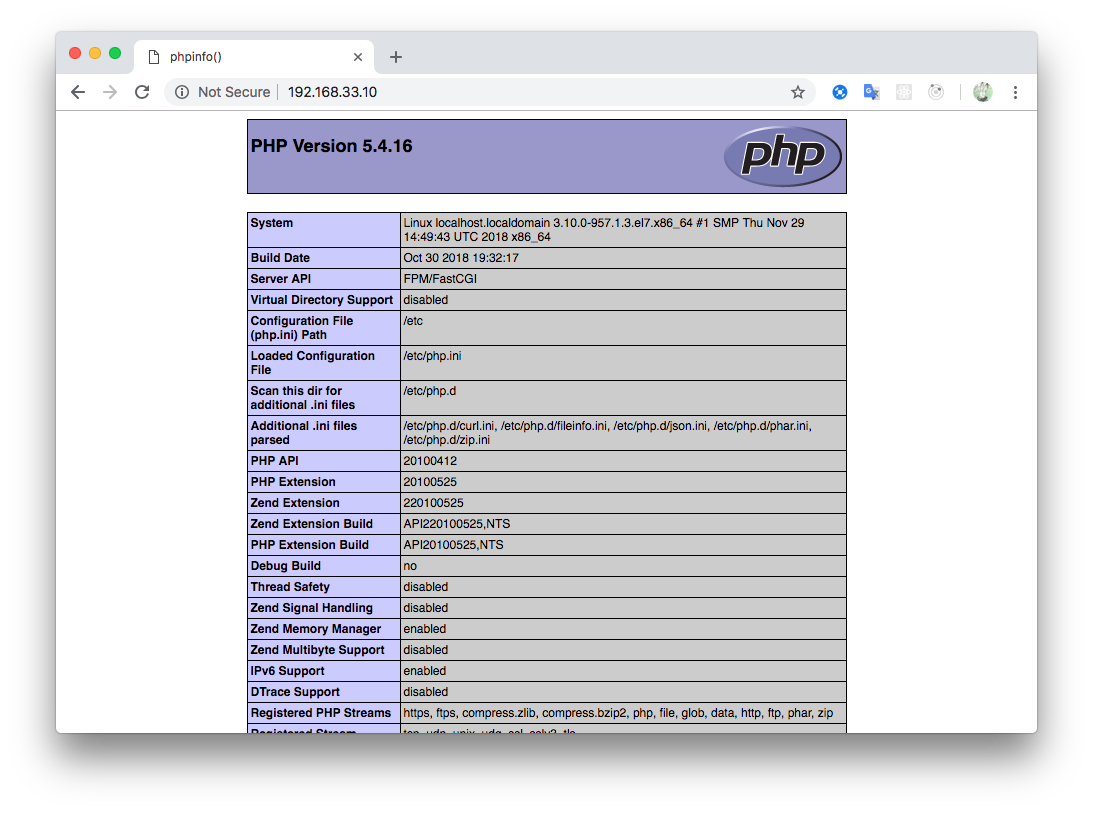
- index.phpを作成
$ sudo sh -c "echo '<?php phpinfo();' > /usr/local/nginx/html/index.php"
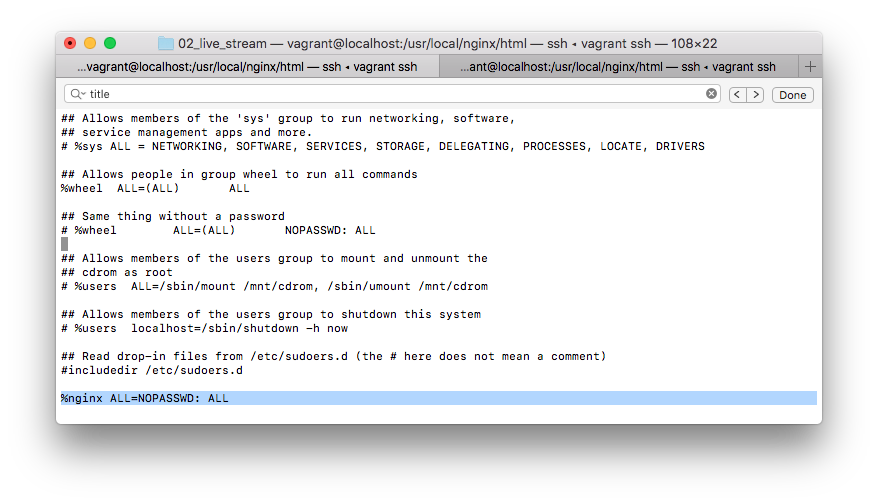
nginxにsudo権限を持たせる
phpからffmpegの起動プロセスをkillするなどでnginxにsudo権限がないとうまくいきませんでした。
$ sudo visudo
以下を一番下に追加して上書き保存
※ローカルの開発環境なのでALLでてきとうに全権限を与えました。
%nginx ALL=NOPASSWD: ALL
SELinuxを無効化しておく
$ sudo vi /etc/selinux/config
enforcingをdisabledに変える
- SELINUX=enforcing
+ SELINUX=disabled
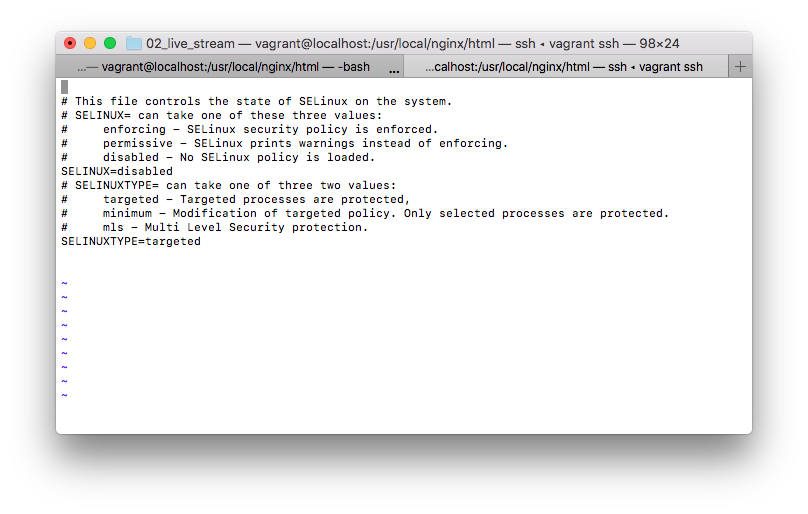
$ sudo reboot # サーバ再起動
$ getenforce # 設定を確認
Disabled
$ sudo /usr/local/nginx/sbin/nginx # nginxの自動起動設定をしていないので起動する
ffmpeg実行用のphp作成
$ sudo vi /usr/local/nginx/html/stream.php
<?php
ini_set('ignore_user_abort', 1);
header('Content-Type: text/event-stream; charset=utf-8');
header('Cache-Control: no-cache');
header('Content-Encoding: none');
header('X-Accel-Buffering: no');

echo sprintf("data: %s\n\n", json_encode(['file' => $time = time()]));
ob_end_flush();
flush();

// 保存を開始する -> ffmpegでストリーミング配信を非同期に保存する
shell_exec(sprintf('echo vagrant | sudo ffmpeg -i rtmp://127.0.0.1/live/test -c copy %s/%s.mp4 > /dev/null 2>&1 </dev/null &', __DIR__, $time));
while(connection_aborted()) {
    echo sprintf("data: %s\n\n", json_encode(['status' => '保存中']));
    ob_end_flush();
    flush();
    sleep(1);
}

// 保存を終了する -> ffmpegのプロセスをkill
$pid = shell_exec('ps --no-heading -C ffmpeg -o pid');
shell_exec(sprintf('echo vagrant | sudo kill %d', $pid));
live.htmlを変更して、ボタンを押して保存などできるようにする
<!DOCTYPE html>
<html lang="ja">
  <head>
    <meta charset="UTF-8">
    <meta name="viewport" content="width=device-width, initial-scale=1.0">
    <meta http-equiv="X-UA-Compatible" content="ie=edge">
    <title>Document</title>
    <link rel="stylesheet" href="https://cdnjs.cloudflare.com/ajax/libs/skeleton/2.0.4/skeleton.css" />
    <link href="https://vjs.zencdn.net/7.3.0/video-js.css" rel="stylesheet">
    <script src="https://vjs.zencdn.net/7.3.0/video.js"></script>
    <script src="https://cdnjs.cloudflare.com/ajax/libs/videojs-flash/2.1.2/videojs-flash.min.js"></script>
    <style>
        .disabled {
            cursor: not-allowed;
            opacity: .5;
        }
    </style>
  </head>
  <body>
    <div class="container">
        <video id="example_video_1" class="video-js vjs-default-skin u-full-width" height="500" controls preload="none" poster="" data-setup="{}">
            <source src="rtmp://192.168.33.10/live/test" type="rtmp/mp4">
            <p class="vjs-no-js">To view this video please enable JavaScript, and consider upgrading to a web browser that
                <a href="http://videojs.com/html5-video-support/" target="_blank">supports HTML5 video</a>
            </p>
        </video>
        <hr>
        <div class="u-pull-right">
            <a id="record" class="button" href="#">保存開始</a>
            <a id="download" class="button button-primary disabled" href="" download="">ダウンロード</a>
        </div>
    </div>
    <script>
    (function(){
        'use strict'
        document.addEventListener("DOMContentLoaded", ()=>{
            let es
            // 保存ボタン
            record.addEventListener("click", e => {
                e.preventDefault()
                if(es == null) {
                    es = new EventSource("./stream.php")
                    es.addEventListener("message", e => {
                        if(JSON.parse(e.data).file) download.href = `${JSON.parse(e.data).file}.mp4`
                        console.log(JSON.parse(e.data))
                    })
                    es.addEventListener("error", e => {
                        alert("error")
                        e.target.close()
                        es = null
                        record.textContent = "保存開始"
                    })

                    e.target.textContent = "保存終了"
                    download.classList.add("disabled")
                } else {
                    es.close()
                    es = null
                    record.textContent = "保存開始"
                    download.classList.remove("disabled")
                }
            })

            // ダウンロードボタン
            download.addEventListener("click", e => {
                if (e.target.classList.contains("disabled")) {
                    e.preventDefault()
                    return
                }
                e.target.classList.add("disabled");
            })
        })
    })()
    </script>
  </body>
</html>
エラー処理をほとんど書いてないので不安定な部分も多いですが、とりあえず動くところまでできました。
最後まで見ていただいてありがとうございましたm(_ _)m
参考
yum groupinstall "Development tools" で入るパッケージ一覧(CentOS) - Qiita
Getting Started with Video.js - Video.js: The Player Framework
In chrome to play rtmp/flv ?? · Issue #58 · videojs/videojs-flash
dom - What is the "hasClass" function with plain JavaScript? - Stack Overflow
十三章第二回 Server-Sent Events — JavaScript初級者から中級者になろう — uhyohyo.net
Handle connection reset by the client? · Issue #1 · hhxsv5/php-sse