@Component and @View decorators used to build an Angular application. This article dives in a bit deeper. However, we can’t cover everything about components in a single article, so future articles will take up other aspects of Angular 2 components.
The code for this article and the other articles in the series is available as in the angular2-samples repo. You can also see the samples running at: http://angular2-samples.azurewebsites.net/.
Although it’s possible to write Angular 2 applications in ECMAScript 5 (the most common version of JavaScript supported by browsers), we prefer to write in TypeScript. Angular 2 itself is written in TypeScript and it helps us at development time and includes features that make it easier for us to define Angular 2 components.
In particular, TypeScript supports decorators (sometimes referred to as “annotations”) which are used to declaratively add to or change an existing “thing”. For example, class decorators can add metadata to the class’s constructor function or even alter how the class behaves. For more information on decorators and the types of things you can do with them, see the proposal for JavaScript decorators. Angular 2 includes several decorators.
As we’ve covered in an earlier article, Angular 2 components are the key building block for Angular applications. They include a view, defined with HTML and CSS, and an associated controller that implements functionality needed by the view. The controller has three major responsibilities:
- Manage the model, i.e. the application data used by the view
- Implement methods needed by the view for things like submitting data or hiding/showing sections of the UI
- Managing data related to the state of the view, such as which item in a list is currently selected.
The term means “Model of a View”, and can be thought of as abstraction of the view, but it also provides a specialization of the Model that the View can use for data-binding. In this latter role the ViewModel contains data-transformers that convert Model types into View types, and it contains Commands the View can use to interact with the Model. — Source (captured 11/27/2015)Because Angular 2 components aren’t native JavaScript entities, Angular provides a way to define a component by pairing a constructor function with a view. You do this by defining a constructor function (in TypeScript it’s defined as a class) and using a decorator to associate your view with the constructor. The decorator can also set various configuration parameters for the component. This magic is accomplished using the
@Component decorator we saw in the first article in this series.
Component Hierarchy
The above describes an individual component, but Angular 2 applications are actually made up of a hierarchy of components – they begin with a root component that contains as descendants all the components used in the application. Angular 2 components are intended to be self-contained, because we want to encapsulate our component functions and we don’t want other code to arbitrarily reach into our components to read or change properties. Also, we don’t want our component to affect another component written by someone else. An obvious example is CSS: if we set CSS for one component, we don’t want our CSS to “bleed out” to another components just as we don’t want other CSS to “bleed in” to our component. At the same time, components do need to exchange data. Angular 2 components can receive data from their parent as long as the receiving component has specifically said it’s willing to receive data. Similarly, components can send data to their parents by trigger an event the parent listens for. Let’s look at how the component hierarchy behaves. To begin, we can draw it as follows: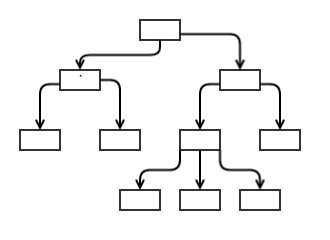 Each box is a component and technically this representation is called “graph” — a data structure consisting of nodes and connecting “edges.” The arrows represent the data flow from one component to another, and we can see that data flows in only one direction — from the top downwards to descendants. Also, note there are no paths that allow you to travel from one node, through other nodes and back to the one where you started. The official name for this kind of data structure is a “directed acyclic graph” — that is, it flows in only one direction and has no circular paths in it.
This kind of structure has some important features: it’s predictable, it’s simple to traverse, and it’s easy to see what’s impacted when a change is made. For Angular’s purposes, when data changes in one node, it’s easy to find the downstream nodes that could be affected.
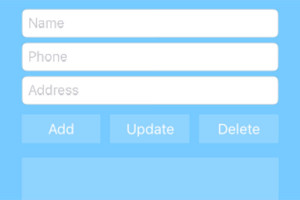
A simple example of how this might be used is a table with rows containing customers and information about them, in which a table component contains multiple individual row components that represent each customer. The table component could manage a record set containing all the customers and pass the data on an individual customer to each of the row components it contains.
This works fine for simply displaying data, but in the real world data will need to flow the other way — back up the hierarchy — such as when a user edits a row. In that case, the row needs to tell the table component that the data for a row has changed so the change can be sent back to the server. The problem is that, as diagrammed above, data only flows down the hierarchy, not back up. To ensure we maintain the simplicity of one-way data flow down the hierarchy, Angular 2 uses a different mechanism for sending data back up the hierarchy: events.
Each box is a component and technically this representation is called “graph” — a data structure consisting of nodes and connecting “edges.” The arrows represent the data flow from one component to another, and we can see that data flows in only one direction — from the top downwards to descendants. Also, note there are no paths that allow you to travel from one node, through other nodes and back to the one where you started. The official name for this kind of data structure is a “directed acyclic graph” — that is, it flows in only one direction and has no circular paths in it.
This kind of structure has some important features: it’s predictable, it’s simple to traverse, and it’s easy to see what’s impacted when a change is made. For Angular’s purposes, when data changes in one node, it’s easy to find the downstream nodes that could be affected.
A simple example of how this might be used is a table with rows containing customers and information about them, in which a table component contains multiple individual row components that represent each customer. The table component could manage a record set containing all the customers and pass the data on an individual customer to each of the row components it contains.
This works fine for simply displaying data, but in the real world data will need to flow the other way — back up the hierarchy — such as when a user edits a row. In that case, the row needs to tell the table component that the data for a row has changed so the change can be sent back to the server. The problem is that, as diagrammed above, data only flows down the hierarchy, not back up. To ensure we maintain the simplicity of one-way data flow down the hierarchy, Angular 2 uses a different mechanism for sending data back up the hierarchy: events.
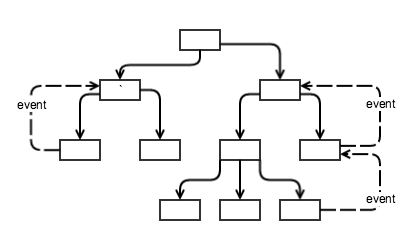 Now, when a child component takes an action that a parent needs to know about, the child fires an event that’s caught by the parent. The parent can take any action it needs which might include updating data that will, through the usual one-way downwards data flow, update downstream components. By separating the downward flow of data from the upwards flow of data, things are kept simpler and data management performs well.
Angular 2 Components: Inputs and Outputs
With that high-level look at Angular 2 components under our belt, let’s look at two properties that can be passed to the@Component decorator to implement the downward and upward flow of data: “inputs” and “outputs.” These have sometimes been confusing because, in earlier version of the Angular 2 alpha, they were called “properties” (for “inputs”) and “events” (for “outputs”) and some developers were less than enthralled with the name change, though it does seem to make sense: https://github.com/angular/angular/pull/4435.
“Inputs”, as you might guess from the hierarchy discussion above, specifies which properties you can set on a component, whereas “outputs” identifies the events a component can fire to send information up the hierarchy to its parent.
 Figure 1: A component that uses “inputs” and “outputs” properties in the
 @Component decorator
There are several things to notice with regards to inputs and outputs above:
- The “inputs” property passed to the
@Componentsdecorator lists “myname” as a component property that can receive data. We also declare “myname” as a public property withinParentCompclass. If you don’t declare it, the TypeScript compiler might issue a warning. - The “outputs” property lists “myevent” as a custom event that
ParentCompcan emit which its parent will be able to receive. Within the ParentComp class, “myevent” is declared as and set to be anEventEmitter.EventEmitteris a built-in class that ships with Angular that gives us methods for managing and firing custom events. Notice that we had to addEventEmitterto the import statement at the top of the file. - This component displays the incoming “myname” in the view, but when we try to access it in
ParentCompconstructor it’s not yet defined. That’s because input properties aren’t available until the view has rendered, which happens after the constructor function runs. - We added a “click” event handler to our template that invokes the myeventEventEmitter’s “
next()” method and passes it the data we want to send with the event. This is the standard pattern for sending data up the component hierarchy — using “EventEmitter” to call the “next()” method.
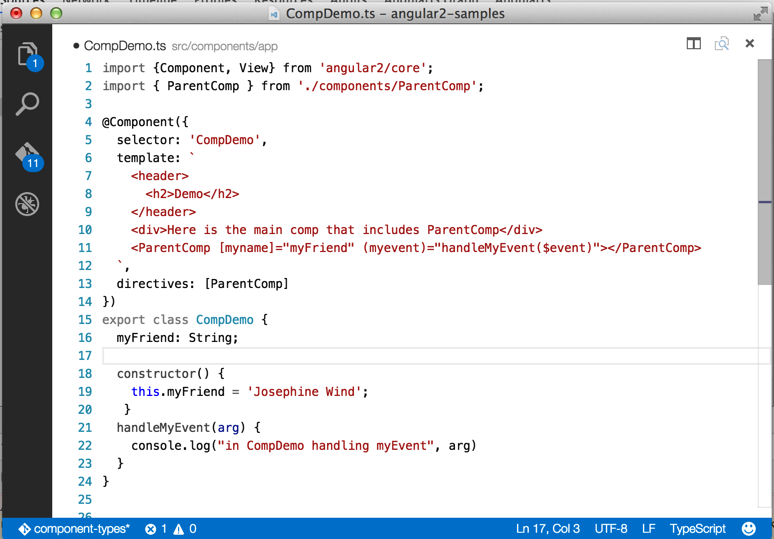 Figure 2: This component uses the input and output defined by ParentComp
The syntax is pretty straightforward for using “ParentComp”:
Figure 2: This component uses the input and output defined by ParentComp
The syntax is pretty straightforward for using “ParentComp”:
[myname] = "myFriend": This tells Angular to set the ParentComp input property “myname” to the value of “myFriend” interpolated as a property of CompDemo. Notice we set “myFriend” in the constructor(myevent) = "handleMyEvent($event)": This tells Angular to invoke the CompDemo “handleMyEvent($event)” method when ParentComp fires “myevent.” The data that we passed to the “next()” method in ParentComp is available in CompDemo by passing “$event” as an argument to the “handleMyEvent()” method.
@Input() and @Output()
There is an alternative syntax available to define input properties and output events in a component. In the example above we used the “inputs” and “outputs” properties of the object passed to the@Component decorator. Angular also lets us use an @Input and @Output decorator to get the same result:
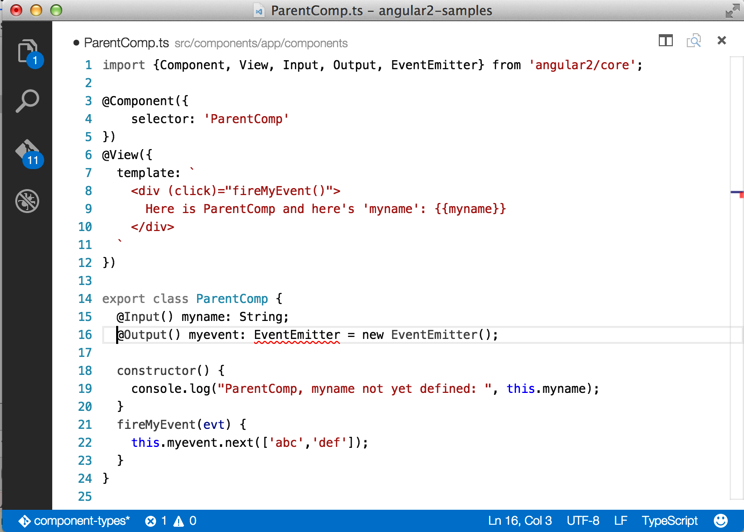 Figure 3: Uses the
 @Input and @Output decorator
In the above version of ParentComp, we dispensed with the “inputs” and “outputs” properties of the @Component definition object. Instead, we added “Input” and “Output” to the import command on line 2 and used the @Input and @Output decorator in the ParentComp class to declare “myname” and “myevent.”
Whether you use inputs/outputs or @Input/@Output, the result is the same, so choosing which one to use is largely a stylistic decision.
Wrapup
In this article, we’ve looked in more depth at Angular 2 components, how they relate, and how you pass data into them and how to get data back out. We’re still only scratching the surface in terms of components; they’re arguably the major feature of Angular 2 and are involved in every aspect of designing and building Angular 2 applications. In future articles, we’ll continue to explore Angular 2 components by looking in more detail at Angular services as a way to re-use code and encapsulate key functionality.More Hands-on with Web Development
This article is part of the web development series from Microsoft and DevelopIntelligence on practical JavaScript learning, open source projects, and interoperability best practices including Microsoft Edge browser and the new EdgeHTML rendering engine. DevelopIntelligence offers instructor-led JavaScript Training, AngularJS Training and other Web Development Training for technical teams and organizations. We encourage you to test across browsers and devices including Microsoft Edge – the default browser for Windows 10 – with free tools on dev.microsoftedge.com:- Scan your site for out-of-date libraries, layout issues, and accessibility
- Download free virtual machines for Mac, Linux, and Windows
- Check Web Platform status across browsers including the Microsoft Edge roadmap
- Remotely test for Microsoft Edge on your own device
- Interoperability best practices (series):
- Coding Lab on GitHub: Cross-browser testing and best practices
- Woah, I can test Edge & IE on a Mac & Linux! (from Rey Bango)
- Advancing JavaScript without Breaking the Web (from Christian Heilmann)
- Unleash 3D rendering with WebGL (from David Catuhe)
- Hosted web apps and web platform innovations (from Kiril Seksenov)
- vorlon.JS (cross-device remote JavaScript testing)
- manifoldJS (deploy cross-platform hosted web apps)
- babylonJS (3D graphics made easy)
- Visual Studio Code (lightweight code-editor for Mac, Linux, or Windows)
- Visual Studio Dev Essentials (free, subscription-based training and cloud benefits)
- Code with node.JS with trial on Azure Cloud
This article is part of a web development series from Microsoft. Thank you for supporting the partners who make SitePoint possible.
Frequently Asked Questions (FAQs) about Angular 2 Components: Inputs and Outputs
What is the significance of @Input and @Output in Angular 2?
In Angular 2, @Input and @Output are decorators that allow communication between components. @Input allows a parent component to pass data to a child component, while @Output enables a child component to send data to a parent component. This two-way data binding is crucial in creating dynamic and interactive web applications.
How do I use @Input in Angular 2?
To use @Input in Angular 2, you first need to import it from ‘@angular/core’. Then, in your child component, you can use the @Input decorator to declare a property that will receive data from the parent component. This property can then be used in the child component’s template or logic.
How does @Output work in Angular 2?
@Output in Angular 2 works in conjunction with EventEmitter. After importing both from ‘@angular/core’, you can use @Output to declare an EventEmitter property in your child component. This property can emit events, carrying data that can be caught and used by the parent component.
Can I use multiple @Input and @Output decorators in a single component?
Yes, you can use multiple @Input and @Output decorators in a single component. This allows for more complex interactions between components, with multiple pieces of data being passed in both directions.
How do I handle events emitted by @Output?
Events emitted by an @Output decorator are handled in the parent component’s template. You can bind a method to the event using Angular’s event binding syntax, which will be executed whenever the event is emitted.
What is the difference between @Input/@Output and property binding/event binding?
@Input and @Output are used for communication between components, while property binding and event binding are used within a single component. Property binding is a one-way data binding from the component’s class to its template, while event binding is a one-way data binding from the template to the class.
Can I use @Input and @Output with directives?
Yes, @Input and @Output can be used with directives, not just components. This allows for even more flexibility and reusability in your Angular 2 applications.
What is two-way data binding in Angular 2?
Two-way data binding in Angular 2 is a combination of property binding and event binding. It allows for data to be passed from the component’s class to its template and vice versa, creating a two-way communication channel.
How do I use @Input and @Output for two-way data binding?
To use @Input and @Output for two-way data binding, you need to use them in conjunction. The @Input decorator receives data from the parent component, while the @Output decorator emits events back to the parent component. This allows for a two-way flow of data.
What are some common use cases for @Input and @Output?
@Input and @Output are commonly used in scenarios where components need to share data. For example, in a to-do list application, a parent component might pass a list of tasks to a child component using @Input, and the child component might inform the parent component when a task is completed using @Output.
 David Aden
David is a consultant with DevelopIntelligence and Senior Developer at Salesforce’s Desk.com working with Angular technologies on Desk’s NextGen support application. He is currently working on a team that is developing an entirely new set of features for Desk built on Angular components with initial release planned for 2016. He spends his free time doing what his wife tells him he will enjoy doing which often includes spending time with the family (which he does in fact enjoy). He is also one of the authors of Angular 2 in Action.