
News these days is full of buzzwords such as automation, artificial intelligence, and machine learning. That's probably why more and more smartphone users are starting to look for smarter apps. As a regular Android app developer, however, you probably lack the resources needed to create such apps from scratch.
Fortunately, Google recently launched a Cloud Machine Learning platform, which offers neural networks that have been pre-trained to perform a variety of tasks. Most of its models are not only highly accurate, but also constantly improving. And guess what? You can use them by simply making a few REST API calls!
In this tutorial, I'll introduce you to the Cloud Machine Learning platform and show you how to use it to create a smart Android app that can recognize real-world objects and name them in multiple languages.
Prerequisites
To make the most of this tutorial, all you need is:
- the latest version of Android Studio
- a device running Android 4.4 or higher
- and a Google Cloud Platform account
1. Acquiring an API Key
To be able to use Google's machine learning services in your Android app, you need an API key. You can get one by creating a new project in the Google Cloud Platform console.
Start by logging in to the console and pressing the Create New Project button. In the dialog that pops up, give a meaningful name to the project.


Once the project has been created, go to API Manager > Dashboard and press the Enable API button.
In the next screen, under the Google Cloud Machine Learning heading, you'll be able to see all the different machine learning APIs available to you. In this tutorial, we'll be using only the Vision and Translation APIs.
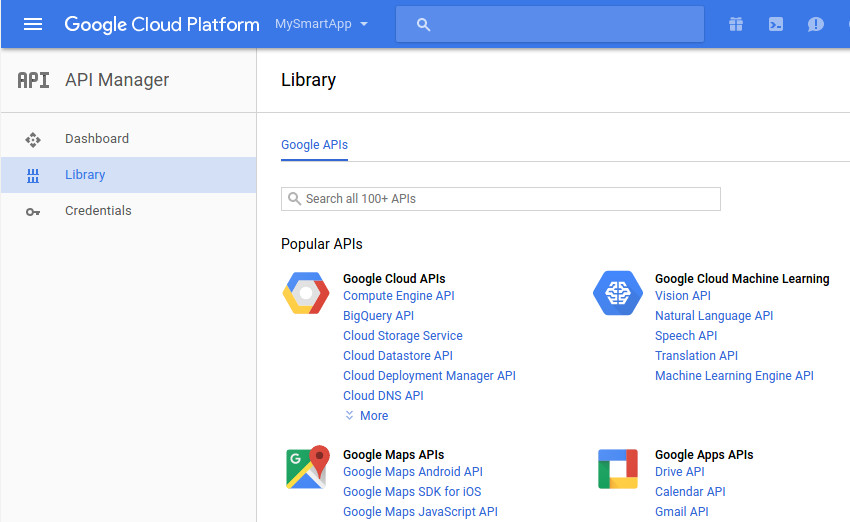


To enable the Vision API, click on its link and press the Enable button.


Similarly, to enable the Translation API, click on its link and press the Enable button.
You'll need just one key to use both the APIs. To get it, go to the Credentials tab, press the Create credentials button, and select API key.


You should now see a popup containing your secret API key.
2. Creating a New Android Project
Fire up Android Studio and create a new project with an empty activity. I suggest you choose at least API level 19 for the minimum supported SDK.
Although you don't have to, it's always a good idea to use a robust networking library to communicate with the Google Cloud Machine Learning platform. In this tutorial, we'll be using one such library called Fuel. Add it as a compile dependency in the app module's build.gradle file:
1 |
compile 'com.github.kittinunf.fuel:fuel-android:1.5.0' |
Press Sync Now to update your project.
Next, our app will need the INTERNET permission to communicate with Google's servers. Therefore, add the following line inside the manifest file of the project:
1 |
<uses-permission android:name="android.permission.INTERNET"/> |
Lastly, add your API key to the values/strings.xml file:
1 |
<string name="mykey">ABCDEF12345-abcdef12345-123</string> |
3. Using the Vision API
The Vision API helps you create apps that can see and make sense of the user's environment. Face detection, emotion detection, optical character recognition, and image annotation are some of its many features. For now, we'll be focusing only on the powerful image annotation feature, also called label detection—which, in my opinion, is very useful.
As you might expect, the API expects a picture as one of its inputs. Therefore, let us now create a screen where the user can take pictures using the device's camera.
Step 1: Create a Layout
Our screen's layout shall have a Button widget the user can press to take a picture, an ImageView widget to display the picture, and a TextView widget to display the labels, or annotations, generated by the API. Accordingly, add the following code to your activity's layout XML file:
1 |
<Button android:text="Take a picture" |
2 |
android:layout_width="match_parent" |
3 |
android:layout_height="wrap_content" |
4 |
android:id="@+id/takePictureButton" |
5 |
android:onClick="takePicture"/> |
6 |
|
7 |
<ImageView
|
8 |
android:layout_width="wrap_content" |
9 |
android:layout_height="wrap_content" |
10 |
android:layout_below="@id/takePictureButton" |
11 |
android:id="@+id/previewImage" |
12 |
android:layout_centerHorizontal="true"/> |
13 |
|
14 |
<TextView
|
15 |
android:layout_width="wrap_content" |
16 |
android:layout_height="wrap_content" |
17 |
android:id="@+id/resultsText" |
18 |
android:layout_below="@id/previewImage"/> |
Note that we've associated an onClick handler with the button. We'll define it in the next step.
Step 2: Create an Intent
By creating a new intent with the ACTION_IMAGE_CAPTURE action and passing it to the startActivityForResult() method, you can ask the default camera app of the user's device to take pictures and pass them on to your app. Therefore, add the following code to your Activity class:
1 |
public final static int MY_REQUEST_CODE = 1; |
2 |
|
3 |
public void takePicture(View view) { |
4 |
Intent intent = new Intent(MediaStore.ACTION_IMAGE_CAPTURE); |
5 |
startActivityForResult(intent, MY_REQUEST_CODE); |
6 |
}
|
In order to receive the images captured by the default camera app, you must override the onActivityResult() method of your Activity class. Inside the method, you'll have access to a Bundle object containing all the image data. You can render the image data by simply converting it into a Bitmap and passing it to the ImageView widget.
1 |
@Override
|
2 |
protected void onActivityResult(int requestCode, int resultCode, |
3 |
Intent data) { |
4 |
if(requestCode == MY_REQUEST_CODE && resultCode == RESULT_OK) { |
5 |
|
6 |
// Convert image data to bitmap
|
7 |
Bitmap picture = (Bitmap)data.getExtras().get("data"); |
8 |
|
9 |
// Set the bitmap as the source of the ImageView
|
10 |
((ImageView)findViewById(R.id.previewImage)) |
11 |
.setImageBitmap(picture); |
12 |
|
13 |
// More code goes here
|
14 |
}
|
15 |
}
|
If you run the app now and take a picture, you'll see that the size of the picture is quite small. That's all right, though—the Cloud Vision API is very accurate even with image thumbnails.
Step 3: Encode the Image
The Vision API cannot use Bitmap objects directly. Instead, it expects a Base64-encoded string of compressed image data.
To compress the image data, you can use the compress() method of the Bitmap class. As its arguments, the method expects the compression format to use, the output quality desired, and a ByteArrayOutputStream object. The following code compresses the bitmap using the JPEG format and also makes sure that the quality of the resulting image is sufficiently high:
1 |
ByteArrayOutputStream byteStream = new ByteArrayOutputStream(); |
2 |
picture.compress(Bitmap.CompressFormat.JPEG, 90, byteStream); |
You can now generate the Base64 string using the encodeToString() method of the Base64 class.
1 |
String base64Data = Base64.encodeToString(byteStream.toByteArray(), |
2 |
Base64.URL_SAFE); |
Step 4: Process the Image
After all that hard work, you have everything you need to interact with the Vision API. Start by creating a string that contains both the URL of the API and your API key:
1 |
String requestURL = |
2 |
"https://vision.googleapis.com/v1/images:annotate?key=" + |
3 |
getResources().getString(R.string.mykey); |
To send data to the API, you must create an HTTP POST request. The body of the request must be a JSON document containing the Base64-encoded image data. For label detection, the document must also have a features array containing the value LABEL_DETECTION. Here's the format of the JSON document:
1 |
{"requests": [{ |
2 |
"image": { |
3 |
"content": <Base64-encoded image data> |
4 |
},
|
5 |
"features": [{ |
6 |
"type": "LABEL_DETECTION" |
7 |
}]
|
8 |
}]}
|
Although it is possible to hand-code the JSON document, creating it programmatically is less error-prone. The following code shows you how to do so using the JSONObject and JSONArray classes:
1 |
// Create an array containing
|
2 |
// the LABEL_DETECTION feature
|
3 |
JSONArray features = new JSONArray(); |
4 |
JSONObject feature = new JSONObject(); |
5 |
feature.put("type", "LABEL_DETECTION"); |
6 |
features.put(feature); |
7 |
|
8 |
// Create an object containing
|
9 |
// the Base64-encoded image data
|
10 |
JSONObject imageContent = new JSONObject(); |
11 |
imageContent.put("content", base64Data); |
12 |
|
13 |
// Put the array and object into a single request
|
14 |
// and then put the request into an array of requests
|
15 |
JSONArray requests = new JSONArray(); |
16 |
JSONObject request = new JSONObject(); |
17 |
request.put("image", imageContent); |
18 |
request.put("features", features); |
19 |
requests.put(request); |
20 |
JSONObject postData = new JSONObject(); |
21 |
postData.put("requests", requests); |
22 |
|
23 |
// Convert the JSON into a
|
24 |
// string
|
25 |
String body = postData.toString(); |
At this point, we can use the post() method of the Fuel class to make the HTTP POST request. As its only argument, the method expects the URL of the API. You must also include the content-length and content-type headers in the request. To do so, use the header() method. Similarly, in order to add the JSON document to the body of the POST request, use the post() method.
Lastly, by calling the responseString() method and passing a new instance of the Handler class to it, you can asynchronously get the response of the request as a string. Accordingly, add the following code:
1 |
Fuel.post(requestURL) |
2 |
.header( |
3 |
new Pair<String, Object>("content-length", body.length()), |
4 |
new Pair<String, Object>("content-type", "application/json") |
5 |
)
|
6 |
.body(body.getBytes()) |
7 |
.responseString(new Handler<String>() { |
8 |
@Override
|
9 |
public void success(@NotNull Request request, |
10 |
@NotNull Response response, |
11 |
String data) { |
12 |
// More code goes here
|
13 |
}
|
14 |
|
15 |
@Override
|
16 |
public void failure(@NotNull Request request, |
17 |
@NotNull Response response, |
18 |
@NotNull FuelError fuelError) {} |
19 |
});
|
When you use the label detection feature, the Vision API returns a JSON document containing labels. Along with each label, you also get a score specifying how accurate the label is. The document looks like this:
1 |
{"responses":[{ |
2 |
"labelAnnotations": [ |
3 |
{
|
4 |
"mid": "/m/id1", |
5 |
"description": "label1", |
6 |
"score": 0.91 |
7 |
},
|
8 |
{
|
9 |
"mid": "/m/id2", |
10 |
"description": "label2", |
11 |
"score": 0.90 |
12 |
},
|
13 |
...
|
14 |
}]}
|
For now, let's just loop through all the objects in the labelAnnotations array and add the value of each description key to the TextView widget of our layout. Here's how you can do that inside the success() method of the Handler class:
1 |
// Access the labelAnnotations arrays
|
2 |
JSONArray labels = new JSONObject(data) |
3 |
.getJSONArray("responses") |
4 |
.getJSONObject(0) |
5 |
.getJSONArray("labelAnnotations"); |
6 |
|
7 |
String results = ""; |
8 |
|
9 |
// Loop through the array and extract the
|
10 |
// description key for each item
|
11 |
for(int i=0;i<labels.length();i++) { |
12 |
results = results + |
13 |
labels.getJSONObject(i).getString("description") + |
14 |
"\n"; |
15 |
}
|
16 |
|
17 |
// Display the annotations inside the TextView
|
18 |
((TextView)findViewById(R.id.resultsText)).setText(results); |
You can now run the app, take a picture of any object nearby, and see the labels the Vision API generates for it.


4. Using the Translation API
The Cloud Translation API, as its name suggests, can translate text to and from over 100 languages. By using it effectively, you can create smart apps that can communicate with your users in their own languages.
In the previous step, you saw that the labels our app generates are in English. Let us now add a button to it to translate those labels to German.
Step 1: Update the Layout
Add a Button widget towards the end of your activity's layout using the following code:
1 |
<Button
|
2 |
android:layout_width="match_parent" |
3 |
android:layout_height="wrap_content" |
4 |
android:layout_below="@+id/resultsText" |
5 |
android:text="in German" |
6 |
android:onClick="translateToGerman"/> |
Notice that this button too has an onClick event handler that must be defined in your Activity class.
Step 2: Translate the Labels
Using the Translation API is far easier than using the Vision API, primarily because you don't have to create a JSON document to define your request. Instead, you can simply pass parameters to it in a query string.
Create the translateToGerman() method and, inside it, create a string containing the URL of the Translation API.
1 |
public void translateToGerman(View view) { |
2 |
String requestURL = |
3 |
"https://translation.googleapis.com/language/translate/v2"; |
4 |
|
5 |
// More code goes here
|
6 |
}
|
To add fields to the query string of the above URL, we can use a List of Pair objects. The following fields are important:
-
key, specifying your secret API key -
source, specifying the language you want to translate from -
target, specifying the language you want to translate to -
q, specifying the text you want to translate
The following code shows you how to configure the API to translate from English to German:
1 |
List<Pair<String, String>> params = new ArrayList<>(); |
2 |
// Add API key
|
3 |
params.add(new Pair<String, String>("key", |
4 |
getResources().getString(R.string.mykey))); |
5 |
|
6 |
// Set source and target languages
|
7 |
params.add(new Pair<String, String>("source", "en")); |
8 |
params.add(new Pair<String, String>("target", "de")); |
Because the query string can contain multiple q fields, we'll be adding one for every label that's present inside our layout's TextView widget. Here's how:
1 |
String[] queries = ((TextView)findViewById(R.id.resultsText)) |
2 |
.getText().toString().split("\n"); |
3 |
|
4 |
for(String query:queries) { |
5 |
params.add(new Pair<String, String>("q", query)); |
6 |
}
|
Finally, you can call the get() method of the Fuel class to make an HTTP GET request to the Translation API. This time too, you can use the responseString() method to asynchronously get the response as a string.
1 |
Fuel.get(requestURL, params).responseString(new Handler<String>() { |
2 |
@Override
|
3 |
public void success(@NotNull Request request, |
4 |
@NotNull Response response, |
5 |
String data) { |
6 |
// More code here
|
7 |
}
|
8 |
|
9 |
@Override
|
10 |
public void failure(@NotNull Request request, |
11 |
@NotNull Response response, |
12 |
@NotNull FuelError fuelError) { } |
13 |
});
|
The response of the Translation API is a JSON document containing an array of translations. It has the following format:
1 |
{ "data": { "translations": [ |
2 |
{
|
3 |
"translatedText": "...." |
4 |
},
|
5 |
{
|
6 |
"translatedText": "...." |
7 |
},
|
8 |
...
|
9 |
] } } |
For now, inside the success() method of the Handler class, let us simply loop through the translations array of the above JSON document, and update the contents of the TextView widget using the values associated with the translatedText keys.
1 |
// Access the translations array
|
2 |
JSONArray translations = new JSONObject(data) |
3 |
.getJSONObject("data") |
4 |
.getJSONArray("translations"); |
5 |
|
6 |
// Loop through the array and extract the translatedText
|
7 |
// key for each item
|
8 |
String result = ""; |
9 |
for(int i=0;i<translations.length();i++) { |
10 |
result += translations.getJSONObject(i) |
11 |
.getString("translatedText") + "\n"; |
12 |
}
|
13 |
|
14 |
// Update the contents of the TextView widget
|
15 |
((TextView)findViewById(R.id.resultsText)).setText(result); |
If you run the app now, generate labels for a picture, and press the second button, you should be able to see the labels in German.


Conclusion
In this tutorial, you learned how to use the Cloud Vision and Cloud Translation APIs, which are part of the Google Cloud Machine Learning platform, in an Android app. There are many more such APIs offered by the platform. You can learn more about them by referring to the official documentation.
While you're here, check out some of our other tutorials on how to use machine learning and cloud services in your Android apps!


